Mac instructions
These instructions are from Qualitative Data Analysis with ATLAS.ti (Third Edition), Chapter 5: Creating a Coding Scheme, copyright © Susanne Friese 2019.
These instructions are for version 8.3 of ATLAS.ti with the MacOS operating system.
If you have been ‘lumping’, meaning you have coded lots of data segments with one code, the need arises to split this code in multiple subcategories.
- Download the project bundle file skill training 5.2_ building subcategories from the online resources website and import it (see Skills Training 2.1 for more detail on how to import a project).
- Open the Code Manager and look at the list of codes. All the codes hold lots of quotations and there are too many things lumped into one code. Thus, you need to split them. I will explain the procedure based on the code ‘effects positive’. If you want to practice more, you can repeat the exercise by selecting any of the other codes in the list.
- Please first read all quotations that were collected under the code ‘positive effects’.
Retrieving all quotations of a code
- Open the Code Manager and select a code. You can read all quotations coded with this code in the bottom pane of the window. Another option is to double-click the code and to read the quotation previews.
In the Quotation Manager, you can review quotations as follows:
- Open the Quotation Manager and select a code in the side panel. Now you only see the quotations of the selected code. Click on each quotation and read it in the preview area. (If you double-click you can read it in the context of the data.)
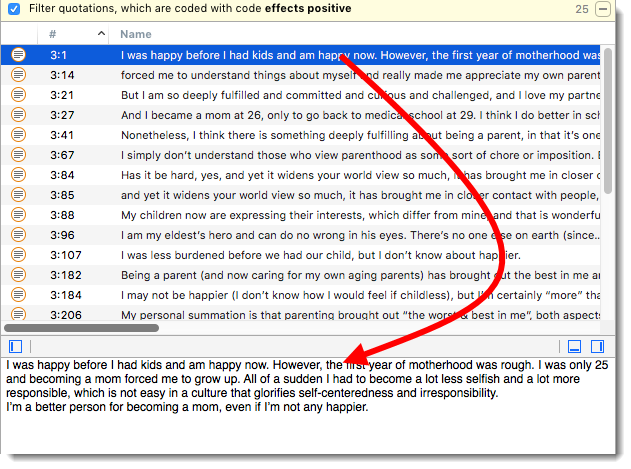
Figure 5.1 Reviewing quotations by code in the Quotation Manager
If you want to export the data to Excel:
- Click on report button on the top right-hand side of the Quotation Manager and select Export as Table. See Skills training 4.15.
When reading the quotations, you will notice that some of them refer to the same aspect of the main topic and can be summarized under a sub topic. As soon as you notice some commonalities, start collecting these aspects. One possibility is to write them down on a piece of paper and run a tally. Figure 5.2 shows my notes. Given enough screen space, another way is to type your ideas into a memo.
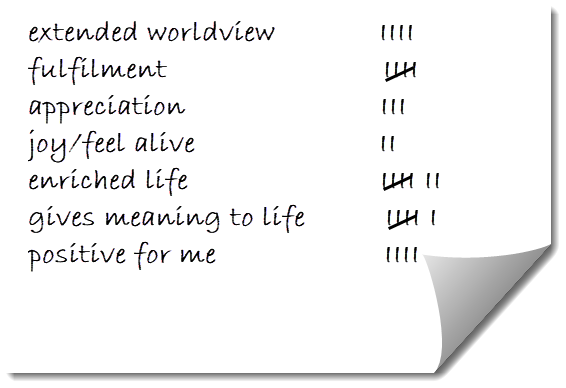
Figure 5.2 Noticing and collecting when developing subcategories
Splitting a code using the split code tools
- Select the code ‘effects positive’ in the Code Manager, right-click and select Split Code from the context menu.
Before you start splitting a code, think about which prefix you want to use. This will also become your category name.
- Click on the Add Codes button and enter names for the subcategories. The name of the code that you are splitting is automatically added as prefix if you move to the next line.
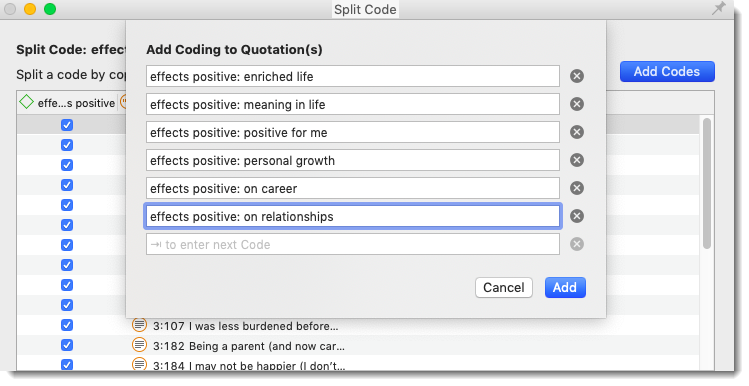
Figure 5.3 Adding subcategories codes in the split code tool
- Once all codes are entered, click Add.
- You can now begin to assign the quotations to the various subcategories. If you click on a quotation, you can read its content in the pane below the list of quotations. Select the fitting code or codes. The code that you are splitting is automatically de-selected as it usually is not necessary to code the quotation with the main and the subcode (Figure 5.2).
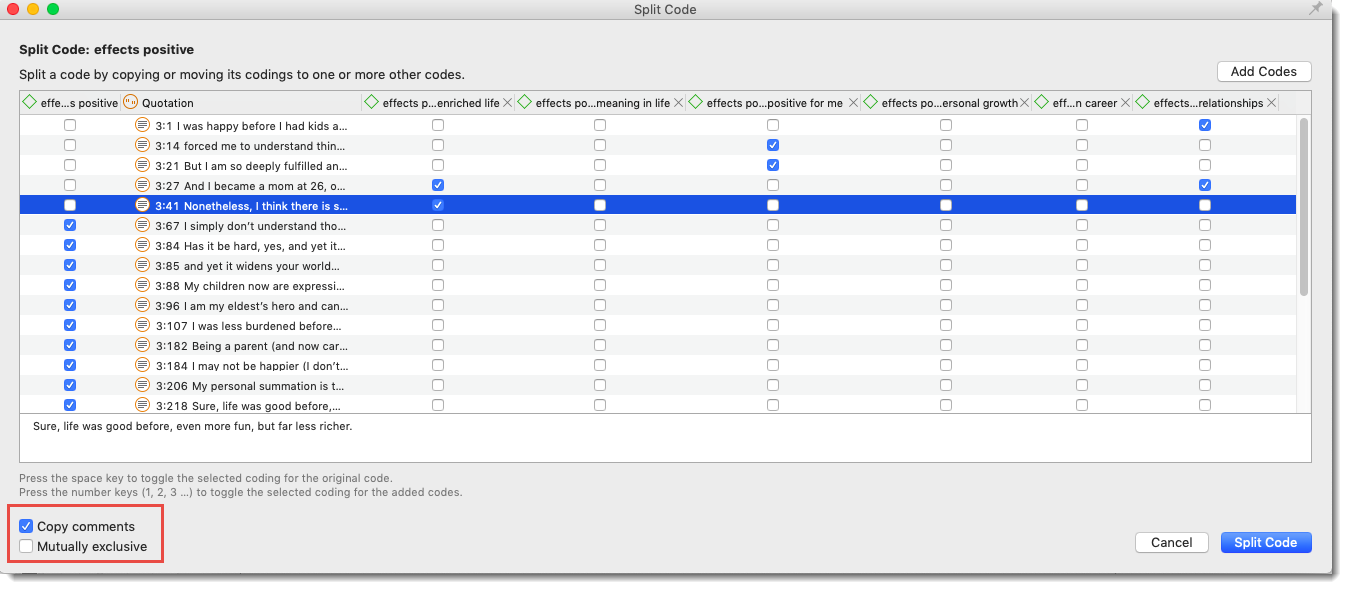
Figure 5.4 Splitting a code, distributing quotations into subcategories
You can add a quotation to two or more codes if you think the quotation has more than one aspect. It is quite common to mention several aspects in a sentence or an analysis unit. In order not to lose the context and for further analytical purposes, such as code co-occurrence analysis, it may be useful to apply multiple codes. There are exceptions, though. If you want to analyze inter-coder agreement applying multiple subcategories of the same category will violate the rule of mutually exclusive coding. If this is important, you can activate the option ‘Mutually exclusive’ at the bottom of the screen (see Chapter 9). ATLAS.ti will then not allow you to select multiple subcategories for one quotation.
- Once all quotations have been added to subcodes, click on Split Code. If the main code that you are splitting contains no further quotations, you will be asked whether you want to keep it. You may if you want to keep it for instance as a title code for the category.
- Rename the ‘effects positive’ code to ‘EFFECTS POSITIVE’ to make it the title code of the category.
- Colour all codes of this new category.
- Create a code group of all ‘effects positive’ codes (see Figure 5.5).
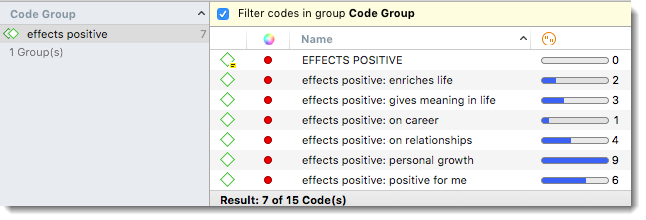
Figure 5.5 The category ‘EFFECTS POSITIVE’ in the Code Manager
Different from ATLAS.ti Windows, you can use the tool for multiple rounds of splitting as you can split into already existing codes. When you click on the ‘Add Codes’ button, it is possible to enter already existing codes.
Splitting a code manually
- Once you have decided which subcategories you want to use, create new codes. As the code list is sorted in alphabetic order, you need to prefix them using the same word or abbreviation, so that all codes that belong to a category are written underneath each other in the code list.
– Effects positive: enriches life
– Effects positive: give meaning in life
– Effects positive: positive for me
– Effects positive: personal growth
– Effects positive: on career
– Effects positive: on relationships
- Next select to display the list of codes in the Project Explorer.
- Filter the list by only the ‘effects positive’ codes, e.g. by entering the search term positive.
- Doppel-click on the code ‘effects positive’ and position the quotation list in such a way that it does not cover the text. See Figure 5.3.
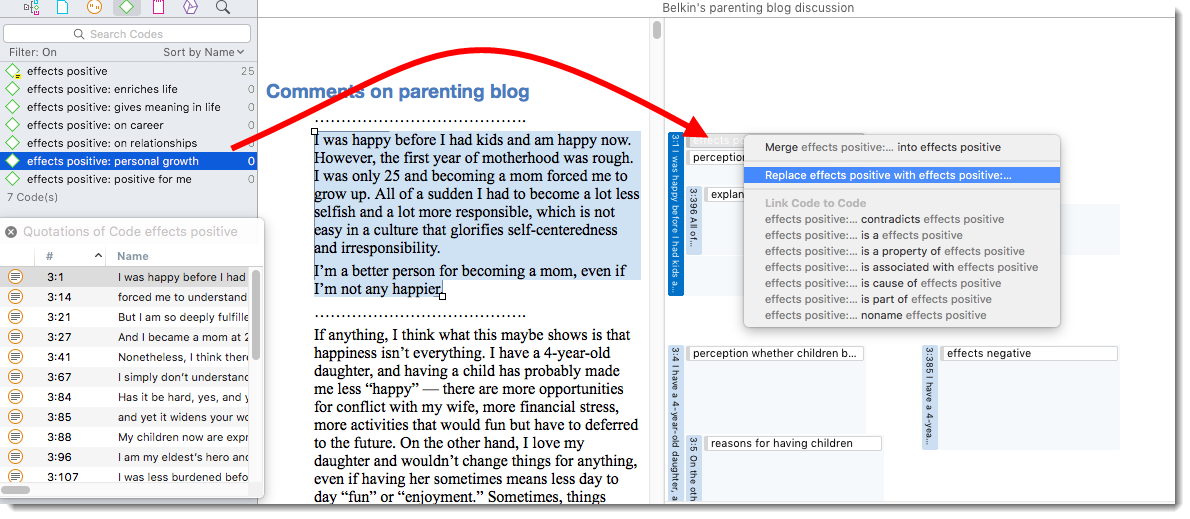
Figure 5.6 Applying subcategory codes by replacing the original code
- Go through each quotation and replace the ‘effects positive’ code with the appropriate subcategory. If two or more subcategory codes apply, you can also apply more than one. When you are done, all quotations are coded with the subcategory codes and the ‘effects positive’ code is empty, which means it has 0 quotations.
- Rename the ‘effects positive’ code to ‘EFFECTS POSITIVE’ to make it the title code of the category.
- Colour all codes of this new category.
- Create a code group of all ‘effects positive’ codes (see Figure 5.5).
Are you a splitter and have already created a few hundred codes for your first two or three interviews? Then this exercise is for you.
- Import the project bundle file skills training 5.4_building categories from descriptive labels.
- Open the Code Manager.
This project holds 48 codes related to positive and negative effects of being a parent. Many of the code labels are based on the words the respondents used and thus are very close to the data. I extended the length of the quotations to include more contextual information. For this exercise, I want you to take a closer look at the 48 codes. The aim is to learn how to move the analysis from a descriptive to a conceptual level.
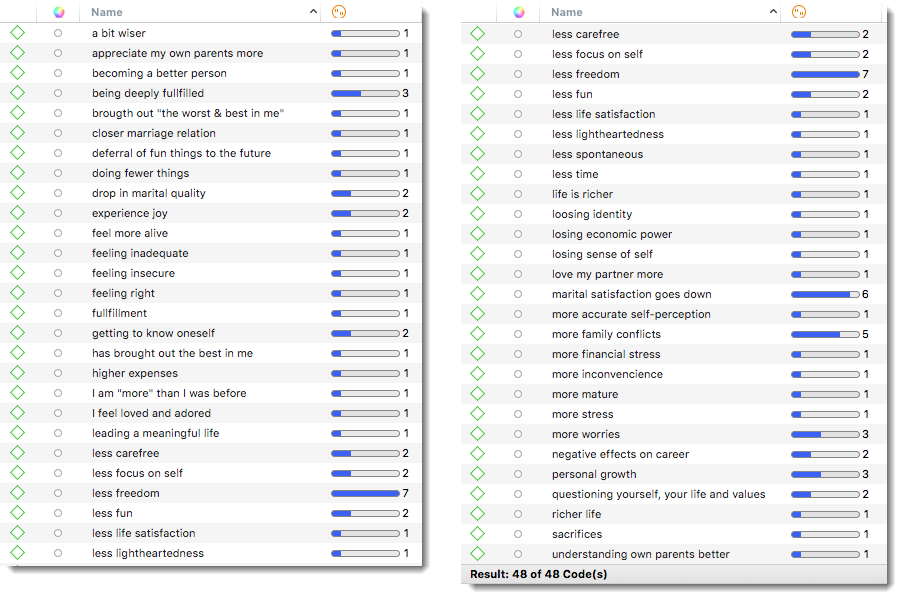
Figure 5.7 List of codes that need to be aggregated
In the following I show how you can aggregate descriptive codes to create categories. If you look at the list of codes, you will quickly find that it is thematically about the positive and negative effects of parenting. Therefore, I propose to first look for codes that name a positive effect and to collect them in a code group. To do this,
- Select the first few codes in the list that you find are about positive effects by holding down the cmd -key (e.g., the codes ‘a bit wiser’, ‘appreciating my own parents more’, ‘becoming a better person’, etc.). Drag these codes into the side panel to the left and enter the name: ‘Effects positive’. Gradually add all the other codes that you think describe a positive effect. If you are not sure, look at the corresponding quote(s). Alternatively, you can use the Code Group Manager for this task.
- Once you are done, click on the code group ‘effects positive’ to filter the list of codes.
The list of codes is now reduced to the codes that relate to the positive effects of parenting. According to my evaluation, these are 24 of the 48 codes (Figure 5.7). Since this project has only 48 codes, you may wonder why you did that. If you code most of the data as in this example, you have not just 48 codes, but 500 or more. Reducing them to 24 codes that are about one topic will be a tremendous help. This will allow you to better see which codes are similar and belong to the same concept and therefore can be merged.
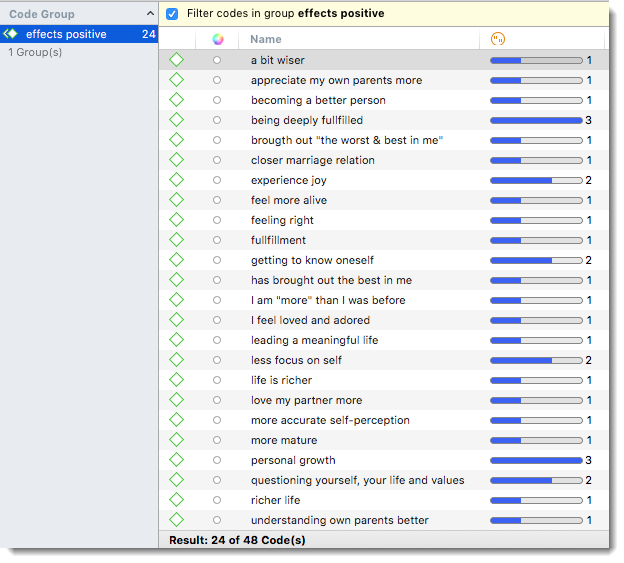
Figure 5.8 Filtered list of codes
- Look at the filtered list of codes. The task is to find codes that belong to a common concept. The concept could already be represented by one of the codes in the list, such as personal growth. If this is not the case, you need to find abstract labels that you can use to combine similar codes. I suggest reducing the list further to the five following concepts:
– personal growth
– improved relationships
– enriched life
– meaningful life
– positive feelings
- Select all codes that are related to personal growth by holding down the cmd -key.
- Drag and drop all these codes onto the personal growth code and select the MERGE option.
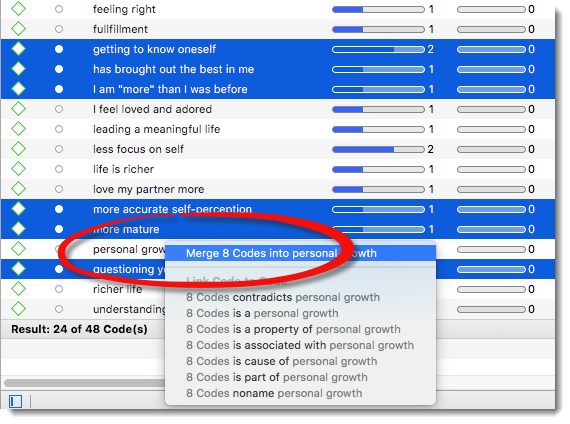
Figure 5.9 Merging codes
- The code list has become much shorter. If you have missed some codes that also belong to personal growth (as I did in Figure 5.8), it will become easier to see them, the shorter the list of codes gets, and you can merge them in subsequent steps.
- Next, select all code labels that relate to improved relationships and merge those. As there is no code label ‘improved relationships’, you can merge the codes into any one of the selected. After merging, rename this code to ‘improved relationships’.
- Repeat the process for the concepts ‘meaningful file’, ‘enriched life’ and ‘positive feelings’ (Figure 5.9).

Figure 5.10 List of reduced codes after merging
- Next you need to add a prefix to all five codes by renaming them. If you enter the prefix for the first time, highlight it and press cmd + C to copy it. This will allow you to paste the prefix in all other codes when renaming them (cmd + V).
The prefixing is necessary so that all codes that belong to the category ‘effects positive’ are listed together in the alphabetically sorted code list.
- When you have finished renaming, remove the filter by clicking on the minus button (-) on the right side of the yellow bar.
The last thing missing is the category code. Since you have built the category from the bottom-up based on descriptive labels, it does not exist yet – different from Skills Training 5.2:
- Create a new code with the name EFFECTS POSITIVE and add it to the code group ‘effects positive’.
- Highlight all codes and give them a colour.
Voilà: there is your new category with subcategories (Figure 5.10).
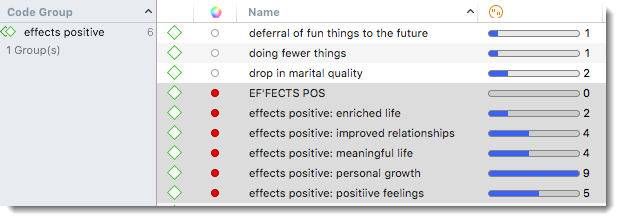
Figure 5.11 Representation of a category with subcategories in the code list
- It is now time to write a definition for the category and for each subcategory in the code comment field.
Repeat the above process for negative effects of parenting:
- Start by collecting all codes that stand for negative effects into a code group with the name ‘effects negative’.
- Click on the code group to filter the list of codes.
- Look for codes that can be subsumed under a more abstract label and merge them.
- Add prefixes. Remove the code group filter. Add the category code EFFECTS NEGATIVE and colour the codes of the new category in the same colour.
Let’s get started with what you already know by creating a research question memo for RQ1:
- Create a new memo by clicking on the plus (+) button at the top left-hand side.
- Rename the default title to ‘RQ1: Definition of happiness – comparing childless respondents and parents’.
- Fill the memo with content by typing the full research question: ‘Who writes something about the definition of happiness in the comments to the blogs? And of those who write something, what do they write? Are there differences between parents and childless people?’
Next, you must think about how you can find an answer to the research question. To make your research transparent, I suggest that you write down how you queried the data. As we haven’t discussed the advanced analysis tools, you don’t know yet what you need to do to answer this question. So, I show you below, how it might look like:
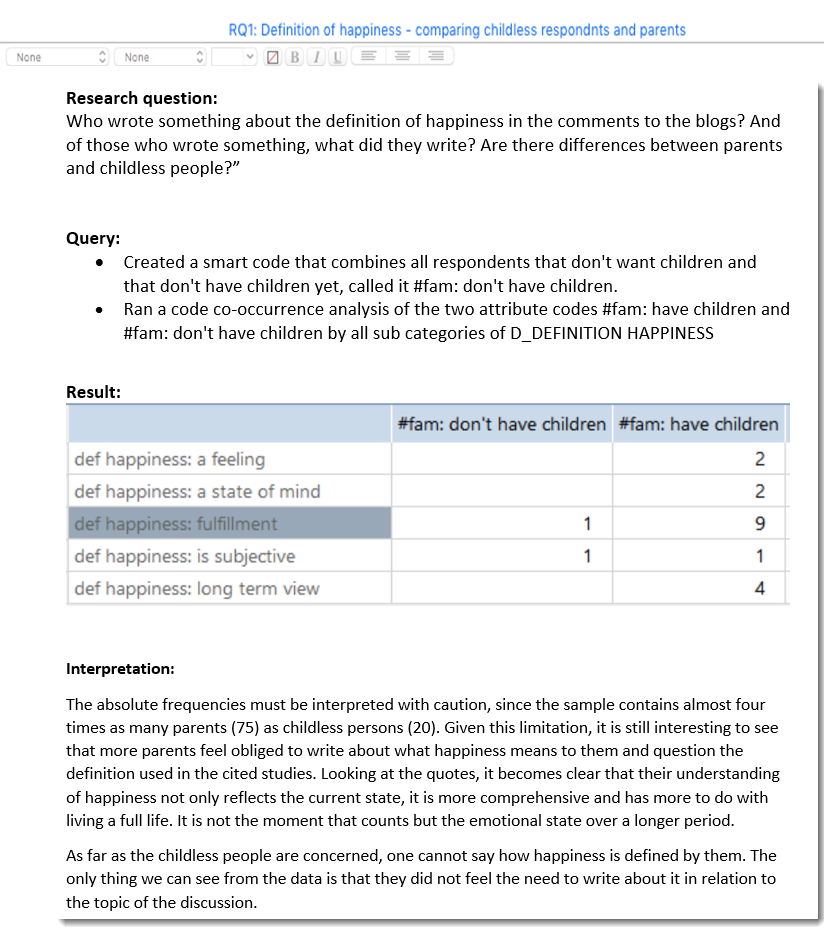
Figure 5.12 Research question memo
- Write down the query. Run the query. Include outputs if applicable.
- Interpret the results and read the quotations that result from the query. Write down your interpretation.
When reading through the quotations that result from a query, you can link the memo with selected quotations. It works much like drag-and-drop coding:
- You can drag the memo from the Project Explorer onto a quotation.

Figure 5.13 Linking a memo to a quotation
When you begin to write your report, you can export these memos with all their linked quotations. Research question memos thus become the building blocks for your research report, as they include the research questions, the query, the results, your interpretation and some example quotes. See Chapter 8 for further detail.