Mac instructions
These instructions are from Qualitative Data Analysis with ATLAS.ti (Third Edition), Chapter 7: Recognizing and Visualizing Relationships: Working with Networks, copyright © Susanne Friese 2019.
These instructions are for version 8.3 of ATLAS.ti with the MacOS operating system.
Exploring code co-occurrences in networks
If you want to click along, you can continue to work with the Children & Happiness_analysis (Chapters 6 to 8) project. It is a coded project that does not yet contain links.
- Open the Code Manager. Select the code ‘#fam: 2 or more children’, right click and select OPEN IN NETWORK from the context menu. A network opens that only contains one code.
- Right click and select ADD CO-OCCURRING CODES. Since we have not set a filter, all codes that co-occur at least once with the code ‘#fam: 2 or more children’ are added to the network. With so many codes in the network, it's unlikely that we can see anything meaningful.
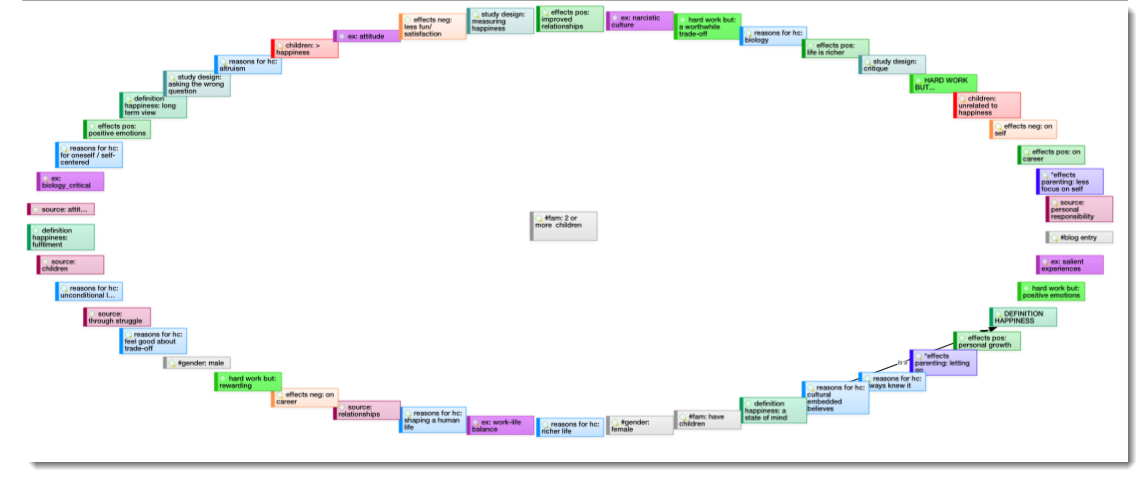
Figure 7.1 Adding co-occurring codes without setting a filter
To create a more meaningful network:
- Close the network without saving it.
- Create a new code group with the name ‘*skills training 7.2’. Add the following codes to it: #fam: 1 child, #fam: 2 or more children, and all subcategory codes of category EFFECTS POS.
- Set this new code group as global filter (right-click on the code group and select the option SET GLOBAL FILTER):
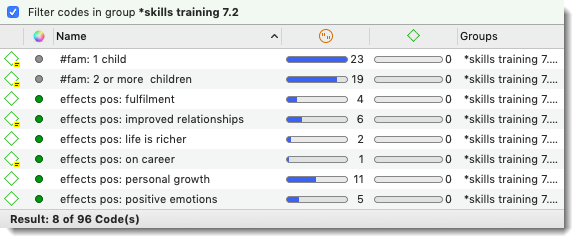
Figure 7.2 Global code group filter for skills training 7.2
- Right-click on the code ‘#fam: 1 child’ and select OPEN IN NETWORK.
- In the network, right-click on the code node and select ADD CO-OCCURING CODES. Now only three codes are added to the network.
- Repeat this for the code ‘#fam: 2 or more children’. Five codes are added to the network. If you place the two networks next to each other you can make a meaningful comparison.
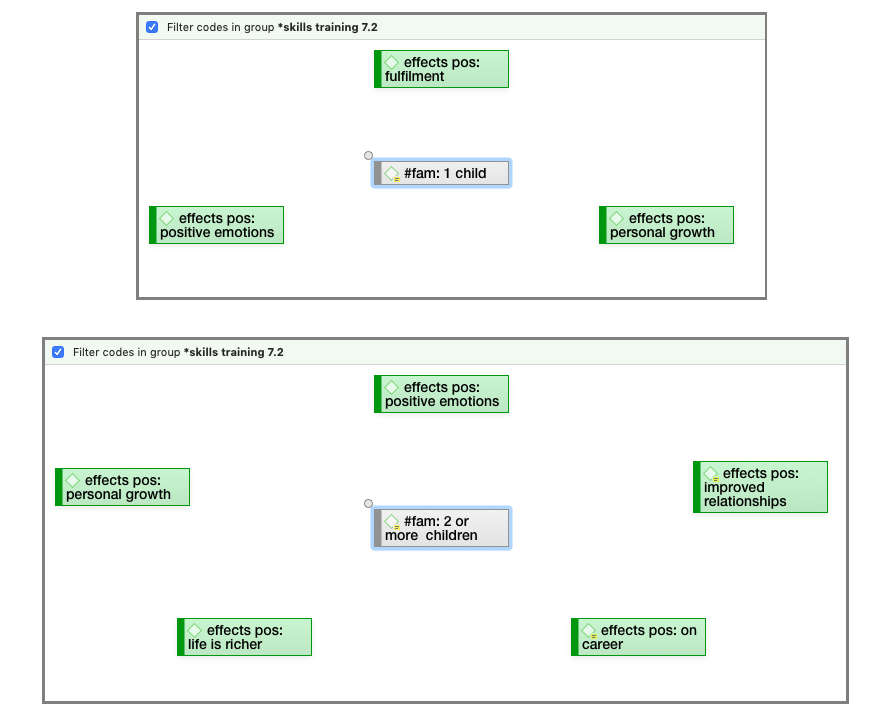
Figure 7.3 Comparing different groups of respondents regarding the positive effects of parenting they wrote about – adding co-occuring codes using a global filter setting
Let’s look at RQ1 again: Do blog respondents who have children define happiness differently from those without children? We have already explored the question in Chapter 6. I will show you how we can find an answer to it using the network function and the code co-occurrence explorer, which we haven’t used so far. First, we need to create a code group that contains the codes that we need for this research question.
- Create a code group with the name‘*RQ1’ and add the codes: #fam: have children, the smart code #fam: don’t have children, and all subcategory codes of the category DEFINITION HAPPINESS.
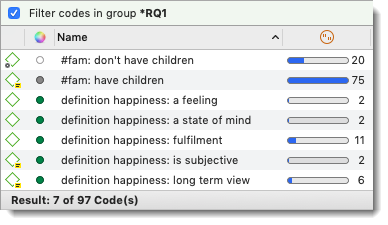
Figure 7.4 Creating a code group for RQ1 and setting it as global filter
- Set this code group as a global filter.
- Open the Code Co-occurrence Explore: ANALYSIS / CODE COOCCURRENCE EXPLORER.
- Open the branches for the two codes ‘#fam: don’t have children’ and ‘#fam: have children’ (see Figure 7.5). Now ATLAS.ti runs the same query as it does in the Code Co-occurrence Table or when you use the COOCCUR operator in the Query Tool.
You immediately see the difference between those who have children and those who don’t.
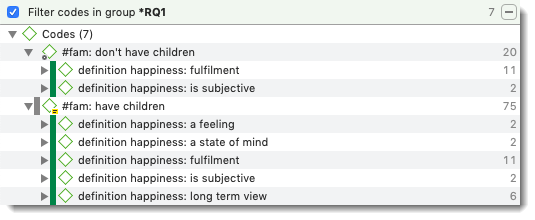
Figure 7.5 Open and expand the Code Co-occurrence Explorer
- To represent this in a network, you can link the green definition happiness codes to the gray ‘#fam: don’t have children’ and ‘#fam: have children’ codes via drag & drop (see Figure 7.6). Select the relation ‘is associated with’.
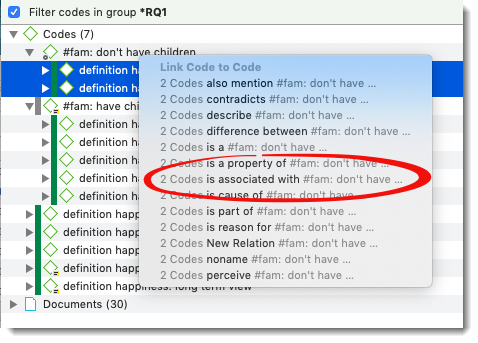
Figure 7.6 Linking codes in the Code Co-occurrence Explorer
- Next, highlight all codes, right click and select OPEN NETWORK.
- Arrange the codes in such a way that you best see the difference between those who have and do not have children.
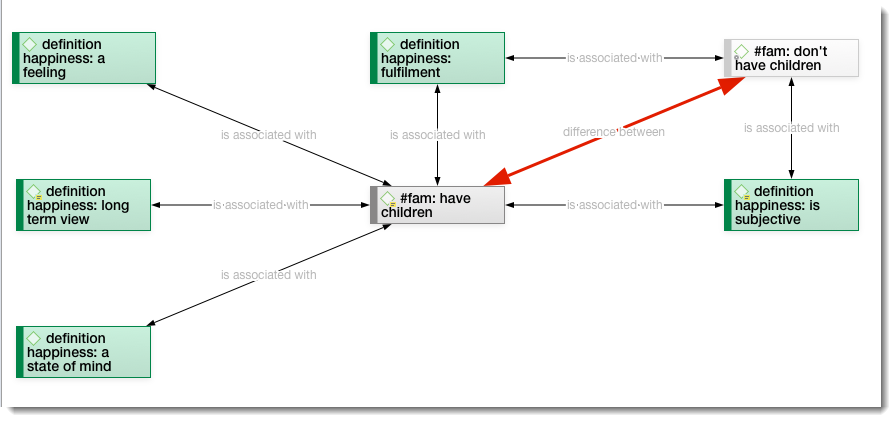
Figure 7.7 Visualizing of results of a research question
Whether the network already tells the complete story can only be discovered after reading the data behind the code nodes. This can best be achieved in combination with the Code Co-occurrence Table. See Skills training 6.3 and Figure 6.17.
- To save the network, click on the X on the top left-hand side and select the option Close and save network. Enter a name like ‘RQ1: Differences in defining happiness by respondents with and without children’.
(Note)
If you close the network without saving it, all links that you have created in the network are saved. What will not be saved is this particular layout.
If you would like to practice this analytic feature of the network function, here is one more research question for you to explore:
RQ10: Is there a difference between those with one child and those with two or more children with regards to the negative effects of parenting they report?
This how you go about finding an answer:
- Change the global filter to ‘*RQ10: Skills Training 7.2’. This will automatically remove the previous global filter.
- Open the Code Co-occurrence Explorer and the branches for the codes ‘#fam: 1 child’ and ‘#fam: 2 or more children’
- Link the ‘effects neg….’ codes and the ‘effects pos…’ codes to the ‘#fam: 1 child / #fam: 2 or more children’ codes using the relation perceive.
- Highlight all codes, right-click and select OPEN IN NETWORK.

Figure 7.8 A possible layout for visualizing the findings for RQ10
Even if this is a very small data set, I am always surprised how well the data can be interpreted. I find the network quite telling. Those with two or more children seem to have put up with the loss of freedom; difficulties with relationships have been overcome; and they no longer seem to experience children as stressful (or have got used to it) and they worry less. Does this finding motivate you to look immediately at how the two groups compare in terms of the positive effects they mention? Go ahead and check – the data are coded and the ideas and queries that come to mind are just a few clicks away. I can tell you already this much, it's worth examining it.
Case-based analysis in networks
RQ3: Compare the comments written on Belkin’s blog to those written on the New York Times blog regarding for instance sources of happiness.
- Set the ‘Sources of happiness’ code group as the global filter in the Project Explorer.
- Hold down the cmd key and select D3 (Belkin’s parenting blog) and D5 (NYTM discussion) in the Project Explorer. Right-click and select OPEN IN NETWORK.
- A network editor will open displaying the two documents. If you want to see a preview of the documents, click on the VIEW button in the toolbar and select SHOW DOCUMENT PEVIEW.
- To see which of the ‘sources’ codes have been used in document 3, right-click on D3 and select the option ADD NEIGHBORS / CODES. Repeat this for D5. Codes that have been applied to the documents are linked with a thin grey line. If you don’t see it, check in the tool bar whether the option Show Code-Document Connection is activated.
- Position the nodes either manually or use one of the layout options. You may also change the colour of the nodes (right-click) to make it more obvious where the similarities and the differences are (Figure 7.9).
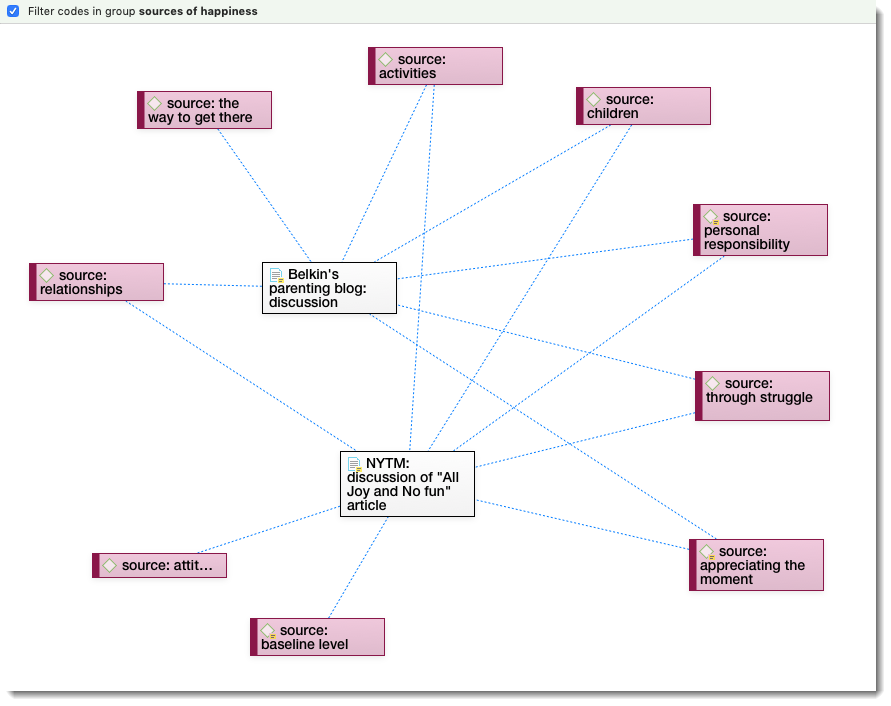
Figure 7.9 Case-based network comparisons in a network
Let’s extend the research question a bit and add document 6 to the network. D6 contains summaries of research findings regarding sources of happiness. By adding this document, you can see if the people who wrote comments on the blogs differ in content from what scientific research has found out:
- To add D6 to the network, drag and drop it from the Project Explorer into the network.
- To see whether it contains further codes, you also need to import the codes for this document. Thus, right-click D6 in the network and select ADD NEIGHBORS / CODES once again.
- Arrange the network in such a way that you can see which of the ‘sources’ codes apply to all three documents, which to only two documents and which to only one of the three (Figure 7.10).
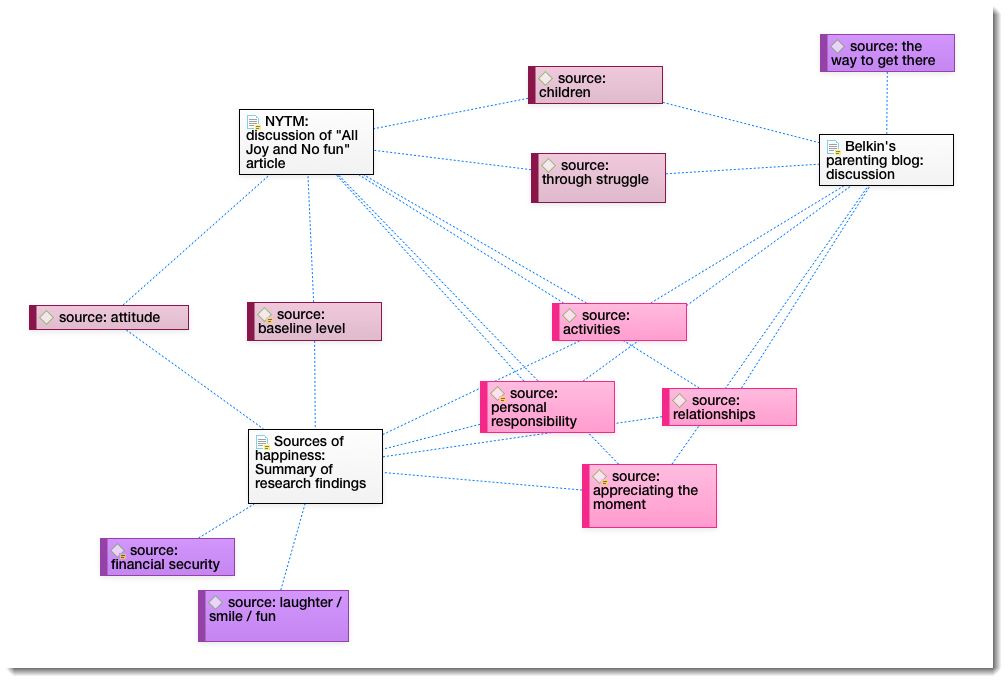
Figure 7.10 Case-based network
The network shows that most of the scientifically proven sources which contribute to a sense of personal happiness have also been mentioned by the people commenting the blogs. What they did not consider is that financial security and just a smile on the face helps make you feel happy. Explicitly, the blog writers mentioned the following: children's contribution to happiness; that happiness must be achieved through struggle, and that it is more about enjoying the journey than considering happiness as an end by itself.
In the next few pages, you will learn about various ways of linking and handling networks. The exercises are intended to teach you the technicalities of working with networks. You will not create ‘meaningful’ networks in an analytic sense. You can choose any of the existing codes to practice with, like you did in Chapter 4 with the four test codes, when I showed you how to code.
Learning how to link
- Remove the global filter if it is still activated.
- Open the Code Manager and choose four codes by holding down the cmd key. Right-click and select OPEN NETWORK from the context menu.
- A network editor will open. The window contains the codes you have selected. If you want to add more codes, you can drag and drop codes from the Project Explorer, the Code Manager, the code list or the margin area.
- Select one of the code nodes with a left mouse click. A dot will be displayed in the top left corner (the dot has the same color as the node). Put your mouse pointer over the dot, hold down the left mouse button and drag. A blue line appears. Drag the mouse on top of another code node and release the mouse button. A list of relations will open. Select the is associated with relation.
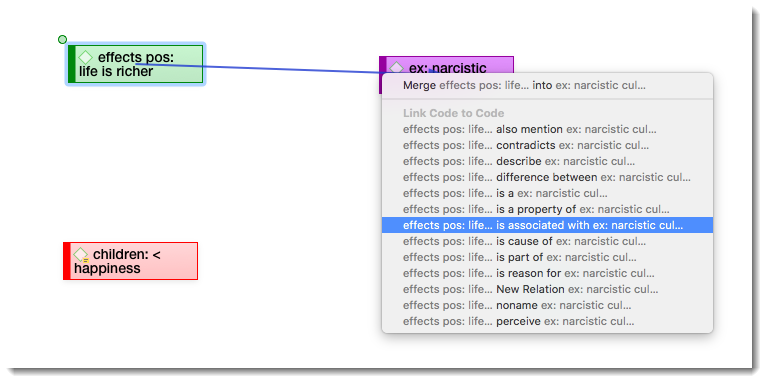
Figure 7.11 Linking code nodes
- Link two other codes using the relation ‘is property of’. It is a directed asymmetric relation and displays an arrow at the node it is pointing to.
- Create one more link using the relation ‘is part of’, which is a directed transitive relation and displays two arrow at the node it is pointing to.
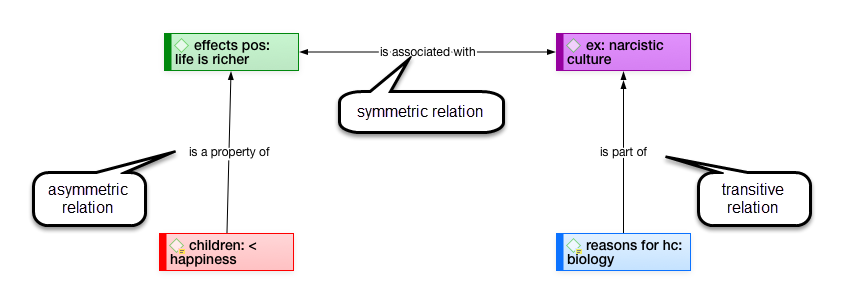
Figure 7.12 Relation properties
Exploring the links
- The link labels are interactive. Right-click on a link label and explore the options like flipping a link, changing the relation or cutting a link (Figure 7.14).
- Each link can be commented individually. Try it. All commented links are marked with a post-it node (as you already know from other commented entities in ATLAS.ti).
- End this exercise by unlinking all codes from each other, because I want to show you next how you can link multiple objects to each other at the same time. For this you need free unlinked nodes.

Figure 7.13 Context menu for links
Linking multiple nodes simultaneously
- After you cut all links, select three of your nodes by holding down the cmd key, or by drawing a frame around the three nodes with the mouse cursor.
- Grab one of the dots and drag it to the fourth code that is not selected. Multiple lines will appear. Drop them on the free code and select a relation.
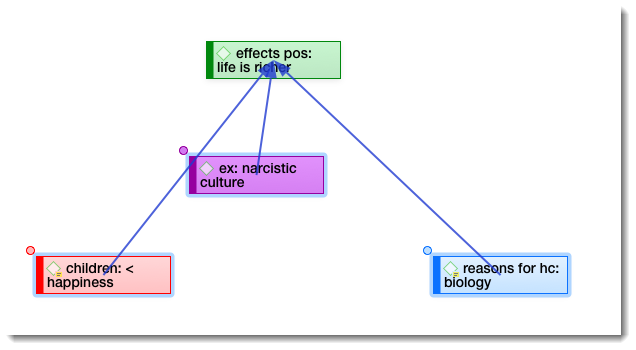
Figure 7.14 Linking multiple nodes at once
The chosen relation is used for all links. If the relation does not apply to all links, you can change the relation in the next step via the link context menu as explained above.
The various ways of linking explained here apply to all entities that can be linked to each other in networks. When linking codes to codes and quotations to quotations you are offered a list of link labels to choose from. All other links cannot be named.
Adding nodes
- You can add entities into a network editor via drag and drop from all managers or the margin area or the Project Explorer. Another option is via the ADD NODES button from the toolbar.
- Click on the down arrow to select a node type. Then select the items to be imported and click on the ADD button.
- The added nodes are placed in the upper left-hand corner. To distribute them evenly in the network, select one of the LAYOUT options.
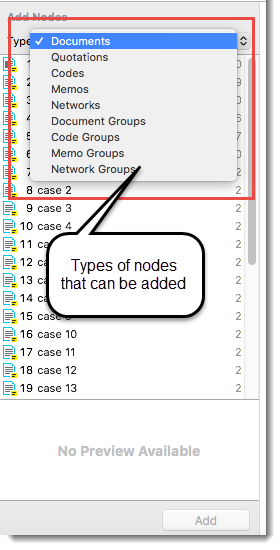
Figure 7.15 Adding nodes from a list
Removing nodes
If you want to remove an item from a network, right-click the node and select the REMOVE FROM NETWORK or press the backspace button.
Moving nodes
If you want to move the whole or parts of the network within the editor, first some nodes need to be selected:
- To select all nodes, use the key combination CMD+A. To select only a few nodes, hold down the cmd key.
- Then point to a node with the cursor and move the selected nodes by dragging the cursor to a different location.
Accessing data behind nodes
- Double-click a code node. You can write, review or edit the comment. At the bottom of the comment field you see the option: SHOW QUOTATIONS (Figure 7.16).
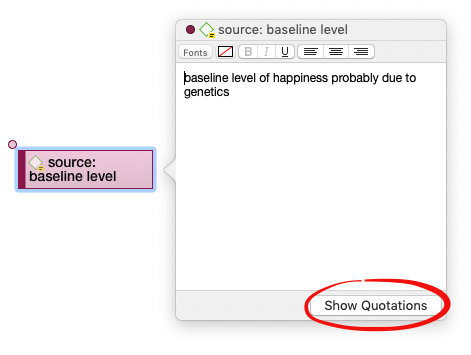
Figure 7.16 Accessing linked or coded quotations in a network
Opening the Relations Manager
- You can access the Relation Manager for codes from the main CODES menu, or from the context menu if you right-click on a code–code link in a network.
Modifying an existing relation
- Activate one of the entries in the Relations Manager and customize the relation according to your preferences in the inspector on the right.
- For example, edit the relation ‘is associated with’. Change the width of the line and select a different colour.
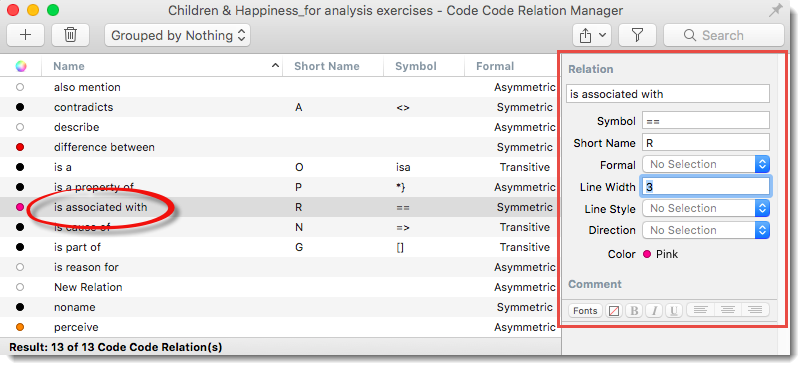
Figure 7.17 Relation Manager for codes
- After changing some properties, return to your network and link two codes using the ’is associated with’ relationship and see what it looks like.
Creating a new relation
Let’s create the relation is reason for:
- In the Relations Editor, click on the plus (+) button
- As name enter: is reason for.
- In the inspector, add a symbolic and a short name (optionally), select a formal property, line width and colour.
Hyperlinks in ATLAS.ti
Linking quotations
At the time of writing, creating hyperlinks via the context menu hadn’t yet been implemented. The two ways of creating hyperlinks are via drag-and-drop in the margin area, Quotation Manager or in a network. When you read this, try right-clicking on a quotation to see whether you have an option to create a hyperlink via the context menu.
Linking via drag and drop
- Load two documents side by side (see Skills Training 2.6).
- Left-click on a quotation bar in the margin in the document on the left-hand-side and drag the mouse pointer to a quotation bar in the document on the left-hand side (or vice versa), release the left mouse button and select a relation (see Figure 7.18).
- If you want to create a new relation, select QUOTATION / SHOW RELATION MANAGER. Creating new relations for hyperlinks is equivalent to creating new relations for code-code links (Skills training 7.4).
You can also link quotations within the same document in this way. Another option is to drag and drop a quotation on top of another quotation in the Quotation Manager.
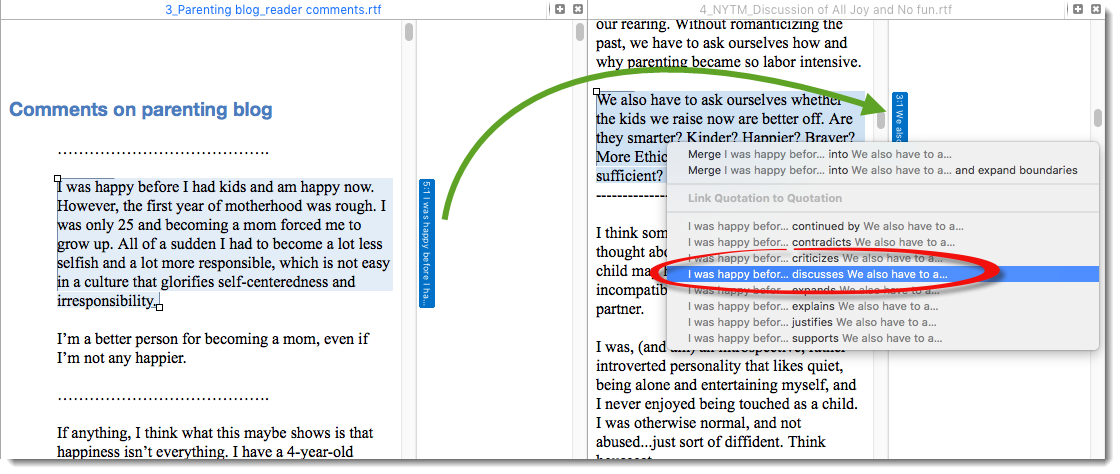
Figure 7.18 Linking across regions
The newly created hyperlink is displayed in the margin area. In the Quotation Manager linked quotations are shown in the inspector.
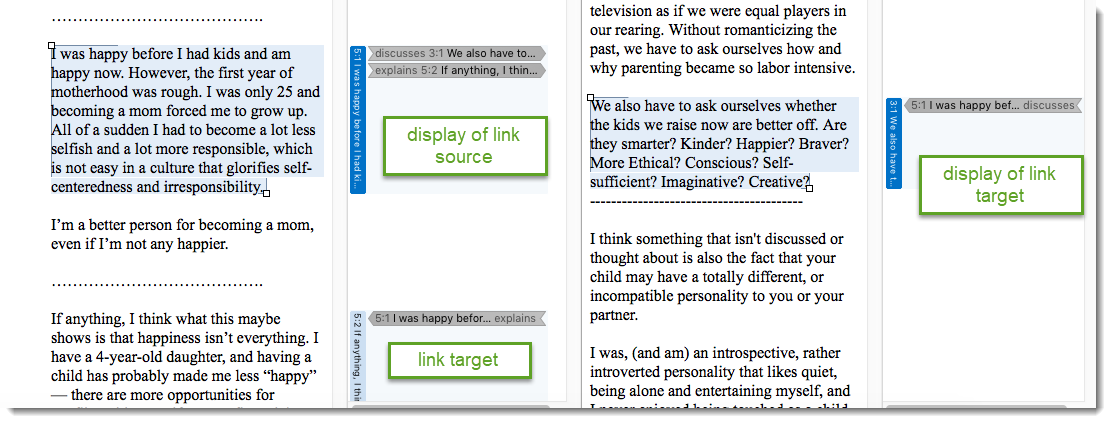
Figure 7.19 Display of hyperlinks in the margin
Browsing hyperlinks
- You can display the contents of a hyperlinked quotation by double-clicking on the hyperlink icon in the margin area. If the quotation is linked to a text quotation, the content of this quotation is shown in a comment field; if linked to a video or audio quotation, the linked quotation is played.
- If you want to see the hyperlinked quotation in context, click GO TO QUOTATION.
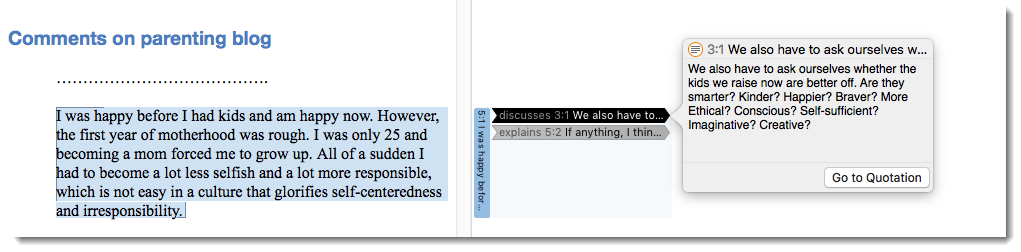
Figure 7.20 View or visit hyperlinked quotations
If you have linked a multimedia quotation, the content of the quotation is played:
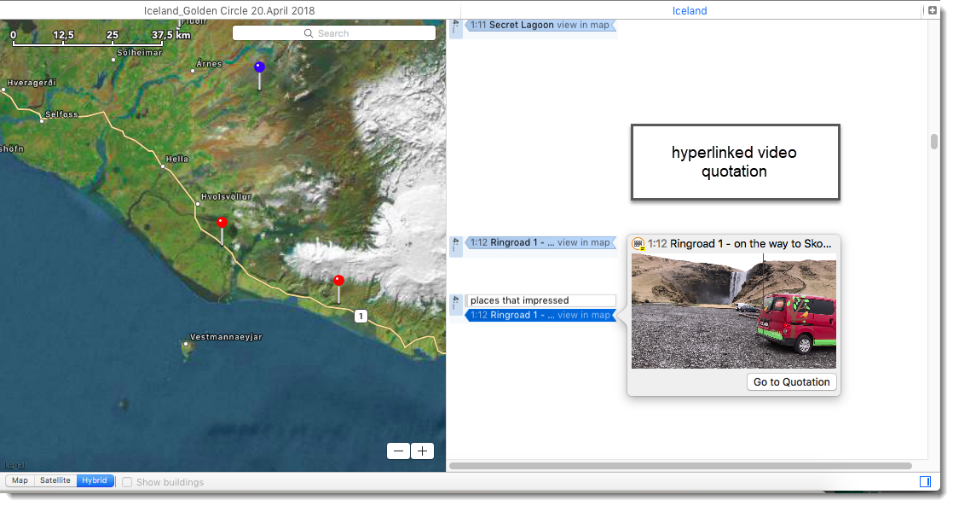
Figure 7.21 Example of a multimedia hyperlink
Visualizing hyperlinks
- Right-click on a hyperlink and select the option OPEN NETWORK. (Another option is to create a network first, add the quotation to the network and import all neighbours.)
The network displays all quotations that are immediately linked and all other neighbours like documents, codes or memos. If you have created a chain, then it is possible to expand the network to show the additional links:
- Right-click on a quotation node in the network and select the option ADD NEIGHBORS / QUOTATIONS.
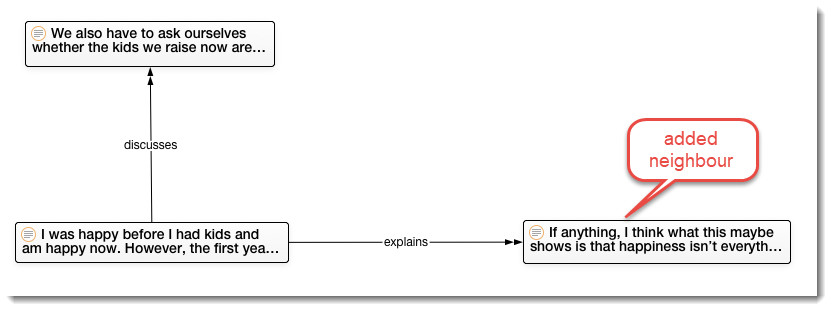
Figure 7.22 Network of hyperlinked quotations
Overview of all code–code links and hyperlinks
You can get an overview of all created first-class linkages in the Link Managers (Figures 7.23 and 7.24).
- To open the Link Manager for codes, select CODE / SHOW LINK MANAGER. To open the Link Manager for hyperlinks, select QUOTATION / SHOW LINK MANAGER.
In the managers, you can search for relations, sort them by the column headers, access them in context, open links in networks, and modify, delete and comment links. Filter settings also apply. This allows you, for instance, to query the relations of just a set of documents, or for a set of codes.
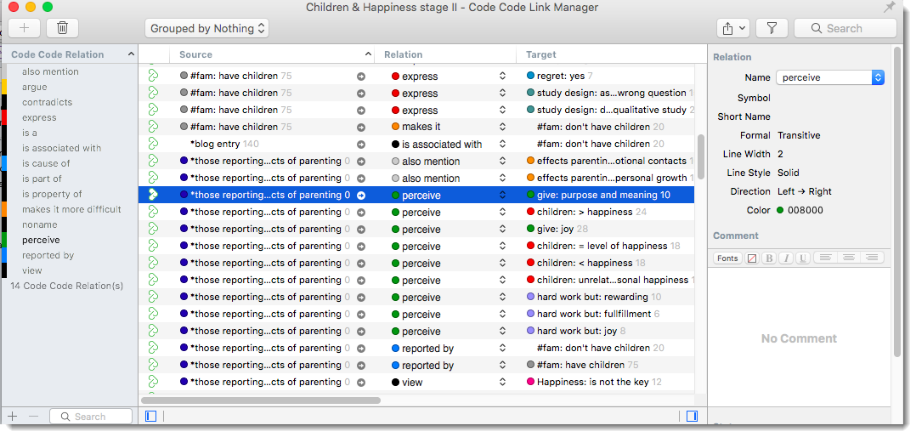
Figure 7.23 Link Manager for code–code links

Figure 7.24 Link Manager for hyperlinks