Windows

On this part of the website, you have free access to up to date click-by-click instructions for NVivo on Windows. Simply click on the headings below to reveal the instructions.

Use the index of click-by-click instructions as a companion guide to help you find the instructions you need, or browse through the instructions below that accompany this chapter.

4.a. Exporting an overview of your Nodes

Consider customizing your list of Nodes to include relevant information, such as the Descriptions (see the subsection in Chapter 3 on Customizing your display and listing Nodes). The next two options will generate output that matches your customization.

Exporting a list of Nodes

  • List View: Select a Node.
  • Ribbon: Share > Export List.

Printing a list of Nodes

  • List View: Select a Node.
  • Ribbon: Share > Print List.

Exporting a Codebook

  • List View: Select a Node.
  • Ribbon: Share > Export Codebook.

Code Summary Report

You can also list your Nodes with a summary of the volume of data for each type of File in your project.

  • Navigation View: Output > Reports.
  • List View: Double-click on Code Summary Report > to the left of Field tick the box > Select > tick Nodes > OK > OK.

4.b. Creating a Memo Link to a Node

  • Navigation View: Codes > Nodes.
  • List View: Right-click on a Node > Memo Link > Link to New Memo.
  • Name the Memo > OK.
  • Date and time stamp your entry > Ctrl + Shift + T.
  • Record your ideas about that Node in the Memo and come back to it any time to review and revisit your interpretations.
    • List View: Right-click on the Node > Memo Link > Open Linked Memo (or Ctrl + Shift + M).
    •  Click to Edit if you want to edit or augment your existing thoughts.

4.c. Using a Concept map to sort Nodes into groups (Figure 4.6)

  • Ribbon: Explore > Concept Map > provide a name > OK.
  • Ribbon: Add Project Items, selecting all your thematic Nodes. Existing connections between them will be ignored > OK.
  • Select a Node or Nodes to move them around the screen, forming groups based on their being ‘the same kind of thing.’
  • Right-click on a Node to Open Item if you need to check what is coded there.
  • Label each group of Nodes:
    • Add Shapes > Select a Shape and drag to the Map.
    • Double-click on a Shape to Name it.

4.d. Rearranging and Creating Nodes in hierarchies

Before making drastic changes to your project, make a backup copy.

Option 1 (the preferred method):

  • Select the X on the top right of the Project.
  • Open your Windows Explorer and copy/paste as you would any other file.

Option 2:

  • File: Manage > Copy Project.

Moving Nodes into hierarchies

Nodes can be dragged from one parent to another:

  • List View: Click once on a Node to select it > click and drag to the parent Node, or
  • List View: Right-click on a Node > Cut > select the desired parent Node > Right-click > Paste.

To place an existing Node at the top level:

  • List View: Select a Node > release your click and return to drag it to the Navigation View: Codes: Nodes, or
  • List View: Right-click on a Node > Cut.
    • Navigation View: Codes > Nodes > Right-click > Paste.

Creating Nodes in hierarchies

  • List View: Right-click on the Node under which you want to create a child Node > New Node > add a Name and Description > OK (Figure 4.8).

4.e. Aggregate child Nodes

To automatically Aggregate child Node(s) into the parent Node as you continue coding

  • Navigation View: Codes > Nodes.
  • List View: Right-click on a (preferably empty) parent Node > Aggregate Coding from Children.

To undo Aggregation

  • List View: Right-click on the Aggregated Node > Aggregate Coding from Children.

4.f. Project Map of your coding structure

figure_4.10.png

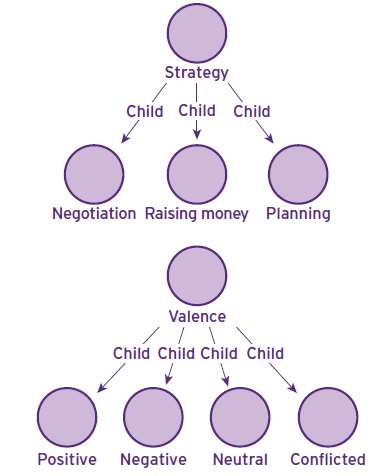
Figure 4.10 Visualizing coding structure with a Project Map

  • Ribbon: Explore > Project Map > Name > OK.
  • List View: Left-click to select one or more parent Nodes, and drag to the Detail View.
  • Detail View: Expand Add Associated Items > select Children and drag to the Map.
  • Ribbon: Project Map Tools > Layout. Use the drop-down menu to choose the option that works best for you (e.g., Hierarchical).

4.g. Auto Coding a File by speaker name

  • Navigation View: Data: File.
  • List View: Select the File(s) > Right-click > Auto Code > Speaker name > Next.
    • Enter Speaker names (or question numbers) in the lines provided (see the highlight below the names for visual feedback. But, wait until all names are entered to see the distinction between all speakers) > Next.
    • Create new classification > provide a name (e.g., Person) > Finish.

If your question Nodes ended up as Cases, simply create a new folder in your Nodes (e.g., Interview responses by question), and cut/paste them into this new folder.

4.h. Running a Word Frequency Query

  • Ribbon: Explore > Word Frequency (Figure 4.12).
  • Search in > leave as Files and Externals to search in everything (or go to Selected Items to scope the search to a narrower focus).
  • Display words > leave at 1000 most frequent or set to a lower number.
  • With minimum length > leave at 3 (increase to only find longer words; decrease to include shorter words).
  • Combine different forms of the same word into the same “Find” as shown in Figure 4.12).
    • Grouping > With stemmed words.
  • Run Query.

4.i. Viewing and adjusting Stop Words

Select the text search language and view the default list of Stop Words

  • File: Project Properties (Stop Words are Project-specific) > General.
    • Text content language.
    • Stop Words.

Modify the Stop Words

  • Change words directly from the Stop Words List (in Project Properties), or
  • Right-click on any Word in the results > Add to Stop Words List.

4.j. Running a Text Search Query

  • Ribbon: Explore > Text Search.
  • Search in > leave as Files and Externals to search in all Files (or go to Selected Items to scope the search to a narrower focus, such as one of your Sets).
  • Search For > enter the word(s) of interest (as in Figure 4.13. use the Special button to add your own synonyms with OR as an alternator between words; use quotations marks for phrases). See the NVivo Help for additional explanations.
    • As an alternative, use Find > With stemmed words or any of the other options.
  • Spread to allows you to expand the result beyond the simple word or phrases you searched for (although we prefer to look at the coding context after the results are provided, as this makes it easier to identify the bolded words in the output, as in Figure 4.13).
  • Run Query.