Qualitative Data Analysis with NVivo
Windows
On this part of the website, you have free access to up to date click-by-click instructions for NVivo on Windows. Simply click on the headings below to reveal the instructions.
Use the index of click-by-click instructions as a companion guide to help you find the instructions you need, or browse through the instructions below that accompany this chapter.
Importing, viewing, annotating, and linking a picture
Import and examine Properties of a picture
- Ribbon: Import > Files > locate the File(s) > Open > Import.
- List View: Right-click on the File > Picture Properties > Picture tab to access metadata such as the date the photo was taken, aperture, and exposure time.
View and adjust your picture
- List View: Double-click on the File.
- Click to Edit.
- Ribbon: > Edit.
- You can now adjust the Brightness & Contrast.
- Rotate the image 90 degrees Right or Left, for instance.
- The area allocated to the image versus the log (described next) can be adjusted with a double-headed arrow on the vertical line separating these areas.
- On the bottom right-hand side of the NVivo window you will also see a slide bar that allows you to zoom in or out on the image.
Writing about a picture
If you would like to write notes about some or all of the image, this can be accomplished with a log, an Annotation, or a Memo Link.
Enter a log
- Detail View: Right-click in the picture > make sure the Edit icon is illuminated. If not, select it to turn it on.
- Click in the picture and drag your cursor diagonally to create a Region and release your Click (Figure 9.3).
- Inside the Region > Right-click > Insert Row.
- The log locates the region (using pixel coordinates) and you can add text in the Content field (Figure 9.3).
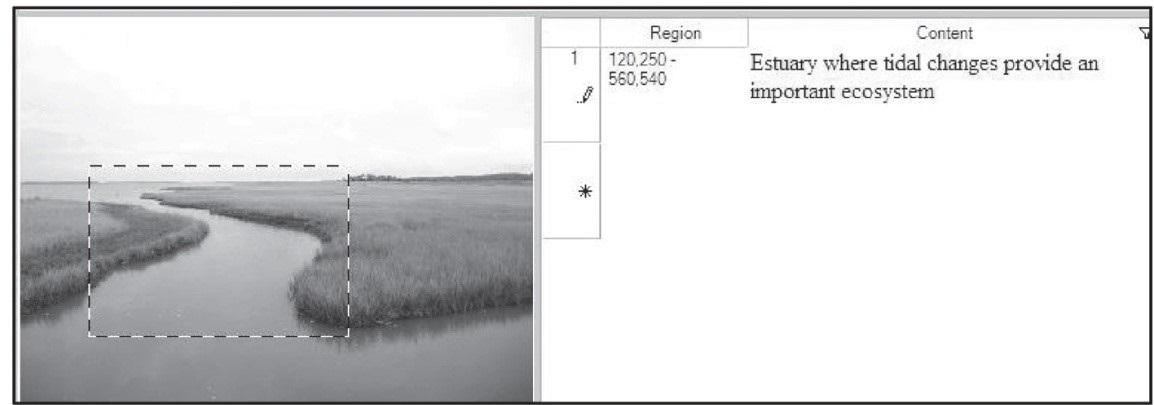
Figure 9.3 Picture with a newly inserted log entry
- Select the number next to any row to illuminate the associated portion of the picture.
Add Annotations or Links to the image or log
To add a Memo Link, Annotation, or See Also Link to the picture or log, follow the instructions in Chapter 1 and treat the selection just as you would text from an interview transcript. In brief:
Memo Link
- Detail View: Right-click anywhere in the picture or log > Links > Memo Link > Link to New (or Existing) Memo.
Annotation
- Detail View: Select a portion of the picture or log > Right-click > New Annotation.
See Also Link to an entire item
- Detail View: Select a portion of the picture or log > Right-click > Links > See Also Link > New See Also Link.
See Also Link to specific content
- Detail View: Select a portion of the picture or log > Right-click > Copy.
- Go to another File, such as an interview, article or another picture and Highlight the passage that is related to this part of the picture.
- Right-click > Paste As See Also Link.
- Alternatively, Select content from another File and Copy it, then return to Select a place in the picture or log > Right-click and Paste As See Also Link. (See Chapter 1 for additional information about See Also Links.)
Coding a picture or log
You can code a picture and its log in much the same way as you code a transcript (drag and drop, right-click, or select recently used Nodes from the Quick Coder). See Chapters 3 and 4 for details about coding text and working with Nodes. The difference from coding other text is in the way parts of the picture or log are selected for coding, and how they appear in a Node.
Coding picture Regions
- Detail View: Click in the picture and drag your cursor diagonally to create a Region and release your Click (Figure 9.3).
- Drag this Region of the picture to any Node, or Right-click to Code.
Coding the log
- Code part of the text in a log row (for images, audio, or video) as you would for any other text.
- To code an entire log row (instead of just a portion) > Select the number to the left of the row > drag this number to the Node (or Right-click and code).
Viewing a coded picture and log in a Node
Viewing a coded picture
- Navigation View: Codes > Nodes.
- List View: Double-click on a Node that is coded with picture data.
- See the pixel coordinates of the image in the Reference tab (the default Node display).
- To see the picture (Figure 9.4), on the right margin of the Node display, switch to the Picture tab.
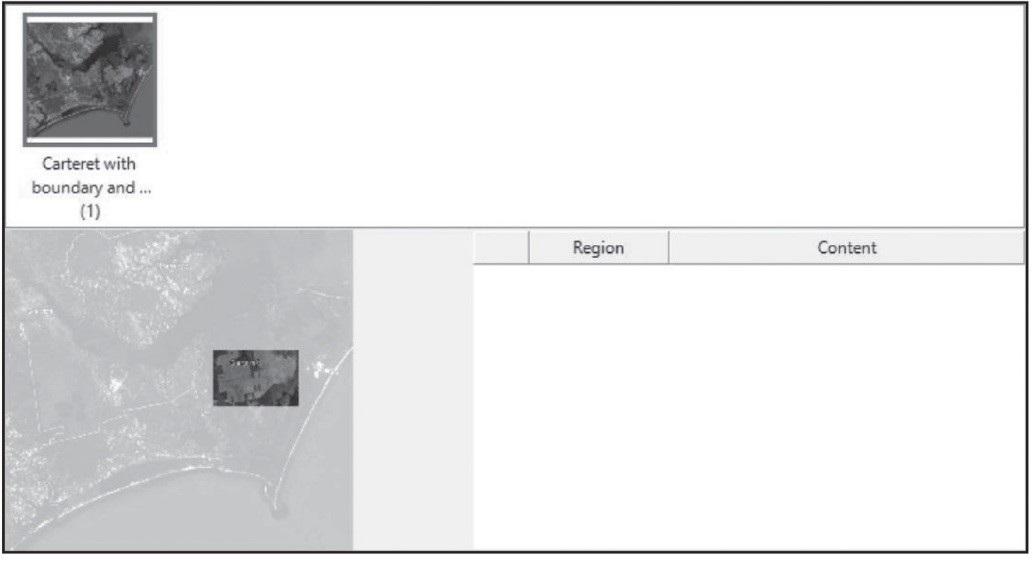
Figure 9.4 The picture content of a Node open in Detail View
Viewing a coded log
- Coded text from a log entry will appear in your Nodes along with other text References.
- List View: Double-click to open your video.
- Ribbon: Video > Play/Pause.
- Detail View: Watch the playhead move across the timeline (Figure 9.6).
- Select > Stop.
- You can place your cursor on the playhead and drag it to any point along the timeline to a different segment > Play/Pause.

Figure 9.6 The playhead moving across the timeline of an audio or video File in Windows (top) and Mac (bottom)
- In the Video Ribbon, Playback group, you will see Play Mode with three different settings (Figure 9.5). You are currently in Normal play mode with a green triangle illuminated.
- To transcribe, you will need to Select the Play Mode on the right that is probably greyed out (circled in figure 9.5) To access and use it:
- Detail View: If it is available, Select the Click to edit bar just above the timeline of your audio or video.
- From the Play Mode options, Select the Transcribe icon (circled in Figure 9.5).
- Adjust the speed and volume of the playback to suit your needs.
- Move your playhead to the location where you want to begin transcribing and click Play/Pause (or use your keystrokes or foot pedal).
- A transcript row appears to the right of the media where you can begin typing next to the Timespan (Figure 9.7).

Figure 9.7 Entering a new transcript row (Windows)
- Click Pause (or use your keystrokes or foot pedals) to remain in the same row while you correct, retype or catch up.
- Click Play to start again.
- Click Stop and then Play to create a new row.
For example, in the Environmental Change Project you could find all the audio and video Files that have been coded to Real estate development and Natural environment. After you find the Files, you can instantly turn them into a Set of People who talk about Real estate development and Natural environment. You can use this Set in a subsequent Query pertaining to only these people.
- Ribbon: Explore > Group.
- Look for: Items Coding.
- Scope: Change Files and Externals to Selected Items > Select > tick the boxes next to your audio and video interview Files (e.g., Betty and Paul, Helen, Ken) > OK.
- Range: Change to Selected Items Select > tick the boxes next to the Nodes (e.g., Real estate development and Natural environment).
- Run.
- Right-click on the File names to Create As > Create As Set > Name the Set > OK (Figure 9.10).
- The Set will be stored in Navigation View: Search > Sets.
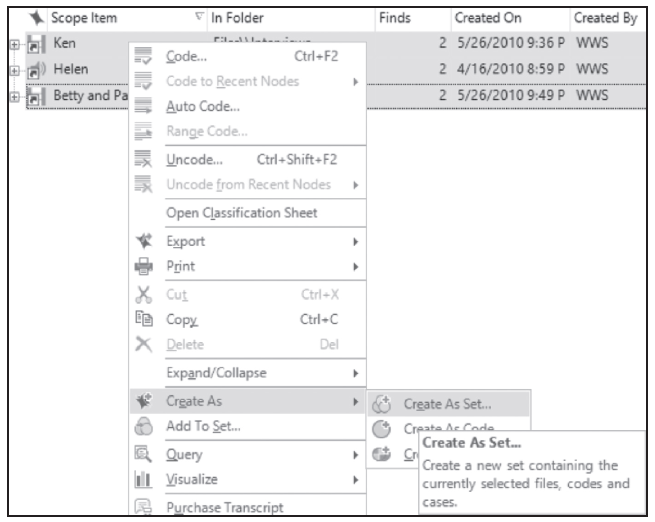
Figure 9.10 Turning the results of a Group Query into a Set
- Select the Connection Map tab on the right to visualize the connections (Figure 9.11).
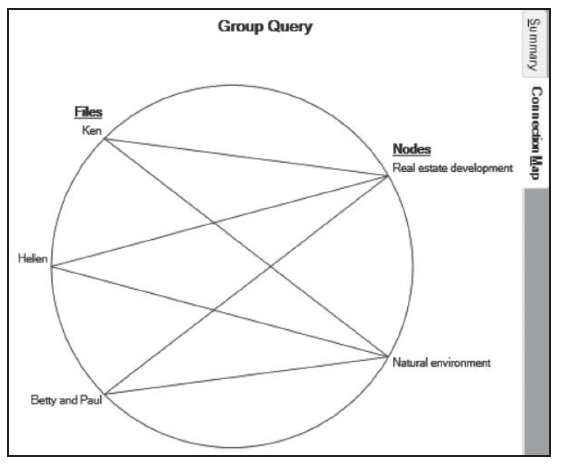
Figure 9.11 A Connection Map of the Files coded to Natural environment and Real estate development
If you want to save this Query to run it again later:
- Ribbon: Explore > Last Run Query > Tick Add to Project > Name it > OK.