Qualitative Data Analysis with NVivo
Mac
On this part of the website, you have free access to up to date click-by-click instructions for NVivo on Mac. Simply click on the headings below to reveal the instructions.
Use the index of click-by-click instructions as a companion guide to help you find the instructions you need, or browse through the instructions below that accompany this chapter.
As there are some functions in NVivo that can only be carried out in Windows, there are deliberate gaps in the Mac instructions numbering system when a tool is not available. This is so that the numbering system matches the book and the index of instructions.
Importing, viewing, annotating, and linking a picture
Import and examine Properties of a picture
- Ribbon: Data > Picture > locate the File(s) > Import.
- List View: Right-click on the File > Get Info > Picture tab to access metadata such as the date the photo was taken, aperture, and exposure time.
View and adjust your picture
- List View: Double-click on the File.
- Tick Edit.
- You can now adjust the Brightness & Contrast.
- The area allocated to the image versus the log (described next) can be adjusted with a double-headed arrow on the vertical line separating these areas.
- On the bottom left-hand side of the NVivo window you will also see two magnifying glasses that allow you to zoom in or out on the image.
Writing about a picture
If you would like to write notes about some or all of the image, this can be accomplished with a log, an Annotation, or a Memo Link.
Enter a log
- Detail View: Right-click in the picture > make sure the Edit icon is illuminated. If not, select it to turn it on.
- Click in the picture and drag your cursor diagonally to create a Region and release your Click (Figure 9.3).
- Inside the Region > Right-click > Insert Row with Region.
- The log locates the region (using diagram) and you can add text in the Content field (Figure 9.3).
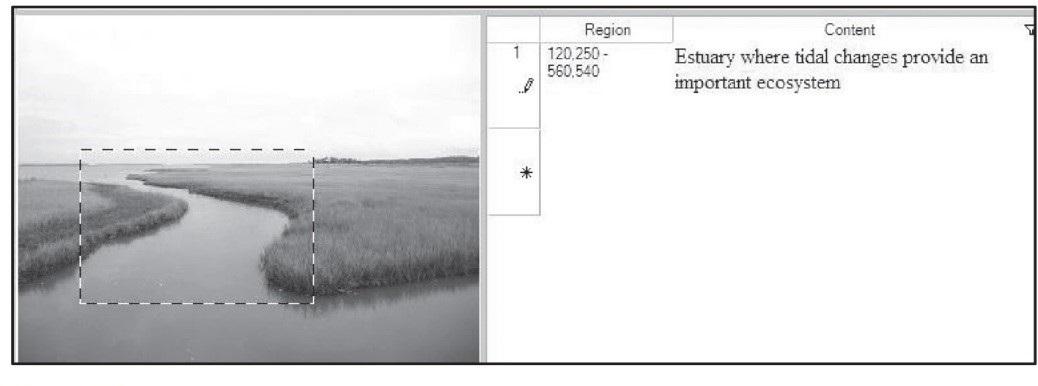
Figure 9.3 Picture with a newly inserted log entry
- Select the number next to any row to illuminate the associated portion of the picture.
Add Annotations or Links to the image or log
To add a Memo Link, Annotation, or See Also Link to the picture or log, follow the instructions in Chapter 1 and treat the selection just as you would text from an interview transcript. In brief:
Memo Link
- Detail View: Right-click anywhere in the picture or log > Links > Memo Link > Link to New (or Existing) Memo.
Coding a picture or log
You can code a picture and its log in much the same way as you code a transcript (drag and drop, right-click, or select recently used Nodes from the Quick Coder). See Chapters 3 and 4 for details about coding text and working with Nodes. The difference from coding other text is in the way parts of the picture or log are selected for coding, and how they appear in a Node.
Coding picture Regions
- Detail View: Click in the picture and drag your cursor diagonally to create a Region and release your Click (Figure 9.3).
- Drag this Region of the picture to any Node, or Right-click to Code.
Coding the log
- Code part of the text in a log row (for images, audio, or video) as you would for any other text.
- To code an entire log row (instead of just a portion) > Select the diagram to the left of the row > Right-click and code.
Viewing a coded picture and log in a Node
Viewing a coded picture
- Navigation View: Codes > Nodes.
- List View: Double-click on a Node that is coded with picture data.
Figure 9.4 The picture content of a Node open in Detail View
Viewing a coded log
- Coded text from a log entry will appear in your Nodes along with other text References.
- List View: Double-click to open your video.
- Detail View: Player controls > Play symbol.
- Detail View: Watch the playhead move across the timeline (Figure 9.6).
- Select > Pause symbol.
- You can place your cursor on the playhead and drag it to any point along the timeline to a different segment > Play/Pause.
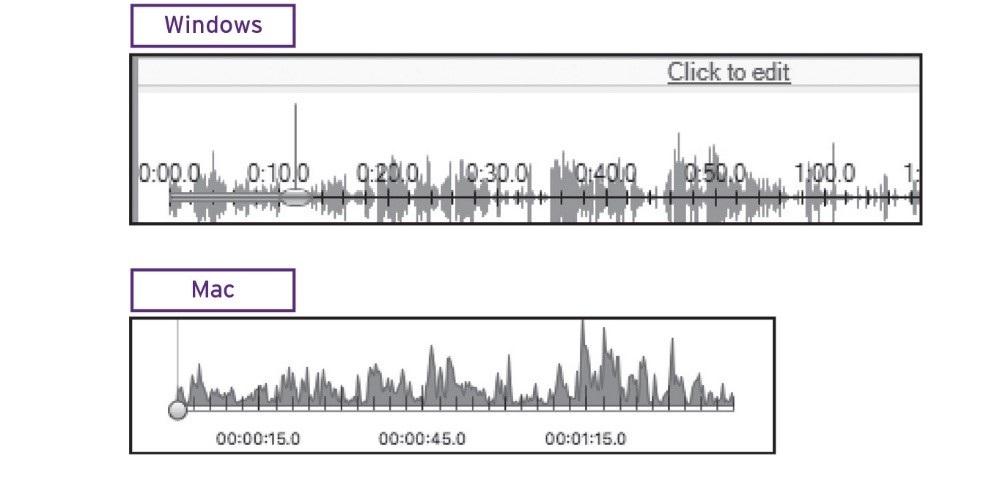
Figure 9.6 The playhead moving across the timeline of an audio or video File in Windows (top) and Mac (bottom)
- Detail View: Tick the Edit box of your audio or video.
- Adjust the speed of the playback to suit your needs at the bottom of the audio or video.
- Move your playhead to the location where you want to begin transcribing > click + at the bottom of the transcript area to create a new transcript row where you can begin typing (Figure 9.8).

Figure 9.8 Entering a new transcript row (Mac)
- Click Player control symbols to correct, retype, or catch up and Pause when transcript row is complete.
- Menu bar: Analyze > Media > Apply End Time.
- Click + to create a new transcript row.
Your decision about when to create a new row or stay in the existing row depends on your analytical goals. You will be able to code either selected text within the transcript row, or select the number next to the row to code the entirety. Some researchers create a new row for each speaker to allow Auto Coding for Cases. Others divide data into similar lengths, or identify meaningful episodes within the media based on the