Qualitative Data Analysis with NVivo
Mac
On this part of the website, you have free access to up to date click-by-click instructions for NVivo on Mac. Simply click on the headings below to reveal the instructions.
Use the index of click-by-click instructions as a companion guide to help you find the instructions you need, or browse through the instructions below that accompany this chapter.
As there are some functions in NVivo that can only be carried out in Windows, there are deliberate gaps in the Mac instructions numbering system when a tool is not available. This is so that the numbering system matches the book and the index of instructions.
- Navigation View: Data > Files > Interviews.
Throughout these instructions, keep in mind that items in the Navigation View sometimes require an extra step in order to see the subfolders (Figure 1.4).
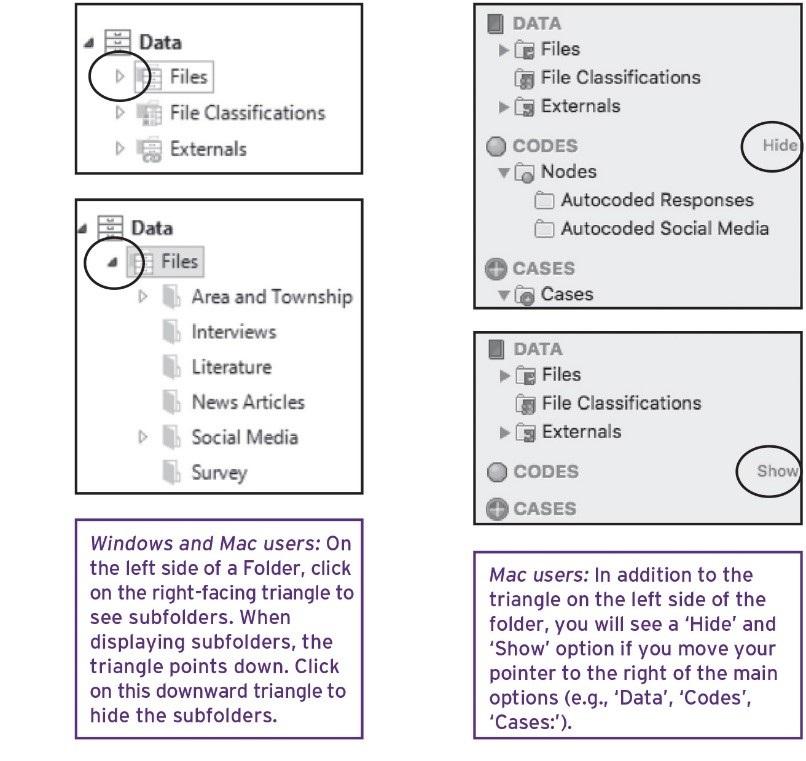
Figure 1.4 Showing and hiding subfolders in the Navigation View
- List View: Double-click on Barbara (Figure 1.5).
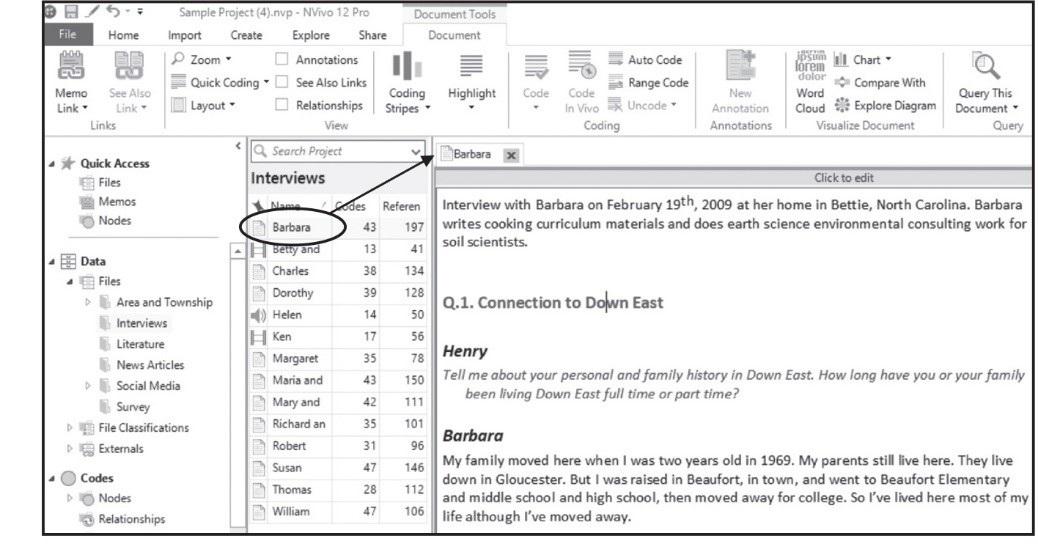
Figure 1.5 Opening Barbara in the Detail View
- Detail View: This File inside NVivo looks similar to the file in Microsoft Word, but NVivo has made a copy of the original file.
- Navigation View: Codes > Nodes.
- Nodes your concept containers and we will discuss them in detail in Chapter 3 are.
- List View: Double-click on the Node, Community change (Figure 1.6).
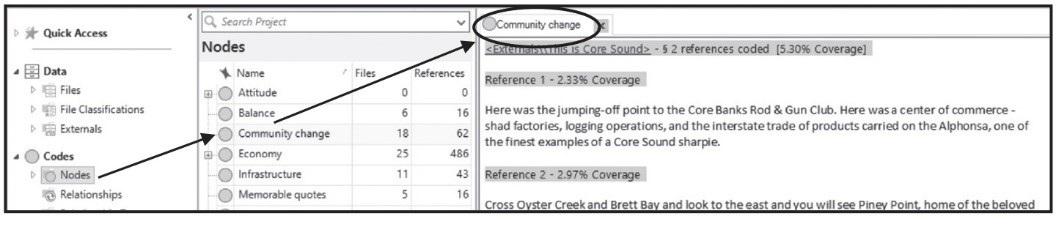
Figure 1.6 Opening Community change in the Detail View
- Detail View: This Node points to passages in various Files that have been coded to the Node (and calls each coded passage a Reference).
It is very important that you only work with NVivo Projects on your hard drive unless you have purchased NVivo for Teams. There are instances of projects getting corrupted if you work off an external drive, server, or jump drive (unless you are using NVivo for Teams, Chapter 11). Don’t panic: you can save backups to an external drive or a server and we show you how to do this at the end of this chapter. However, as you work through the instructions below to create a Project, we recommend that you save it in your Documents folder.
- Launch NVivo > Create new project (Figure 1.9).
- Provide a name in the Save As window.
- Add a Description for the Project (these can be changed later).
- Identify the location of your Project (default is usually the Documents folder, unless you recently used another location to save an NVivo Project).
- Create.
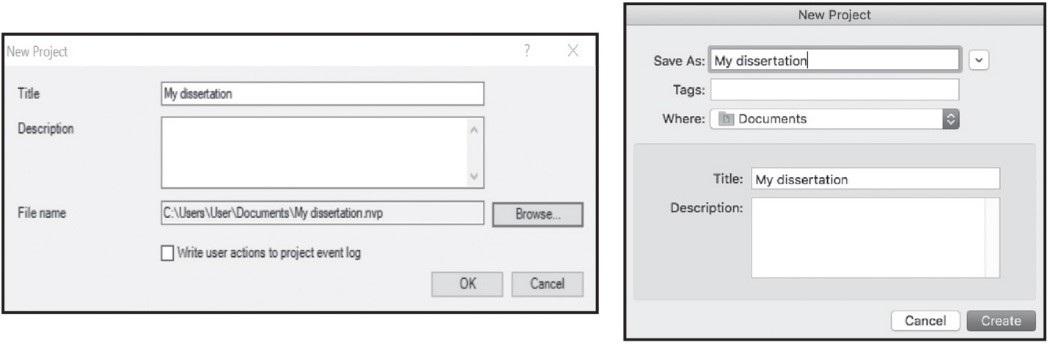
Figure 1.9 Creating a Project in Windows (left) and Mac (right)
Creating a journal
- Ribbon: Create > Memo (Figure 1.10).
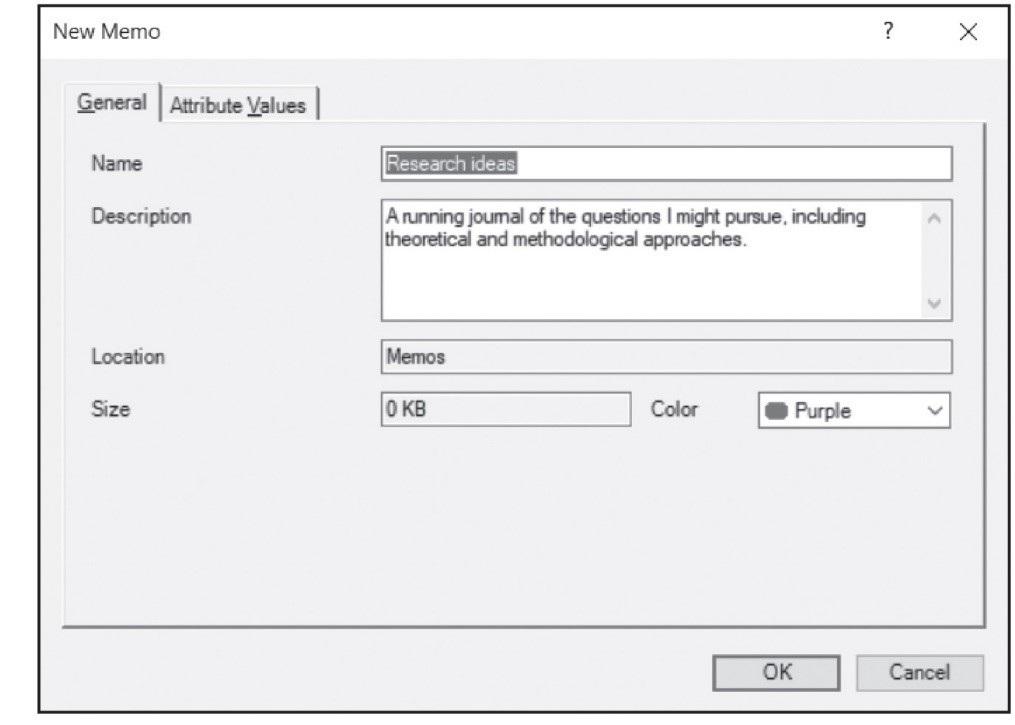
Figure 1.10 Creating a Memo to use as a journal
- Name (provide a concise title)
- Description (an optional, additional, brief overview of the Memo)
- Colour (use as an optional strategy for grouping items, such as Memos about methodology)
- Done.
If you have a journal already started in a document outside of NVivo you can import it into the Project:
- Ribbon: Data > Memos > Select the File > Import.
If you are importing only one Memo, you will encounter the Memo Properties window where you can rename, add a colour, etc. (this can also be done later through the Memo Properties window) > Done.
Journal writing, saving, closing, reopening and editing
- Ribbon: Home > Insert > Insert Date/Time to keep track of the evolution of your ideas (note the alternative shortcut keys: Cmd + Shift + T).
- Ribbon: Home to adjust Format (colour), Style, etc.
- Detail View: Write some ideas about your expectations for the Project or a list of things to do next as you move forward with your design and analysis.
- Menu bar: File > Save (although you do not need to save it before you close the Memo, only before you close the Project).
- Navigation View: in the Open Items list, Select the X to the right of the Memo to close the Memo (see Figure 1.7).
- To reopen the Memo:
- Navigation View: Notes > Memos.
- List View: Double-click on the Memo to re-open.
- Detail View: Click to edit with the check box on the far right above your Memo > add more thoughts.
Create a Mind Map (Figure 1.11)
- Ribbon: Explore > Mind Map > Provide a Name for your Mind Map > Done.
- Detail View: Name your Main Idea for this Project.
Connect an Idea
- Select the Idea you created (Main Idea) and add a Sibling or Child Idea to it.
- Use the icons at the top of the Detail View.
Alternatively:
- With the main idea selected > Right-click > Insert Child Ideas > Name the idea.
- Create a Sibling idea: Right-click on an idea > Insert Sibling Idea > Name the idea.
Move an item from one branch to another
- Right-click > Cut > Right-click on the destination item > Paste.
Create a floating idea
- Detail View: In the white space Right-click > Insert Floating Idea > Label the idea. Floating ideas are used when there is not (yet) an obvious connection to the other ideas.
Create Nodes from a Mind Map
- Detail View: Click anywhere on white space to ensure the Detail View is active.
- Detail View: At the top > Create as Nodes > Nodes > Select.
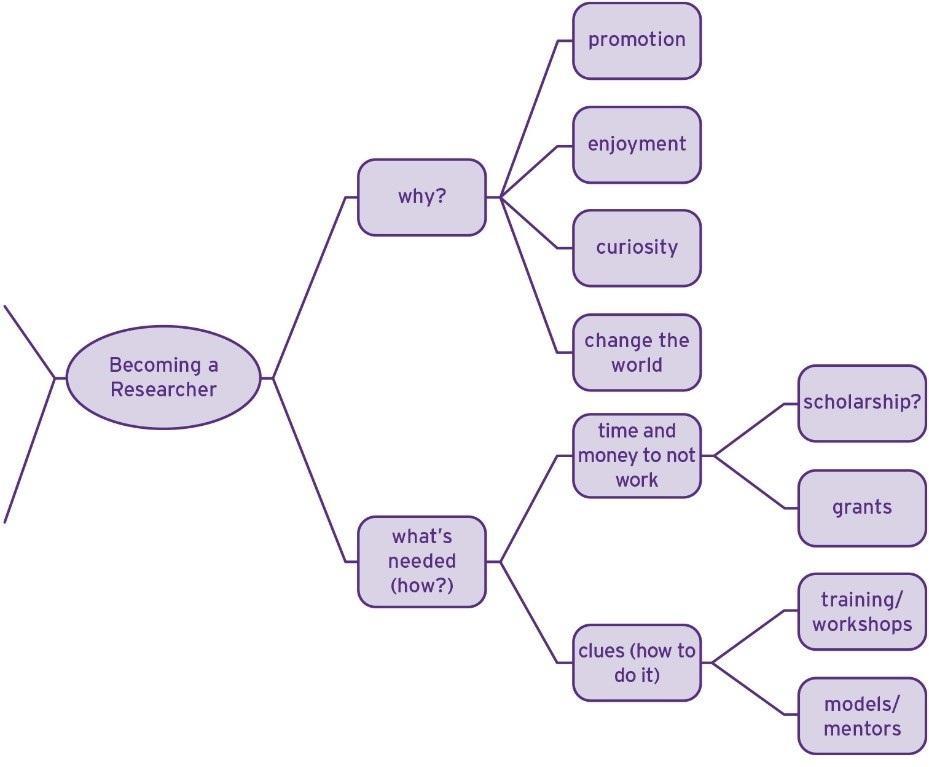
Figure 1.11 Mind Map to launch the Researchers Project
Create a Concept Map (Figure 1.12)
- Ribbon: Explore > Concept Map.
- Provide a Name for your Concept Map > Done.
The Detail View will open with an empty workspace. At the top of the empty Map you will find options to add Shape, Connector, and Project Item.
- Click on Shape (sometimes this is a very small icon with no label just above the empty space of the Map) to add one to the workspace area.
- Double-click on the Shape to label it. You might want to use different Shapes to represent different categories or theoretical concepts.
- Add another Shape to the workspace, and label it. Add as many as you need to capture all of your concepts.
Managing shapes and connections
To illustrate real or potential connections between concepts or categories, you can add connecting lines between items.
- Select a Connector from the menu above the Detail View.
- Detail View: Select one item, then while holding the left mouse button, drag to another item, to make a connection.
To change the type of Connector:
- Select the Connector you want to change.
- Detail View: Format pane: Connector > Select from the drop-down options.
To rearrange items
- Select any item and hold the left mouse button to drag the item.
Other options
Select any item or items in your Map, to change their colour and border.
- Detail View: Format Tab > Select Fill, Border Colour, and Border Width to modify the appearance of the item.
If your mapping has prompted fresh thoughts about your Project, record those in your Project journal. Maps can be copied and pasted into the Project journal, as well.
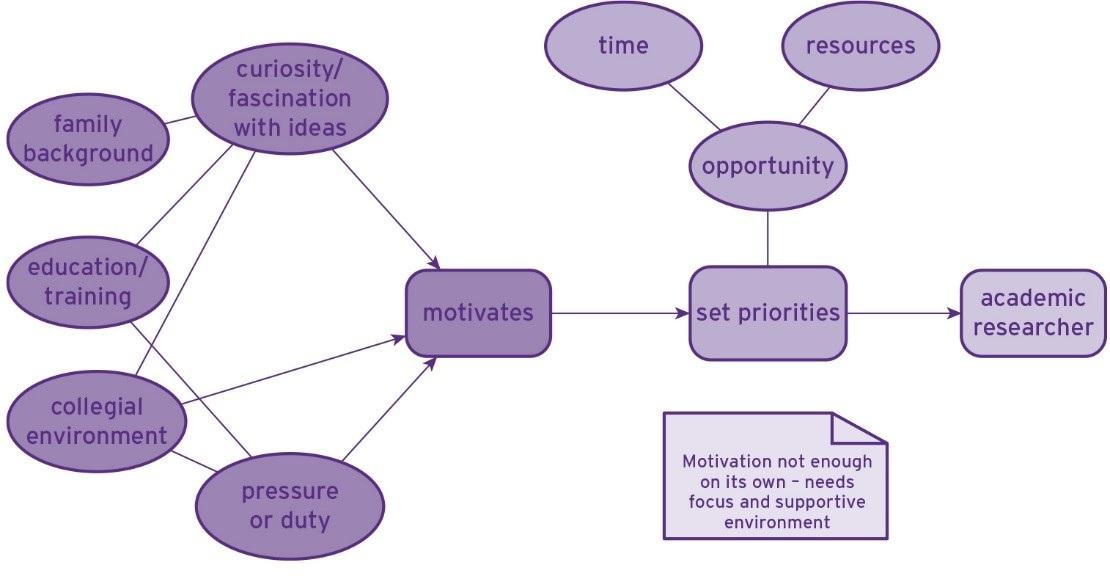
Figure 1.12 Becoming a researcher: preliminary Concept Map
- Detail View: Select a word or a few words in the passage to be Annotated (usually short) > Right-click (on the highlighted text) > New Annotation.
- A box will open in the Detail View.
- Type your Annotation.
- Detail View: Passages with an Annotation will be indicated with a blue highlight (click anywhere in the Detail View to release your selection to see this).
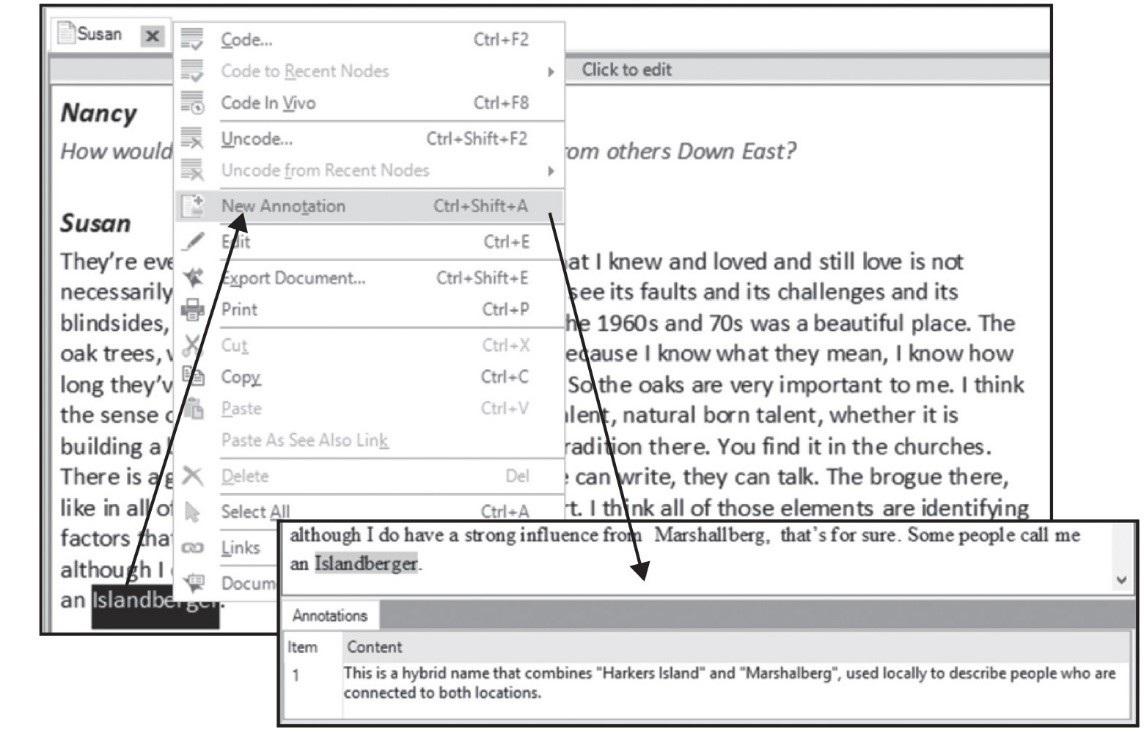
Figure 1.13 Creating an Annotation (Windows)
- Detail View: At the top, select Annotations.
- Detail View: Click anywhere in the blue highlighted text to see the matching comment; or
- Select a comment to see the associated blue highlight in the text (which will turn a darker blue).