Mac instructions
These instructions are from Qualitative Data Analysis with ATLAS.ti (Third Edition), Chapter 9: Team work, copyright © Susanne Friese 2019
These instructions are for version 8.3 of ATLAS.ti with the MacOS operating system.
Checking user accounts
ATLAS.ti automatically creates a user account based on the name that you use on your computer. If you want to check under which name you are logged in:
- Select TOOLS / USER MANAGEMENT / SHOW USER MANAGER.
If two people on a team have the same user name, you may want to consider renaming, or creating a new user account. When merging projects that come from different computers and that use the same user name, the duplicate name will automatically be renamed to <user name> (2). This means you can still distinguish the two users. However, it may be a bit cumbersome to always remember who is who.
- To change the name, select the user and edit the name in the inspector.
- To create a new user, click on the plus (+) button and enter a new user name and password.
Project Manager: merging projects
- To begin the merge process, open one of the two projects that you want to merge. This is the target project.
- Select PROJECT / MERGE WITH PROJECT.
In the Mac version, you always merge a project bundle file that is stored outside of ATLAS.ti. Let’s refer to it as the incoming project.
- Select a project bundle file and click OPEN. The merge process starts. Before the projects are finally merged, you see a summary report that lists all changes that will be made. If there are conflicts, you can decide how to resolve them.
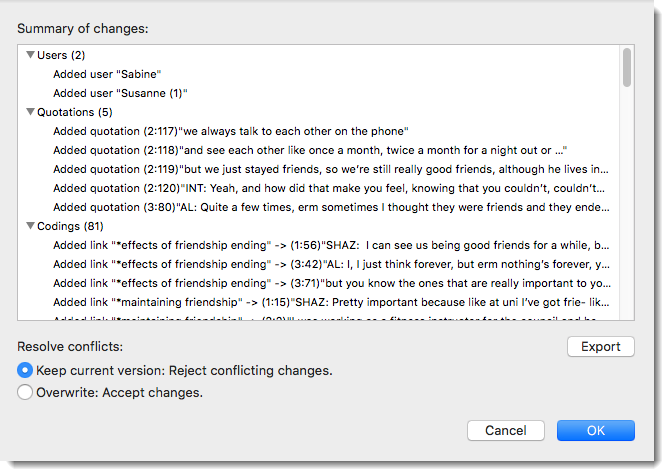
Figure 9.1 Merge Report
As explained, all entities that are the same will be merged. Those are not listed in the report. All entities that are different will be added and are listed in the report. As you can see in Figure 9.1, the author Susanne was also available in the incoming project but was not recognized as the same ‘Susanne’, which already existed in the target project. Therefore, it is duplicated.
Merging duplicated users
If a username gets duplicated but the person is in fact the same person, you can merge users:
- Open the User Manager: TOOLS / USER MANAGEMENT / SHOW USER MANAGER
- Drag the duplicate username on the username you want to keep and select the MERGE option. It works just like merging codes.
In Figure 9.2 you see that there is a conflict for code groups. The two groups ‘activities’ and ‘end of friendship’ have been changed by the second coder, Sabine, in the incoming project.
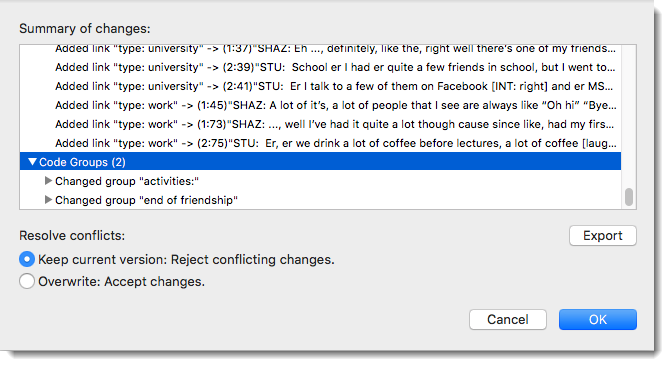
Figure 9.2 Checking and resolving merge conflicts
You can now decide whether you want to accept the changes made by the second coder or not. If all team members have been coding different documents, merge conflicts are unlikely to occur. A conflict could arise, for instance, if someone has modified a document or code group, or modified a comment. As project administrator, you will have to decide whether to accept this change or not.
If you want to reject changes that have been made in the incoming project and that result in conflict, select Keep current version: Reject conflicting changes.
If you want to accept the changes made by the second coder, select Overwrite: Accept changes.
- After selecting an option for resolving conflicts, click OK. Now the projects are merged, and you will see a message that informs you that the merge was successful.
- After merging, check the merged project for plausibility. If you are satisfied with the results, save the project. If not, you can always select Undo.
- If applicable, continue with merging the next project bundle file.
Housekeeping
If coders have created codes with the same name on different computers, the codes have different IDs and therefore will be added rather than merged. The project manager needs to merge those codes manually after the project merge. You have learned how to merge codes in chapter 4 (Skills training 4.10). Here is a quick recap:
- Open the Code Manager. Highlight the code(s) that need to be merged and drag it (them) to the code you want to keep. Select the merge option from the context menu.
Team members: importing project bundle files
When you import the project bundle file that you receive from your project manager, you need to rename it by adding your name or initials to the project name. This is important for the project manager later when he or she merges the projects of all team members.
- Immediately after importing the project bundle file, select PROJECT / RENAME from the main menu.
Scenario 1 – analyzing a common set of documents
The project manager creates a new project, adds documents, organizes data into document groups, as discussed with the team, adds codes and code groups, saves the project, exports the project, and distributes the project bundle file to all team members.
When exporting a project, the Mac version does not automatically add the name of the author and the date to the project bundle file name (see Figure 9.3). You need to add it manually to the file name. Adding the author is useful as then everyone knows who created the project; adding the date is useful because then everyone knows when the project was exported. Depending on how you distribute the file, the date for the file that is generated by your computer may indicate when it was downloaded or saved, but not when it was exported.
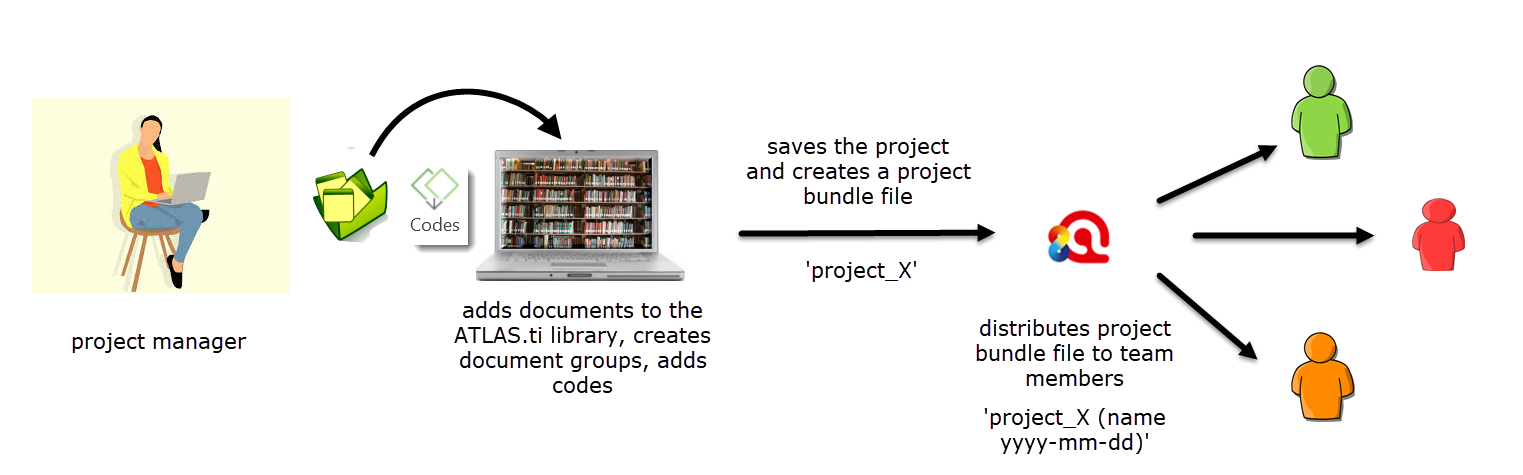
Figure 9.3 Analysing a common set of documents – project set-up
All team members import the master project bundle file, rename it, work on their project as instructed, when they are done export their project (adding the date to file name of the project bundle) and send the project bundle file back to the project manager. Adding the author name to the project bundle file name is not necessary, because it is already contained in the project name. This is different from the Windows version, where it is done automatically.
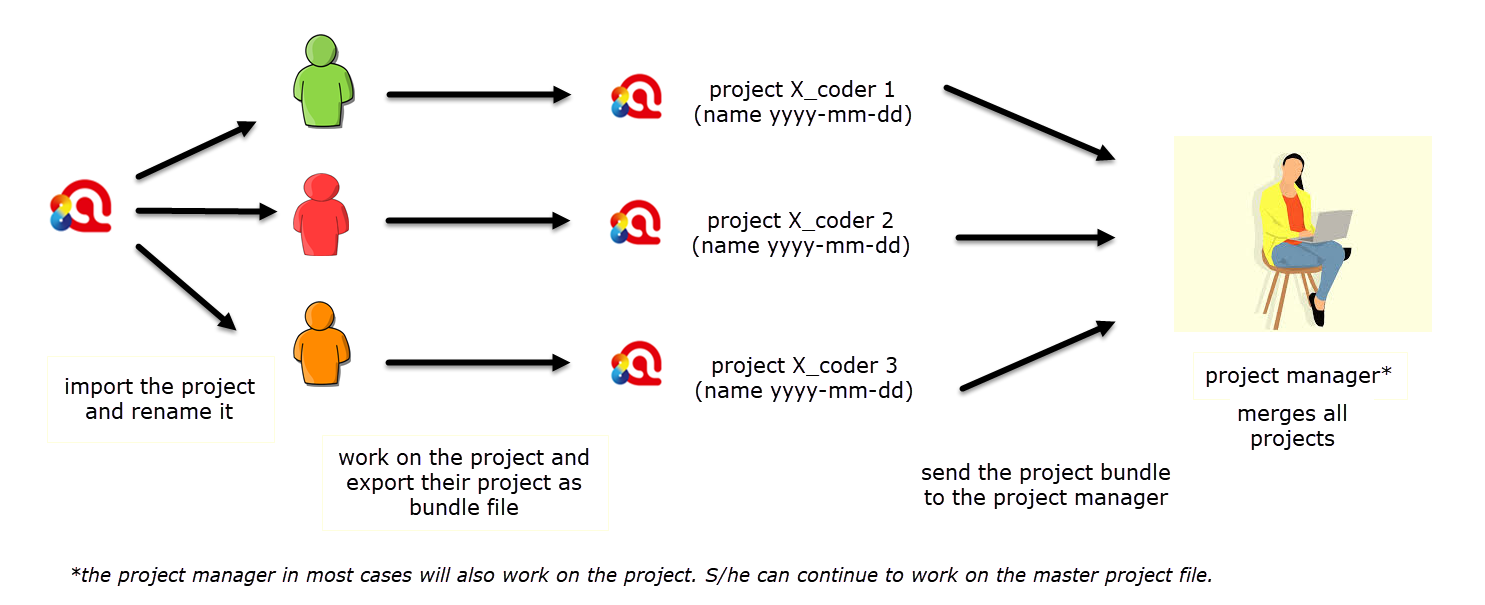
Figure 9.4 Overview of step 2 and 3
The project manager merges all sub projects and checks whether some housekeeping work needs to be done like merging codes, saves the Master project and exports it for distribution to the team members.
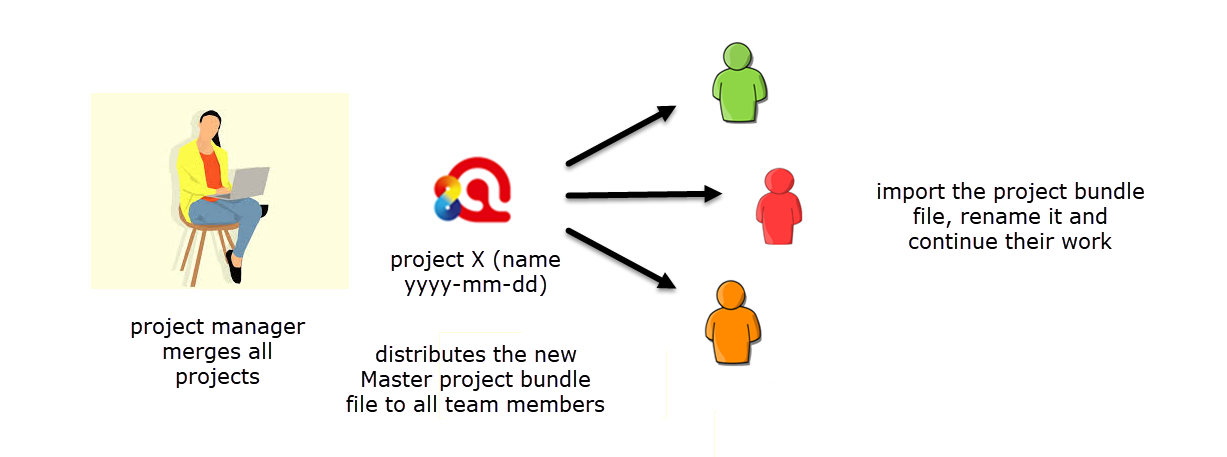
Figure 9.5 The project manager merges all sub projects and distributes a bundle file again
The team members import the updated master project and, as before, renames the project file by adding their name or initials.
This cycle continues. If new documents need to be added to the project, this is best done by the project administrator. A good time for this is after merging and before sending the updated project bundle file. Individual team members can also add documents to their sub projects, but this must be coordinated well. Keep in mind that every document, when added to an ATLAS.ti project, will have a unique ID (see Chapter 3). For your team not to end up with sets of documents that cannot be unified due to different IDs, individual team members can add documents only if nobody else adds them as well, and you do not want to wait for the next project merge.
Scenario 2 – analyzing different set of documents
For this scenario to work, you must start with a common code list. If everyone develops their own codes, after merging you will have a very long code list and few overlaps between the projects. Several of the codes probably have the same meaning or even the same label, but because they were created in separate projects, they are duplicated when the projects are merged. It will then take a lot of effort to clean up the code system. If there is no code system available at the onset of the project, look at Scenario 3. There I explain how to develop a coding frame together in a team.
The project manager creates a new project and imports the list of codes with code definitions and code groups, saves the project, exports it and distributes the project bundle file to all team members. As explained above, when exporting a project, the Mac version does not automatically add the name of the author and the date to the project bundle file name. You need to add it manually to the file name.
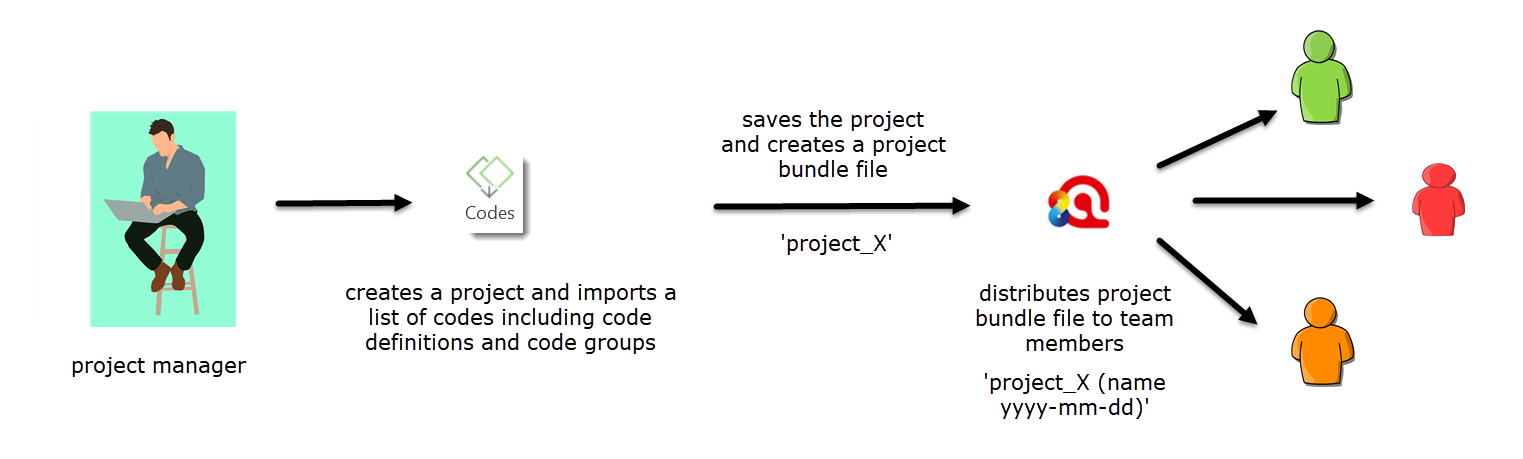
Figure 9.6 Project setup when analyzing different documents and using a common code list
The team members import the project bundle file that contains the coding frame and immediately after importing rename the project.
Discuss with your team how you want to name each project. If the data is from different regions, you could agree on a naming convention as follows: project X_region north; project X_region south; project X_region east. Instead of regions, it could be different school districts, different groups of respondents, different types of data (interview, focus groups, surveys), etc.
Next, each person adds their own set of documents, organizes the data into document groups, codes the data, saves the project, exports it and returns the project bundle file to the project manager. Remember to add the date to the project bundle file when exporting it.
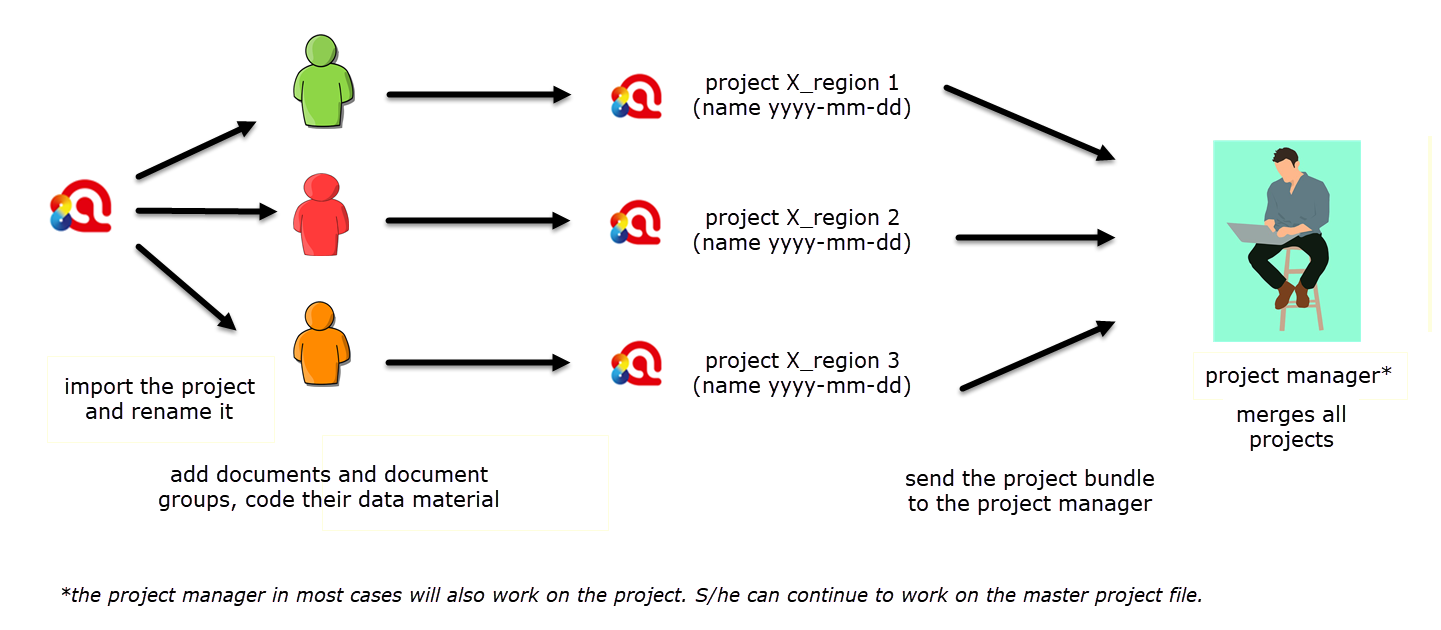
Figure 9.7 Team members add documents and work on their projects
The project manager merges all sub projects, saves the result as a new Master project, checks whether some housekeeping work needs to be done like merging duplicate codes, save the Master project and exports it for distribution to all team members. The project bundle file contains the combined work of all team members.
The team members import the master project.
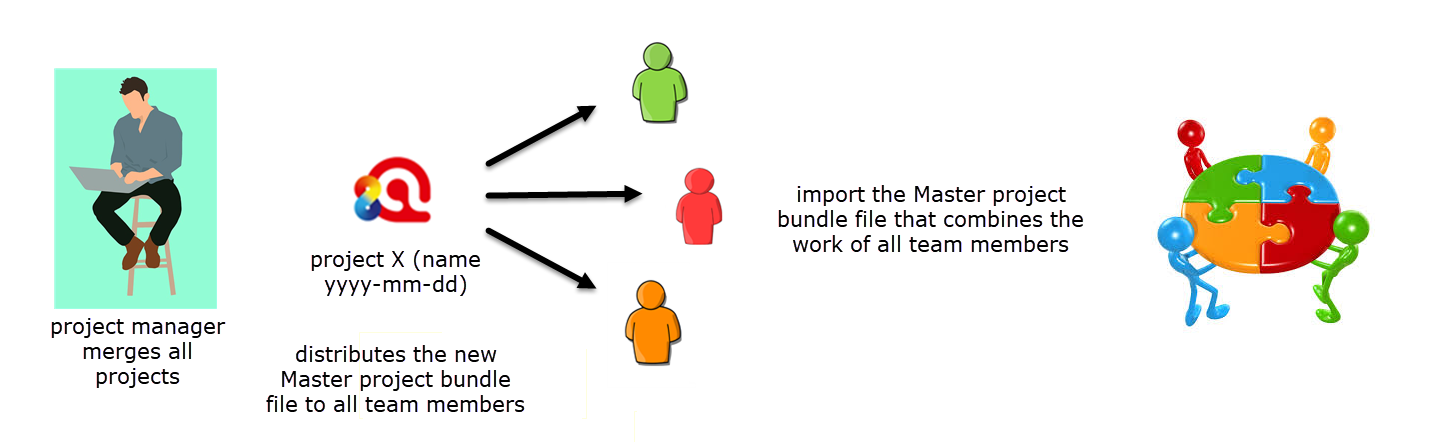
Figure 9.8 The project merges all projects and distributes the Master project bundle
Scenario 3 – joint development of a coding frame
If you want to develop a coding frame from scratch, I suggest that you set up a team project with two to three documents only. Choose documents that are as different as possible, and that cover a variety of issues. The sole purpose of this project is to develop the coding frame. It is very likely that you will have to recode the documents after you decide which codes to use.
Please note that the focus of the instructions is on the technical rather than the methodological aspects. I assume that as a team you discuss your research goals and not everyone just codes for the sake of coding. Also, for team projects it is important that thoughts and considerations for creating and applying a code are documented in code comments. These serve as the basis for further discussions in the team when jointly developing the coding system.
The project manager creates a new project, adds documents, saves the project, exports the project (adds his or her name and the date of export to the project bundle file) and distributes the project bundle file to all team members.
The team members import the master project bundle file and rename the project by adding their name or initials to the project name, codes the documents, writes a comment for each code that they create as a basis for later discussion with the team. After coding, they export their project and send it back to the project manager.
The project manager merges all sub projects and saves the result as a new Master project; scans the list of codes and groups all codes into code groups that have either the same label, a similar label or a similar meaning; saves the project, exports it and distributes the project bundle file to all team members for inspection. Organizing the codes in code groups serves as preparation for the team meeting, to make it easier to discuss the codes.
The project manager arranges a team meeting to discuss the results of the first round of coding. I suggest that you look at the project together by projecting it with a beamer onto a wall; or in case you meet online, use the ‘Share Screen’ feature of your meeting software.
All team members take some time to look at the merged project so that everyone gets an overview of how others have coded the data and develops ideas on how to sort and structure the code list.
During the team meeting, one person (= the facilitator) is responsible to make changes to the master project. I suggest that the facilitator creates a snapshot of the original Master project before making changes.

Figure 9.9 Discuss the codes of the merged project
Facilitator: Opens the Code Manager and moves the author column next to the code label, so everybody can easily see who created which code. This will facilitate the discussion.
Team: Go through each code group that contains similar codes and decide which codes to keep. Codes that have the same meaning can be merged. Codes with similar meaning might be subcategories of the same higher order theme. Begin to add structure to the code list by prefixing those codes that belong to the same category. See Skills training 5.3. Discuss how to define each code. The facilitator merges, renames and writes code definitions as you proceed.
Check for codes with high quotation frequency and discuss whether they need to be split. Split the codes as appropriate (see Skills training 5.2).
Discuss all other codes that were not already grouped into code groups and continue as above.
Another helpful option is to look at the codings in the margin area. If you hover over a coding, the name of the author is displayed:
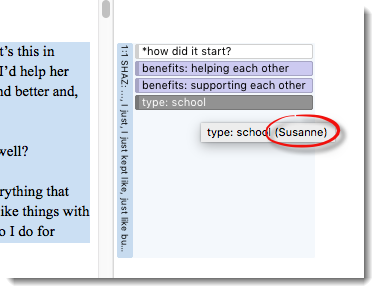
Figure 9.10 Display of the codings of different users
Scenario 4 – team projects for the class room
This is how you implement it:
The teacher creates a Master project, adds all documents to this project, adds the code list including comments and groups to the Master project by importing an Excel table, and saves the Master project.
If you are the teacher, you could give all groups a copy of the Master project and tell each group which document they should work on. This, however, bears a first source where errors can occur. Students may misunderstand which is ‘their’ document and you may end up with one document coded by three groups and two not being coded at all. Therefore, I suggest that you create a sub project for each group based on the same Master file:
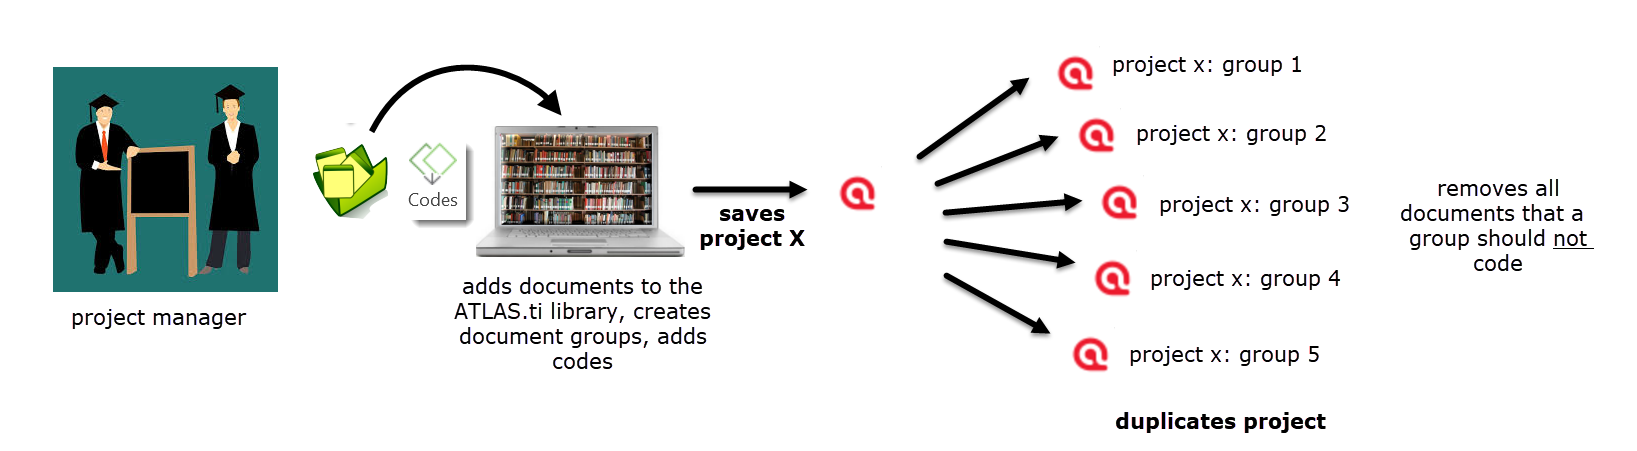
Figure 9.11 Project setup for teacher-guided classroom project
You need to duplicate the Master project for each group you have in the class.
- Close the Master project (an open project cannot be duplicated).
- Select PROJECT / OPEN. Right-click no the project and select the option DUPLICATE.
- Rename the duplicate, e.g. by adding the group name or number:

Figure 9.12 Duplicating projects
- Repeat this for as many student groups that you have.
- Next, open each duplicate and remove all documents that the group should not analyze. This would be: document 2 to 5 for group 1, documents 1, 3, 4 and 5 for group 2, and so on.
- Save each project and prepare a project bundle file for each group. In the Mac version you have to add your name and date of export manually to the project bundle file.
- Distribute the project bundle files to each student group.

Figure 9.13 Project distribution to student groups
If you are wondering why you cannot create individual projects that contain one document each, then this is due to the unique ID with which codes are stamped when importing. If you would add the Excel file with the code list to each individual project, the codes in each project would have a different ID and, in the end, when all projects are merged, each code will occur as many times as there are projects.
Project set-up
As principal analyst you have already coded the data and developed a coding framework. Now you want to check if other coders (two or more) identify the same data segments as relevant and code the data in the same way.
Figure 9.14 Preparing your project for ICA analysis
- Open your project and duplicate it. Name it in such a way that it is clear that this is the version for testing inter-coder agreement., e.g. Project X_sub project for ICA. Continue to work with the duplicate project.
Based on the estimated required sample, remove the appropriate number of documents from the project:
- Select the documents that should not be coded by the other coders, either in the Project Explorer or Document Manager, right-click and select DELETE.
Option A: coders get a project with predefined quotations
- From the main menu select QUOTATIONS / UNLINK ALL CODES FROM ALL QUOTATIONS. The project now holds the documents, quotes and all codes and code groups with definitions. If you have written memos, you must decide whether or which ones are relevant for the other coders. Remove those that you do not want to share.
- Save the project and export it. Remember that in the Mac version you must add your name and date of export manually to the file name.
- Send or give the project bundle file to the other coders.
If you remove only the codings, the other coders do not need to decide what is relevant matter in relation to the research question, as all quotations already exist and only need to be coded. This means the ICA coefficient for relevance will be 1.
Option B: coders get a project that only contains the documents to be coded and the codebook
There are two ways to prepare the project. You can either start from your own project or create a new one. If you prepare the project based on your own project:
- Open the Quotation Manager. Select all quotations (cmd +A), right-click and select DELETE.
- Save the project, export it and give the project bundle file to the other coders.
If you create a new project:

Figure 9.15 Preparing a new project for ICA analysis
- Export the code list from your project first: From the main menu, select CODES / IMPORT/EXPORT / EXPORT CODEBOOK (XLSX).
- Create a new project, add the documents that the coders should code. Import the codebook: CODES / IMPORT/EXPORT / IMPORT CODEBOOK (XLSX).
- Save the project, export it and give the project bundle file to the other coders.
The other coders import the project bundle file and rename the project directly after they have imported it by adding their name or initials (PROJECT / RENAME). They code the data by either creating their own quotations or by applying the codes of the code system to the already existing quotations.
If they have questions about the coding system, they create a memo and write all questions, concerns, needs for clarifications, etc. into the memo. If a question concerns a specific quotation, it can be written into a quotation comment.
They save the project, export it and send the project bundle file back to the principal analyst.
Performing ICA Analysis
The principal analyst imports the project from the other coders and checks their work, enables inter-coder mode and merges the projects.
If you do not have your own project yet, but want to practice it, you can download an example project from the online resources website.
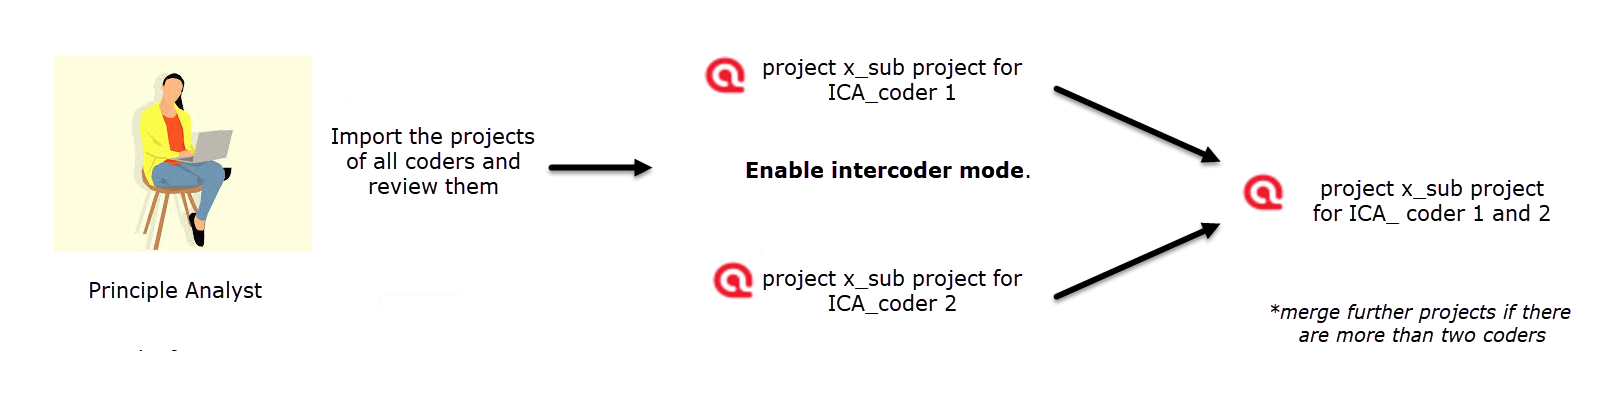
Figure 9.16 Merging projects before you can start ICA analysis
- Import the projects of the other coders and review them.
- Close all but one project as you cannot merge a loaded project.
- Enable inter-coder agreement mode: from the main menu, select PROJECT / ENABLE INTERCODER MODE.
- Merge the projects of coder 1 and 2. If there are more than two coders, repeat the process. (See Skills training 9.1: merging projects).
- Save the merged project.
A coding is the link between a code and a quotation. In the margin area, you can see which coder has applied which code to a quotation if you hover over a code.
For the following description, the project ICA_sample project merged_3 coders (Chapter 9) from the online resources page is used for illustration purposes:
To start the ICA analysis, select ANALYSIS / CALCULATE INTER-CODER AGREEMENT.
- Click on the Add User button and select two or more coders.
- Click on the Add Documents button and select the documents that should be included in the analysis. The default option is for all selected documents to be regarded as one continuum and all coded quotations of these documents will go into the calculation. You can, however, also view agreements / disagreements per document and get a coefficient for each document.
- Click on the Add Semantic Domain button and add one or more codes to the domain. See ‘Development Of Semantic Domains’.
- Repeat this process for each semantic domain.
After you have added coders, documents and codes, your screen looks similar to what is shown in Figure 9.17
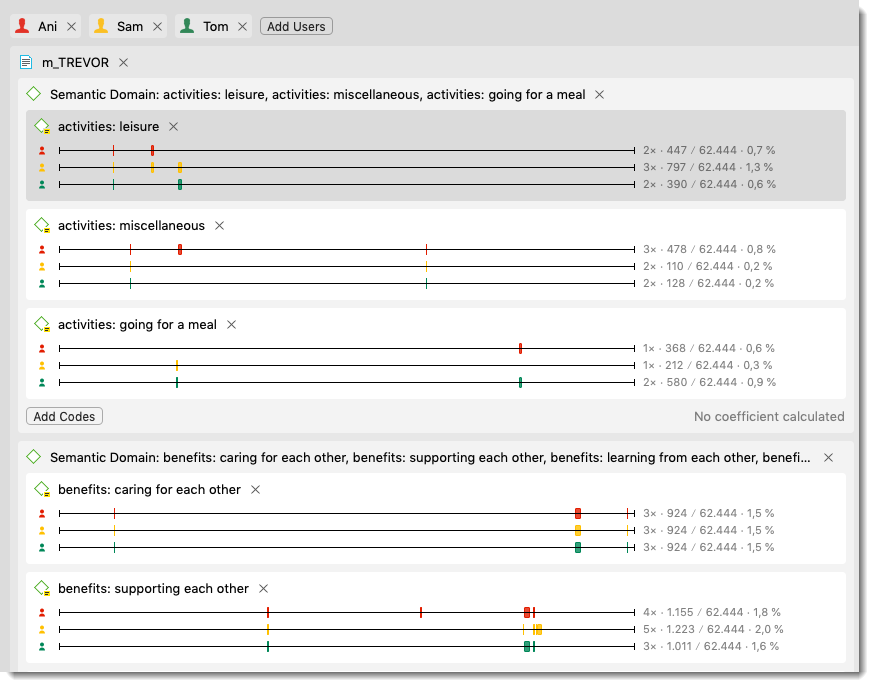
Figure 9.17: Entering coders, documents and semantic domains to the analysis
The numbers behind each line can be read as follows: The red coder (Ani) has applied the code ‘activities: leisure’ 2 times to 447 characters (=0.7%); the yellow coder (Sam) 3 times to 797 characters (=1.2%); and the green coder (Tom) 2 times to 390 characters (= 0.6%). The total number of characters in the analysis are 62.444. In version 2 of the ICA tool released with version 9 of ATLAS.ti, these numbers will no longer be displayed. Instead you will see the full matrixes that help you to better understand where coders agree and disagree.
You can remove coders, codes or documents from the analysis by clicking on the X.
| As there currently is no function to define a semantic domain formerly, all codes that you are adding from the list will be considered to belong to a semantic domain. As you can see in Figure 9.17, semantic domains were already built indirectly in the process of developing the code system by adding the same prefix to all codes that belong to the same semantic domain like ACTIVITIES or BENEFITS. Please remember that all sub codes of a semantic domain (i. e., all codes with prefixes) must be applied to quotations in a mutual exclusive manner. If multiple sub codes of the same semantic domain have been applied to a quotation, a Krippendorff's alpha coefficient cannot be computed. |
- When you select a sub code of a semantic domain, a quotation preview is displayed on the right-hand side. You can review quotations, write comments and export them.
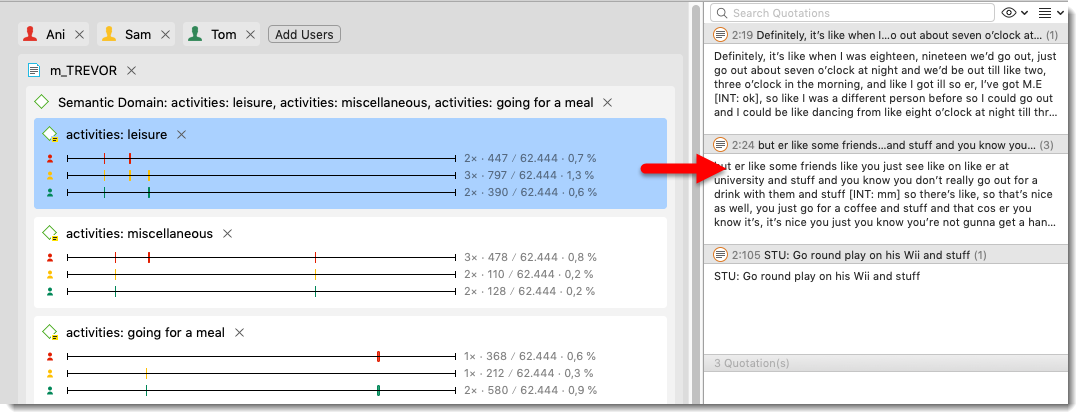
Figure 9.18: Quotations of a selected sub codes
- If you double-click, you can view the quotation in context. If this does not work, right-click on a quotation and select OPEN IN MANAGER. From there you can access the quotations in context of the document.
- When you hover over a code in the margin area, you see who has applied the code. This is useful for a qualitative comparison of the codings of the various coders.
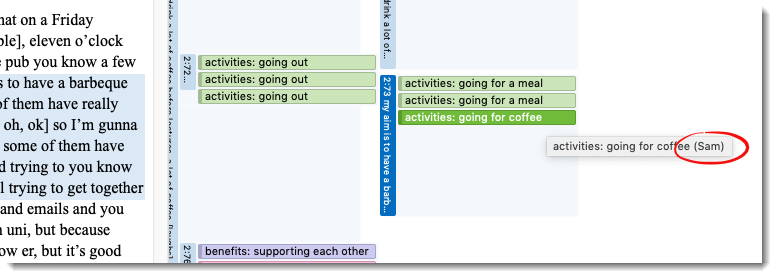
Figure 9.19: Viewing codings by coders in the margin area
Calculating an inter-coder agreement coefficient
To calculate a coefficient, select one of the four method. See ‘Measuring Inter-coder Agreement’ for more detail.
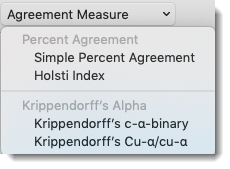
Figure 9.20: Available agreement measures
For the following analysis, codes from three semantic domains have been added: activities, benefits and characteristics.
Below the results of the Krippendorff's coefficients are explained in more detail.
ICA for relevance
- Select Krippendorff’s c-α-binary.
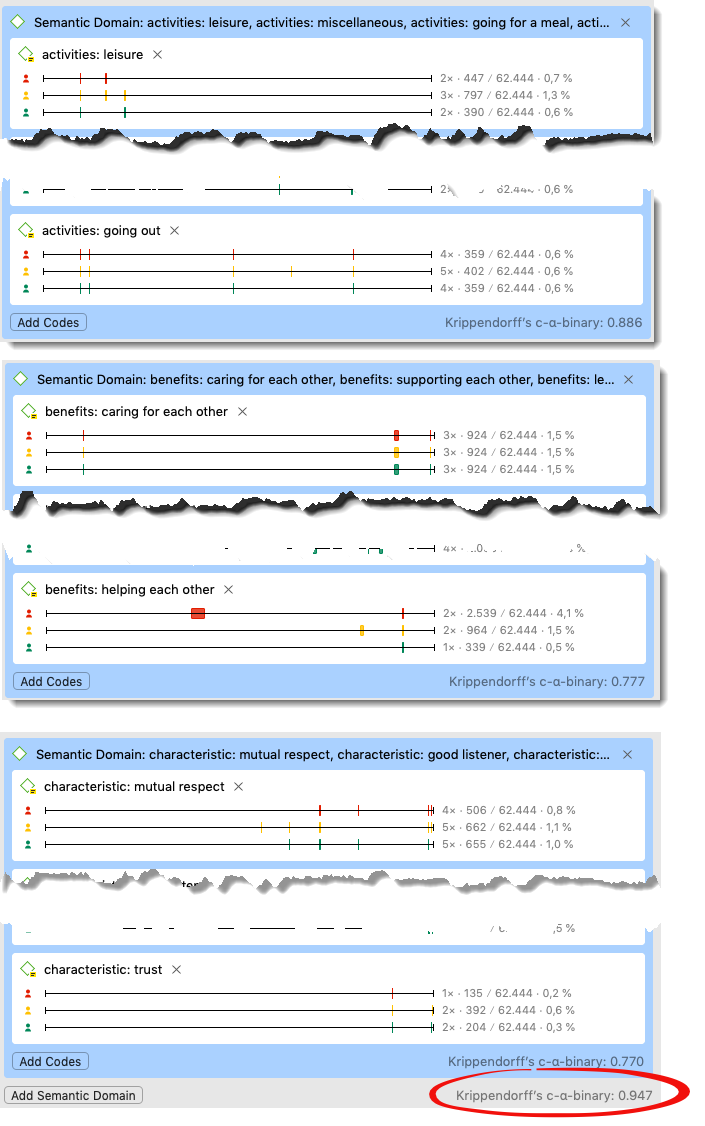
Figure 9.21: Measuring ICA regarding the identification of relevant / irrelevant matter
The c-alpha binary for the three selected semantic domains activities / benefits / characteristics in Figure 9.21 is 0,886 / 0.777 / 0.770. This means that the reliability for identifying relevant from irrelevant matter related to the codes of this domain is high. The overall coefficient for all semantic domains is 0.947. It is not simply an average of all other coefficient because it is possible to code the same or overlapping quotations with codes from different semantic domains (see ‘Multi-valued coding’).
| Version 2 of the ICA tool (released with version 9 of ATLAS.ti) will give you more information regarding where coders had problems understanding a code and its definition and how to apply it. Currently you only get a low agreement coefficient and you must check for yourself which codes lead to confusion and which ones were well understood. |
ICA for identifying an distinguishing between semantic domains
- Select Krippendorff’s Cu-α/ cu-α.
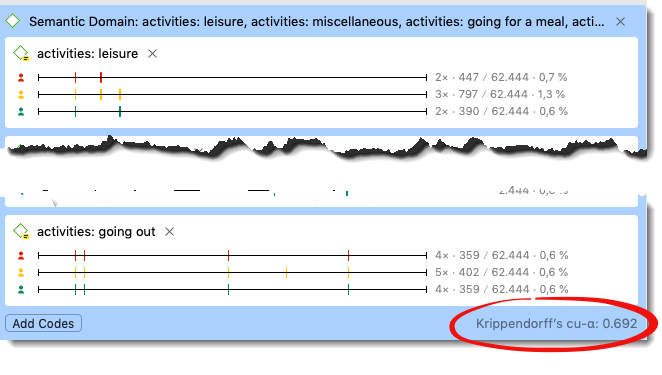
Figure 9.22: Measuring ICA for a semantic domain
The coefficient for the domain BENEFITS is acceptable, but there is some confusion. Given the current implementation we can only determine by looking through the quotations and check those instances where coders disagree in order to find the source of the confusion. This is necessary to improve the code definition if we want to obtain a better coefficient in a next round of coding.
If you click along and look at the cu-alpha for the domain CHARACTERISTICS, you notice that the coefficient cannot be determined. The reason for this is that some of the codes in this domain have not been applied in a mutual exclusive manner. You can find such instances with the help of the Code Co-occurrence Explorer. See page 282 in the book.
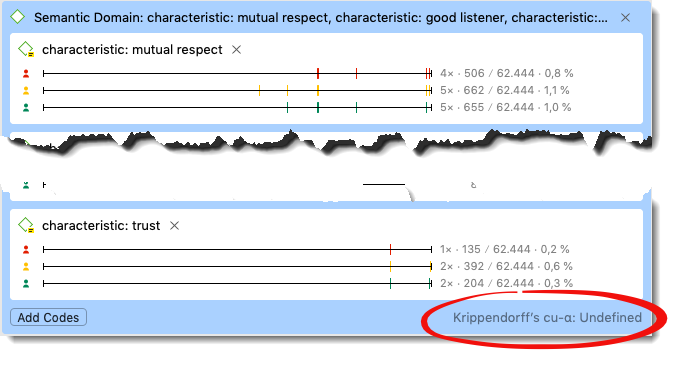
Figure 9.23: If non-mutual exclusive coding is violated
Below all semantic domains, an overall value is provided the (capital letter) Cu-alpha. This value tells you how well the different coders distinguished the various semantic domains, meaning they applied to the same data segments codes of the semantic domain BENEFITS rather than ACTIVITIES or CHARACTERISTICS; codes from the domain ACTITIVIES rather than BENEFITS or CHARACTERISTICS, and so on.