Products
Electronic Test Banks
ExamView
Download the ExamView Help Manual
Systems Supported
The following software and hardware specifications are required before using the ExamView Assessment Suite:
PC
- Microsoft Windows 7 and Windows 8 and Windows 10 (32 or 64 bit)
- Intel® Pentium® dual-core processor, 2 GHz or higher (or equivalent)
- 2 GB RAM
- 500 MB hard disk space
- Monitor capable of displaying 1024 x 768 or higher resolution
- An active internet connection to access your Turning Account, to utilize the content update feature and to publish an HTML test
Mac
- OS versions 10.9, 10.10 and 10.11
- Intel® processor 2 GHz or higher (or equivalent)
- 32 or 64-bit Kernel and Extensions
- 2 GB RAM
- 300 MB hard disk space
- Monitor capable of displaying 1024 x 768 or higher resolution
- An active internet connection to access your Turning Account, to utilize the content update feature and to publish an HTML test
How do I access and install ExamView?
Select titles include ExamView assessment suite via the instructor companion website. Navigate to the website and click on "Test Bank" in the left navigation. Download the appropriate zip file for Mac or PC depending on your operating system. Note that titles with SAGE Coursepacks include all publisher provided assessment questions within the coursepack.

The ExamView Assessment Suite software includes the Test Generator, Test Manager and Test Player.
The installer automatically copies SAGE provided question banks to a new folder within the Banks
folder. It may install an additional Publish folder for storing files that are needed for publishing
questions to the publisher-hosted server.
A free account with Turning Technologies at ExamView Account has to be created before installing the software.The first time you open the software, you are prompted to enter your name, school/organization name, city and state. This information is used to help identify the files you create. Enter as much information as possible. Each time you open the ExamView Test Generator software, the Welcome screen is displayed. You can choose to create a test using the Test Builder or enter your own questions using the Question Bank Editor.
To install the program, follow the on-screen prompts.The program installs the program to these paths:
PC - C:\Program Files\eInstruction\ExamView OR
C:\Program Files (x86)\eInstruction\ExamView
Mac - HD:\Applications\eInstruction\ExamView
If you have a later version of ExamView on your computer, the installer will automatically
install all ExamView content (question banks and tests) in the correct folders.
What question types are available in ExamView?
True/False, multiple choice, multiple response, bimodal, yes/no, numeric response, matching, completion, short answer, essay, case, and other question types are supported.
What is the Test Builder?
If you want ExamView Test Generator to choose questions randomly from one or more question banks, choose the QuickTest Wizard command to create a new test. Then, follow the step-by-step instructions to (1) enter a test title, (2) choose the question bank(s) from which to select questions, and (3) identify how many questions you want on the test. The QuickTest Wizard automatically creates a new test and displays it on the screen. You can print the test as is, remove questions, add new questions, or edit any question.
If you want to create a new test from scratch, select the option to create a new test from scratch. Enter a test title. You may then add questions to the test by using one or more of the following question selection options: Randomly, From a List, While Viewing, By Standard, By Criteria, or All Questions.
After you create a test, you can customize the appearance of the test by changing the number of columns, allowing for mixed question types, changing the order of the questions, editing test instructions, specifying the font and style for selected test elements, and choosing whether to leave space for students to write their answers directly on the test. The changes you make will not change the original question bank; your changes are only applied to the copy of the questions on the test you just created.
When you have finished creating your test, you can print it and/or save it. To print a test, you may select how many copies of the test you want, whether you want all the copies to be the same, whether you want to scramble the questions and the multiple choice options, and whether you want to calculate new values for dynamic questions. If you scramble the questions, a custom answer sheet is printed for each variation of the test.
What is the Question Bank Editor?
The Question Bank Editor allows you to edit questions in an existing question bank or to create new question banks. Always use the Question Bank Editor if you want to permanently change a question in an existing question bank.
You may edit questions in a question bank or add new questions by using the built-in word processor. The word processor includes many features commonly found in commercially available word processing applications. These features include the following: fonts, styles, tables, paragraph formatting, ruler controls, tabs, indents, and justification.
A question bank may include up to 250 questions in a variety of formats including multiple choice, multiple response, true/false, modified true/false, bimodal, completion, yes/no, matching, problem, essay, short answer, case, and numeric response. You can assign a difficulty code, reference, topic, and two objectives to each question.
How do I import tests in Word into ExamView?
ExamView allows test files in word format to be converted to test bank files through the ExamView Import Utility software. This is located in the path:
C:\Program Files (x86)\eInstruction\ExamView.
The file folder where our test banks are held is called “Banks” and the path on a PC should be:
C:\program files (x86)\einstruction\examview\banks.
Download the intructions to convert tests in word to ExamView test bank files:
![]() importing_word_test_files_to_examview.pdf
importing_word_test_files_to_examview.pdf
Note: The ExamView Import Utility Software is available only for a Windows PC not MAC.
In order to import the RTF files to a MAC PC, follow the steps below:
- Move your RTF files to a Windows machine.
- Use the ExamView import utility to convert the RTF files to question bank (.bnk) files. These files can be opened by the Windows version of ExamView.
- If you are using ExamView 6.2 or later, your ExamView question bank files (.bnk) are cross-platform files. You can open the files on a PC or Mac.
For more information, visit https://www.turningtechnologies.com/examview/quick-start-guides/.
Is this compatible with my LMS?
Using ExamView you can publish or export tests and question banks to popular learning management systems (LMS) that include:
- Blackboard 9.1
- Canvas
- Desire2Learn
- Moodle 3.1
- WebCT
The steps to publish or export a test/question bank and use those questions online differ depending on the destination LMS platform. Click here for detailed instructions on how to import test banks onto your LMS course shell.
Who do I contact for tech support?
If you have questions about the ExamView software, contact ExamView support at support@turningtechnologies.com.
Phone: 330.746.3015
Online Chat - https://www.turningtechnologies.com/examview/ and click the chat icon in the lower right corner to start a session.
If you have questions about assessment content provided by the publisher, contact SAGE at 1 (800) 818-7243 ext. 7080 or our Technical Support Form.
Respondus
Download the Respondus FAQs
Systems Supported
Operating Systems
Windows 10,8,7
Browsers
Chrome
Internet Explorer
Firefox
Safari
Memory
32 MB RAM minimum
Hard Disk Space
10 MB of free hard disk space for program files
Monitor
1024x768 or 1280x720 minimum resolution
Other Software Needs
An instructor must have Respondus. Many schools have site licenses.
How do I access Respondus?
Confirm if your school or instructional technology department has a site licence to the product. If you are unsure of the department or person at your institution responsible for this, send an email to licensing@respondus.com. They will provide you the contact information.
If you do not have access, Respondus offers a 30-day trial and single-user licenses are $79.00. Respondus is accessable at www.respondus.com.
How do I install Respondus?
First you must download the Respondus program to your computer.
Once the installation finishes, you need a password and the Product ID# to activate the installation. The Product ID# is presented to you the first time you open the Respondus program. You will receive the password once you have purchased a permanent activation password or a 30-day trial password.
You can obtain a password by following this link: http://respondus.com/download/respondus.shtml.
Follow either link shown on the screenshot below to register. You must provide an email address and the Product ID# that displays on the opening screen of Respondus. Once the information is submitted, the activation password is sent to the email address you specified.

Once the password is received, enter it into Respondus. Start Respondus and enter the password when prompted. You may want to copy and paste the password from the email message to prevent typing mistakes. Click "OK" to continue. The Respondus software is now activated.
Importing Tests Into Your LMS Using Respondus
How do I know if the book I’m using offers a Respondus test bank?
You can access our test banks via the Respondus Test Bank Network, which houses test banks for all publishers that work with Respondus. You can also download a Respondus test bank from the book’s companion website (if applicable). Instructions for downloading these test banks are on the password protected Instructor Site.
Is this compatible with my LMS?
Respondus 4.0 is compatible with the following learning management systems and industry standards:
- Blackboard Learn 9.x
- Brightspace 10.x
- Instructure Canvas
- Moodle 3.x
- IMS QTI 1.x
Demonstration videos via the Respondus website take you through these various LMS sytems. The Respondus user guides and instructions to use Respondus across various Learning Management Systems can be found at Respondus for LMS .
Does this feed my gradebook?
Respondus does not directly feed your gradebook. You are able to set up tests in your LMS that you can choose to feed to the gradebook. Depending on the LMS, you are able to retrieve custom reports such as student scores, summary statistics, and answer distributions as well as download answer databases and save them in Excel format.
I’m getting an error when I try to install Respondus. What do I do?
If you are running Windows XP, Windows Vista, or Windows 7, make sure to enable full administrator rights. For Windows Vista/7, the "full administrator rights" should go to the person who will be using Respondus after installation.
Next, make sure that your virus software is up-to-date and that there isn’t a virus on the computer. Check also to see if there is spyware running on your computer.
Finally, download the Respondus software again from the Respondus website (use a different download folder) and run the setup program again.
Respondus isn't connecting to my online course ( Blackboard, Desire2Learn, eCollege, Moodle). What should I do?
Consider the following items when troubleshooting this issue:
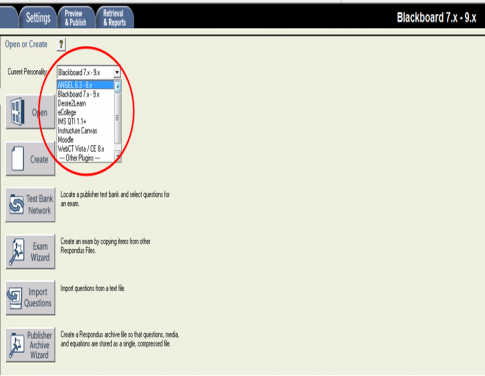
- Make sure you have selected the "user personality" in Respondus that matches your learning management system. For example, if you are using Blackboard Learn 9.x, you can't have the D2L personality selected.

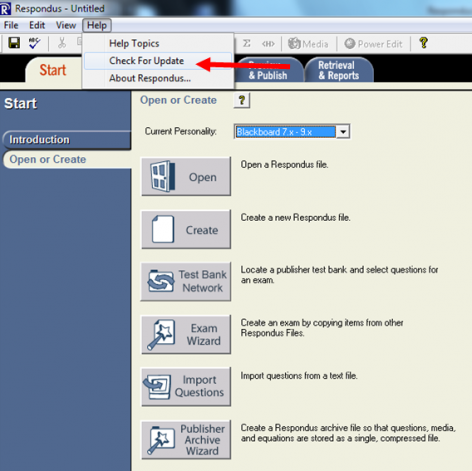
- Make sure that you are running the latest version of Respondus. Go to Help > Check for Update to see if you are running the latest version.

- Make sure your connection to the Internet is working properly. (Open a web browser and go to a couple of web sites to check this.)
