Using Software in Qualitative Research
A Step-by-Step Guide
Student Resources
Chapter 5 – Getting Started (MAXQDA)
Download the pdf for this chapter guide here.
In Chapter 5 to help get you started, we talk about productive things you can do in the early stages of setting up a ‘project’ in software. Experimenting with these processes where relevant in your chosen software will help to become familiar with useful entities in the software. Also incorporated here is information about data preparation to optimize data for auto coding where appropriate, as discussed in Chapter 4. See all coloured illustrations (from the book) of software tasks and functions, numbered in chapter order.
Sections included in Chapter 5:
Creating the software project
Transparency
Getting organized
Importing data
Cross referencing
Literature management
A framework of memos
MAXQDA11 and Case Study B – data preparation
Focus Group Transcripts
There is no necessity to carry out any substantial pre-editing of the transcripts before importing them into MAXQDA11 because the program has an editing function which can be used to correct minor errors later. However it may be helpful to check and correct paragraph markers first, as these are significant in the process of coding focus group speakers.
As shown in Figure 4.4.1, in MS Word the “Show/Hide” button on the Home ribbon can be used to switch on the display of formatting characters so that the paragraph markers may be checked. When the focus group transcripts are imported into MAXQDA11 the layout will be retained but the hard and soft returns will be recognised differently. It will be important that there is at least one hard return between each separate speaker in the transcript, whereas in the sample data there are some inconsistencies in this respect.
To see an example, open the Group2 transcript in MS Word and switch on the show/hide tool. Note how the lines near the top, with data about each participant, have soft returns to separate them – these should be replaced with hard returns. Note also how near the top of page 2, where the moderator asks “anyone else?” there is only a soft return before the response of R..53 starts – this displays adequately in MS Word but both speeches will be included in the same paragraph for autocoding purposes in MAXQDA11.


Figure 4.4.1 – Checking paragraph markers in MS Word
So, it is recommended that all of the focus group transcripts are checked for missing hard returns between speakers and re-saved to store all editing corrections before importing them into your data analysis project. After this has been done there will still be some other errors in these documents but it may be more instructive to find and correct them by using the tools in MAXQDA11.
Survey Data
MAXQDA has a straightforward procedure for importing the data collected in a survey into a project, but a small amount of data preparation is necessary to make this work. It is essential that the data is set up in a spreadsheet, such as MS Excel, with a single row for each case or respondent, and with the variables and question responses in columns. This has been done already in this example, in the file “Downturn survey – increased sample July 2012.xlsx” and this will be the starting point for this section
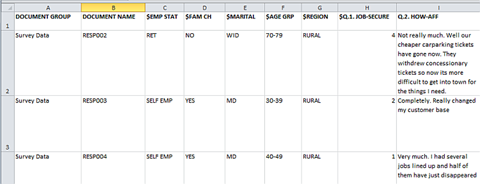
Figure 4.4.2 – Survey Data spreadsheet prepared for import to MAXQDA11
The first step as above, is to insert a new column at the extreme left of the spreadsheet so that it becomes column A. In cell A1 enter the text “DOCUMENT GROUP”. In cell A2 enter the words “Survey Data” and copy this into every row down column A to the bottom of the dataset at row 192.
The second step is to rename column B from “RESPONDENT” to “DOCUMENT NAME” by editing the text in cell B1. The identifiers down this column are in a valid format so do not need to be edited, but it may be worth checking to make sure that there are no accidental duplications in the list.
The third step is to identify the columns of data that will be treated as variables in MAXQDA and edit their heading labels in row 1 by inserting the “$” symbol at the beginning of each string. Thus the text in cell C1 should be changed from “EMP STAT” TO “$EMP STAT”. In general the only data that should not be treated as a variable will be the responses to open-ended questions, ie questions 2, 3A, 4A and 5, so these should be the only header labels that do not need the addition of the $ symbol. The $ symbol will not be displayed in MAXQDA11, it is merely an identifier to tell the import routine which columns of data should be treated as variables. The remainder of each label will be shown as the variable name in the program and so these labels should be short and clear, here “emp stat” is an abbreviation for “employment status”. Make sure that all of the labels are easy to understand.
At the completion of these simple procedures save the spreadsheet under a new name, as this will preserve the original source data prior to editing, and then close it. Figure 4.4.2 above shows a part of the file after editing.
MAXQDA11 and Case Study B – Creating a new project
There are no really disastrous pitfalls awaiting you in MAXQDA11 as you decide on a file structure for your project. In most cases of textual analysis all of the project data will be incorporated into a single file along with the analysis codes and memos, and this project file can be backed-up and moved to other locations in simple procedures.
It makes sense to have at least one unique folder for each project that you work on with the program. The main working copy of the project file should be stored there, and you may decide to store the original data files in that same location for simplicity but this is not essential. If you are working in an institutional setting with a network and central data storage then you may find it more convenient to have the working copy of the project file stored on your local computer’s hard drive and set the defaults so that back-up copies of the project are stored on the central storage drive. This is recommended because of the large number of times the program needs to access the project file as you work on it, which can sometimes give rise to frustrating delays if the program has to access the central storage drive for each new task.
Opening MAXQDA11 for the first time
When you first open MAXQDA11, probably by double-clicking on the program icon on your desktop, you will see a welcome dialog in which you should click “Next”. This opens a further dialog with two parts. In the upper part you are asked to enter your name as the “User” of the program, this is required as MAXQDA stamps all of the work that you do in each project with this user name, something that becomes very important when you start to work as part of a team or share your project with another colleague. Enter a short name or initials that will identify you within your organisation. The lower half of the screen will list recently opened projects when you have them, but on the first occasion you will have to select “create and open new project” to proceed. You then see a standard MS Windows dialog in which you will need to enter a project name and select a folder in which to save it. You need to do this even though you know you have no data in that project as yet, but you need to create the project file before you can bring the data into it.
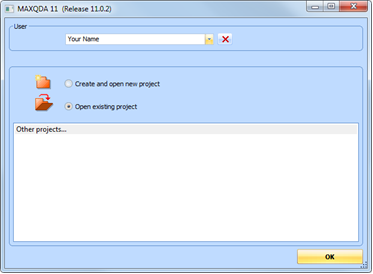
Figure 5.2.1 – Starting the program for the first time
- Set your own name in the “User” field
- The first time you start the program you will have to create a new project
- On subsequent occasions you can select an existing project from the list below to work on it.
Opening MAXQDA11 on subsequent occasions
Whenever you open the program you have to create a new empty project or open an existing one. The dialog screen will suggest the same user name as you used previously and the lower half of the dialog will show a list of recently opened projects, which makes it very easy to pick-up where you last left off with an ongoing project.
Backing-up, copying and moving a MAXQDA11 project
You can easily copy a project file to a new location by using the menu option “Project > Backup” and then opening the newly created backup version as your working copy. So initial decisions on naming and locating the project file are not too significant, at this stage you can afford to experiment. It is easy enough to check whether a file was created successfully by looking for it in Windows Explorer.
To check or alter the default settings, in an open project use the menu option “Project > Options”. In this dialog there are around 20 default settings. Only two of these concern file storage paths. In the first section, “General”, you will see a setting for “Folder for externally stored documents”. This setting is not relevant for the data in Case Study B, since this is all in the form of text based documents, but it is a setting that controls where the program will locate bulky multi-media or audio files that are in general not embedded inside the main project file. In the next section, “Automatic project backups”, you will see a setting for “Folder for backup files” as the last line in the dialog. This setting is worth thinking about and in particular it is probably worth directing your automatic backups to a folder in the central storage server so that most of your work is protected by all the centralised systems applied there. Editing the setting is simply a matter of typing in the full required path, or copy/pasting it from Windows Explorer.
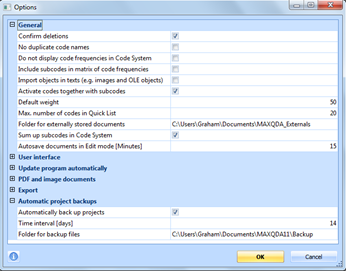
Figure 5.2.2 – Project Options Window
- Sections can be minimised or expanded using ‘-‘ or ‘+’ boxes
- Set path here for storing very large data files outside your project
- Set the default path here for system-prompted project back-ups
Note that when you make a back-up by using the “Project > Backup” option you have the opportunity to choose the file name and location for it. If you take this option the software will ask you which version of your project you wish to work in. Be clear in your own mind whether you are creating a back-up for fail-safe reasons or sequenced versions of working projects and answer the question carefully. As discussed in the Chapter 5, you should plan a systematic protocol for naming your back-up files so that you can easily revert to identifiable stages of the analysis, should you need to. When you accept the program’s automated suggestion that it is a long time since you last backed-up the project then a backup file will be created in the default backup folder using the current project name and an 8 digit date string.
More detail on Back-ups and Moving project files
Note that the program offers you an automatic backup procedure. By default you are asked after 14 days when you open a project if you want to backup it. If you say yes, MAXQDA saves a copy of the project to the folder “MAXQDA11_Backup”, and continues working with the opened file (not with the backup file). You can change the time period for this backup reminder and the file path in the “Project > Options” dialog (see the guidance in Chapter 5 Exercise 2 of these notes). We recommend that if you are working in a networked environment that you set this path to store your back-ups on the appropriate file-server, although you may well find it more convenient to have the working copy of the project file on your local hard-drive so that it can be accessed quickly and frequently without problems as you work.
The main working copy of your project file and all standard back-up copies have the file extension “.mx5” if you are working with MAXQDA11 or “.mx4” if you are using MAXQDA10. This is an indication that the back-up file is in the same format as the working copy of the project, so there is no need for a ‘restore’ type of function if you want to re-open a project from an earlier back-up, you can simply use the “Project > Open” option and navigate to the back-up that you want to use and open that.
Moving a project
When you have chosen “Project > Backup project” and you have pressed the “Save” button in the back-up dialog you will be presented with a new dialog asking if you want to use the new back-up file (“Do you want to open the saved copy and continue working with it?”). This provides a way of moving a project to a new location or giving it a new name, by running the back-up routine to that new location or new name and then using that new copy you achieve a direct move to the new file.
It is also quite possible to use MS Windows copy and paste functions to create a copy of the “.mx5” file which contains your project into another location, such as a memory stick for example in order to move it from a desktop to a laptop and continue working at home. All that you will have to do is to use the manual navigation dialog when you want to open the project in the new location because the “Recently-opened projects” list inside MAXQDA11 will not know about the copy and paste that you did outside the program.
TIP: A project that is opened in MAXQDA can’t be moved in the Windows Explorer or sent by mail, because it is locked. Please close the project file first.
Large items stored in the “Externals” folder
Backing-up is more complicated if you have some very large components in your data, such as audio or video data files, because these may not be held within the main project file.
All of the above guidance notes are based on the assumption that you are working with data like that in Case Study B on this website, ie data that is mainly text-based and that can be stored entirely within the single project file. If you have additional bulky audio or video files, say, that have not been embedded in the project file then you will need to use some additional functions that are available from the “Project” menu of options for identifying, bundling, and unpacking files in the “Externals” folder.
If you are still in your MAXQDA project – think about creating some structures to contain and organize data. See next exercise…..
MAXQDA11 and Case Study B – Document System groups
Creating a folder structure for source data
The Document System window will be found in your MAXQDA11 workspace above the Code System window on either the left or right side of the screen (depending on whether or not you have used the “Windows > Screen Layout Manager” to change the appearance of the workspace). In a new project it will look like Figure 5.3.1, below.

Figure 5.3.1
Note in Figure 5.3.1 how the green coloured bar with the words “Document System” also contains some toolbar icons for functions applying to the contents of this window only. These will be explained as they become relevant in later instructions, and this will be referred to as the “Document System toolbar”.
The first task is to create a “Document group” for each type of source data that will be used in the project. (Please note that more groups can be created at any time, and groups can also be merged and simplified later as well, so decisions taken at this stage are not irreversible.) Each group can hold multiple documents containing the data to be analysed. The purpose in creating these groups is to make it easier to find a specific data document when you have many sources to analyse. There are at least three equivalent ways of making a new group.
- Use the menu option “Documents > New Document Group”
- Use a right-click on the word “Documents” in the Document System window and select the option “New Document Group” from the context menu
- Use the third icon in the Document System toolbar (which is also illustrated in the menus of the other two ways)
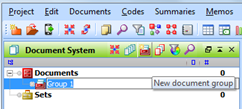
Figure 5.3.3
You now have a folder structure in the project ready to hold the example data.
There is no implied significance in the order in which the groups are listed in this illustration. At any time you can change the sequence by dragging a group up or down the list, or you can sort all of the groups into alphabetical order with a context menu option when you right-click on the Documents header. There is only one level of document groups, as shown here, but there is no hierarchy structure for groups within groups.
MAXQDA11 and Case Study B – Creating Memos to keep notes
Creating a Research Process Journal
In MAXQDA11 the Research Process Journal is called the “Logbook” and there is a dedicated function for it within the “Memos” option. Figure 5.4.1 shows this option and the beginning of such a journal with some comments added in the text field about how this function works.
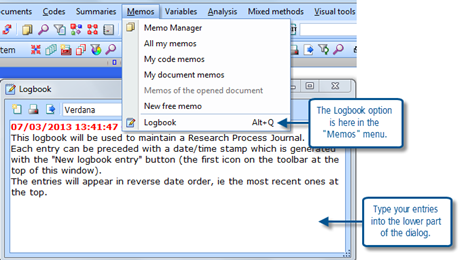
Figure 5.4.1 – Starting the Logbook
Note how you can open the logbook at any time with the option “Memos > Logbook” or the shortcut “Alt+Q”.
The first icon within the Logbook dialog window (with the shining star symbol used throughout MAXQDA to signify adding something new) creates a new line in the logbook and applies the current date and time automatically. This will be used to organise the entries so that the most recent item appears at the top of the list, which will be the most useful way to keep a diary of the procedures used in the project.
The next two icons are for printing and exporting the logbook, two functions which can be expected to be useful when keeping colleagues informed about what work has been done.
Creating Free Memos for Research Questions
There are several different types of memo that can be created in MAXQDA11, each with a different theoretical purpose. However these are not a straightjacket and fleeting ideas or insights can be noted quickly anywhere as they come to mind, and then moved to a more structured location later. Memos are the objects in the project file where you write your own words, as distinct from documents which contain your source data.
Most memos are attached to specific objects within the project because they have particular relevance to that object. But it is possible to have “Free memos” which are not related to any one item but are potentially relevant to all data. To create a free memo use the menu option “Memos > New free memo”.
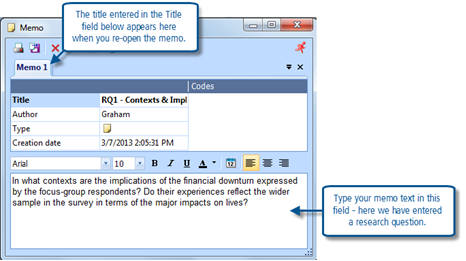
Figure 5.4.2 – Using a free memo for a Research Question
In Figure 5.4.2, above, two edits have been applied to a blank free memo:
- The Title field has been selected and “RQ1 - Contexts & Implications for FC respondents” entered
- The wording of the first research question has been typed into the main text field in the lower part of the window
This memo can be reopened as often as required so that further text can be added if more information or ideas about this research question arise. Each new memo is date stamped with its creation date. There is no need to use a save function, all edits are automatically saved whenever the memo window is closed (with either the Windows ‘X’ button or a click on the red running man icon).
On subsequent work sessions you can re-open this memo by using the menu option “Memos > Memo Manager” and then double clicking anywhere in its row in the table. If you create the research question memos before any others they will always be found easily at the top of the table when it is sorted by date of creation. (The Memo Manager window is illustrated at Figure 5.4.4 below after other types of memo have been demonstrated.) If you add further comments to a memo you can add a date stamp for each entry by clicking on the calendar icon in the formatting toolbar just above the main text field.
When the Memo Manager window is open, there is a “New free memo” icon in its toolbar which is an alternative way of starting an appropriate memo for each research question (See figure 5.4.4 below). An abbreviated version of the question would be useful as the memo title, for example we have used “RQ1 - Contexts & Implications for FC respondents” as the title for the first research question memo. You can type the full research question into the main text field in the memo window, where it will always be accessible during the life of the project.
Create other types of memo
All memos that are not free standing are attached to specific items in the project.
- Memos can be attached to any object in the Document System, ie a document, a document group, or a document set
- Memos can be attached to any item in the Code System, is a single code, the header of a group of codes, or a code set
- Memos can be attached to any location in a source document when it is open in the Document Browser, ie a line of text or a segment of an image
These are probably not yet available in your project as you may not have imported any data or created any codes so they will be explained later (in Chapter 6 Exercise 1). But you can now plan how you might use the 11 available visual symbols to distinguish different types of memo. These appear as variations on the small “Post-it note” symbol which shows where memos have been attached to your data.
Open one of the free memos you have created and click on the “Type” field where a plain post-it symbol can be seen. This will open a drop-down menu with the available symbols displayed, as shown below in Figure 5.4.3.
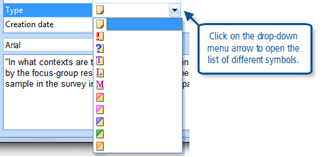
Figure 5.4.3 – Applying a memo type symbol
How you use these symbols is entirely up to you, but if you can use them consistently they will enhance your use of memos to organise your ideas.
The Memo Manager
Figure 5.4.4 shows an illustration of the Memo Manager window at a later stage in a project when a number of memos have been created for various different purposes. This shows how the different visualisation symbols appear in the first column. One memo has been highlighted in the list and its text is shown in the panel at the top of the window (this is a memo about a particular passage in one of the focus-groups which has prompted an idea in the analyst’s mind).
The New Free Memo icon can be seen in Figure 5.4.4 as the fourth from the left in the toolbar.
The table of data in the Memo Manager can be sorted on any of the columns with the standard Windows operation of clicking on the bar at the top of the column.
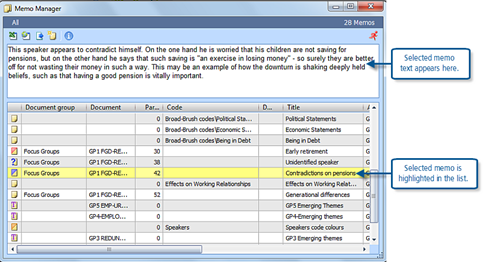
Figure 5.4.4 – The Memo Manager
MAXQDA11 and Case Study B – Creating documents inside a project for literature notes
Creating a new document in MAXQDA11
If you wish to use documents within your project to hold your notes and ideas from a literature review this can be done quite straightforwardly in MAXQDA11. As these documents will be held in the Document System alongside your source data it is worth considering how to name them and where to place them to keep the distinction between your ideas and the materials you will be analysing. At this stage we suggest holding such documents as notes on your literature review in the Bibliography group, although you may also decide to create a further document group for your own documents.
In the Document System window click on the group where you want to store the new document so that it is highlighted (in our example “Bibliography”) and then right-click in the same place to open the context menu, and select “Create document” from that menu. (With practice you can select the group and open the context menu with a single right-click). You will then see a small dialog asking if you wish to create a text or a table document (see Figure 5.5.1 below).
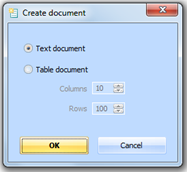
Figure 5.5.1 – Create a new document dialog
At this stage it is probably best to leave the default as the text document and press OK.
Several things happen quickly as the document is created in the Document System and opened in the Document Browser. Figure 5.5.2 illustrates this.

Figure 5.5.2 – Creating a new text document
In Figure 5.5.2, note the new document called “Document 1” within the “Bibliography” group in the Document System window on the left and highlighted in the blue bar. Note also how this group and name appear in the green header bar of the Document Browser window on the right (the green colour indicates which of the windows is currently active, so the Document Browser is now the active window). In this illustration the toolbar with the editing functions has been moved to a position just above the two windows in order to make it clear for the demonstration but in its default location it is just as easy to use. It is switched to edit mode as part of the process of creating a new document (see more explanation below).
You can start typing straight away in the Document Browser window as the cursor will be blinking ready for you. A few quick tests will show you how to use the formatting and editing tools in the toolbar, which work in ways very similar to other word-processing programs. However this is not a fully-blown word-processor so do not expect overly sophisticated functionality, but you can easily apply different fonts, bold, italic, and underline effects, and different colours to your text. These should be sufficient for most of your writing needs.
To rename the document move the mouse pointer back to the Document System window and right-click on the existing name label. From the context menu that appears select “Rename document”. This is illustrated in Figure 5.5.3, below.

Figure 5.5.3 – Renaming a text document
Note that Function key 2 could be used as an alternative to the context menu. When you select the rename option the cursor moves to the document label and allows you to type a new name in place of the previous one, as shown in Figure 5.5.4 below.
After renaming the document you can continue to edit it by adding further typing in the Document Browser window.

Figure 5.5.4 – Typing the new name
TIP: Note how you see different context menus when you right-click on a Document group header (such as “Bibliography” here) and a document name.
There is no need to make a special effort to save your edits as the program will store them automatically whenever you move onto another document. However, you should be aware that the undo function can only reverse edits made in the current session, so once you have gone to another document you will be unable to use that tool to correct a mistake.
The Code/Edit toolbar
The toolbar shown at the top of Figure 5.5.2 (above) may require some additional explanation as it changes appearance significantly between two modes of operation. In “Edit” mode it shows the word-processing tools, but in its other mode it shows coding tools. The mode can be switched by clicking on the “Edit” button at the left of the toolbar. Note in Figure 5.5.2 how that button is highlighted, whereas the same toolbar is shown in “Code” mode in Figure 5.5.5 below the edit button is not highlighted. When you create a new document inside your project, as we did earlier in this exercise, the edit mode is switched on automatically but you can toggle between the two modes at any time by clicking on the “Edit” button.
![]()
Figure 5.5.5 – Code toolbar with Edit mode switched off
At this stage no codes have been created in the example project and so none are available for display in the drop-down menu box, and the other buttons are similarly not active. These will be discussed extensively in the coding materials later.
In the Toolbar options menu this is called the “Code” toolbar and it can be turned on or off there. It should generally be kept turned on as it will be used frequently.
See next sections to experiment with importing data… see Chapter 4 sections if you need to revisit data preparation issues
MAXQDA11 and Case Study B – Importing data files
Importing focus group transcripts
Before importing the focus group transcripts make sure that you have followed the suggested procedures in Exercise 4 of Chapter 4 to replace “soft returns” with “hard returns” as paragraph markers in MS Word. Also make a note of the path and folder where the corrected versions of the data files are stored.
In your working project in MAXQDA11 select the group called “Focus Groups” in the Document System window so that it is highlighted with a blue bar, this ensures that the data will be brought into the correct location. There are three possible ways to start the import routine, each has the same end result as the others so it is a matter of personal preference which you use:
- Use the main menu option “Documents > Import document(s)”, or
- Right-click and use the context menu option “Import document(s)”, or
- Use the short-cut keystroke “Ctrl+Shift+T”
The three options each open the same dialog window in which you can navigate to the folder where the corrected transcripts are stored, select as many document files as you wish, and complete the command by clicking on the “Open” button.
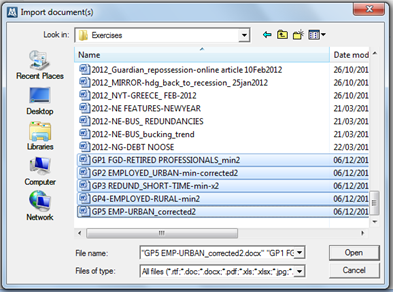
Figure 5.8.1 – Import Document(s) dialog
In Figure 5.8.1, above, all five of the focus group transcript files have been selected (using standard MS Windows commands: Ctrl and Shift key) as shown by their being highlighted. A click on the “Open” button will complete the operation and cause all five data files to be imported into the project. The Document System window should then look something like that in Figure 5.8.2 below.
If you are not happy with the location where your data files have appeared you can always move a document to another group within the Document System by left-clicking on it and dragging it to a new location. There are also two sorting options in the context menu when you right-click on a group header in the Document System window, alphabetical and reverse-alphabetical order.
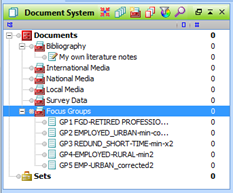
Figure 5.8.2 – Document System window after importing focus group files
The focus group transcripts are now available to work on within your MAXQDA project. Please note that this routine has copied the data from these files into your project file and there are no links to the files from which that data came, so those source files can be deleted or moved without any disruption to the data in your project.
There will be more work to do on these focus group documents to make them more useful in the project, those procedures will be explained in Exercise 10 of this chapter.
Importing survey data
Make sure that you have followed the procedures in Exercise 4 of Chapter 4 to ensure that the survey data is in the correct format for use with MAXQDA11, and make a note of the location of the corrected spreadsheet file with that data. You start the import process by choosing “Documents > Import documents from spreadsheet” from the main menu. This is the only location for the function that is needed here, there is no short-cut icon or context menu option for this, you have to start in the Documents menu at the very top of the screen.
The first dialog outlines the procedures required to prepare the data, as we have done this already simply press the “OK” button to proceed. The second dialog box requires you to navigate to the file where the survey data has been saved and open it. A small dialog then appears with the question “Ignore empty cells?” – we suggest that you answer “Yes” to this question as it will lead to a faster process than the alternative. (If you answer “No”, then a blank response will be created and coded for every empty cell, or non-response). The next dialog shows you all of the columns from the spreadsheet which have been identified as variables along with the target type (which seems to default to “String” in every case) and an example of the data content. It may be worth editing the variable “Q1. JOB SECURE” to target type “Integer” by double-clicking on that cell in the dialog and using the drop-down menu that appears. Check that all of the variables that you expect to be imported appear in this list (see Figure 5.8.3 below).
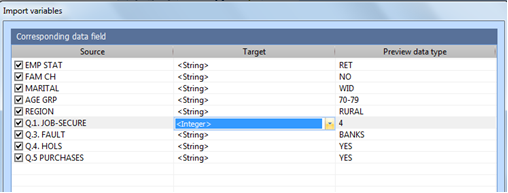
Figure 5.8.3 – Editing variable types during survey data import
When you are ready, click on the “Import” button and watch the counter display to check the progress as it counts up the number of cases imported (there are 191 in Case Study B). At the end of the routine an information screen appears telling you the quantities of data that have been processed. This is shown in Figure 5.8.4 below.
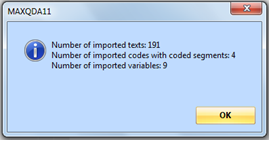
Figure 5.8.3 – Editing variable types during survey data import
The interpretation of this dialog is that 191 cases have been brought into the project, corresponding to the 191 rows of data in the spreadsheet. The 4 imported codes and their segments are the text responses to the four open-ended questions in this survey, this is the qualitative data element of the survey. The 9 variables are the other data columns from the spreadsheet and represent the more quantitative elements of the data.
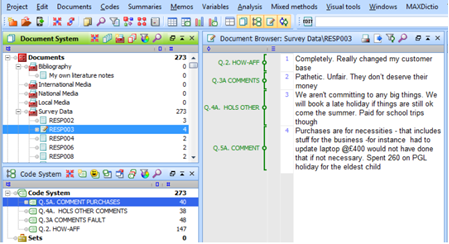
Figure 5.8.5 – Project screen after importing survey data
In Figure 5.8.5 we can see several details of the survey data import. Before this screenshot was captured one survey response (“RESP003”) was opened in the Document System with a double click so that their responses to the open questions could be seen in the Document Browser, this helps to demonstrate some features of the survey data import procedure.
- In the Document System window note how the respondents are identified with the labels that were stored in the second column of the spreadsheet. In accordance with normal survey methods these are fully anonymous
- Also in the Document System window note that, at this stage of the analysis, the number appearing to the right of each respondent indicates how many of the four open questions they have answered. When thematic analysis codes are applied to the survey data these numbers will increase because they simply show the number of codes currently attached to each document, but at the moment only the question identifying codes have been applied
- In the Code System window note the four new codes that have been created during the data import routine, one for each question, using the labels at the head of each question column in the spreadsheet. These may appear in reverse order because each new code was added above the previous one during the import routine, they can be simply re-ordered when we put them into a separate group (as described below)
- Also in the Code System window note the numbers appearing to the right of each question code, these indicate how many responses have been captured for each question. So only 40 people provided a response to question 5A, while 147 answered question 2
- In the Document Browser window we can see all of the responses provided by respondent 003, someone who did answer all 4 open questions. Here, in the code margin to the left of the text, we can see green code brackets indicating how the question codes have been applied to the texts
- TIP: It is not essential, but may be helpful later, if you rearrange the question codes into a small hierarchical group within the Code System. When you are not using the survey data you can then minimise that code group to save screenspace, and there may be operations when it would be simpler to work with the whole group as a single unit.
Creating a group for the survey question codes
Strictly speaking, what we suggest doing here is to make the survey question codes into “sub-codes” of a new header code (there are no “groups” as such in the Code System). In the Code System window select the top line (“Code System”) and right-click to bring up the context menu as shown in figure 5.8.6 below.
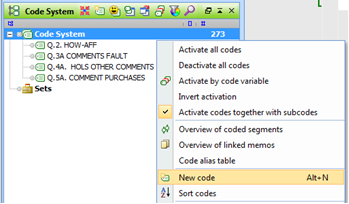
Figure 5.8.6 – Create a new code to use as a group header
In the context menu select “New code” with a left-click, to open the dialog shown in Figure 5.8.7, below.
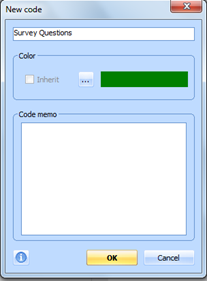
Figure 5.8.7 – New code dialog
Type in text such as “Survey questions” in the empty field at the top of the dialog (as shown here) and leave the other fields unchanged, then click on the “OK” button.
A new code will appear in the Code System window just above the question codes. You can now drag each of the four question codes onto this new code so that it becomes the head of a small hierarchy. Just hold the left mouse button down after clicking on a question code while you drag the pointer onto the header code and then release the button. Start with the code for Question 5A, then work up the table through Q4A, and Q3A to Q2, because in this way the codes will end up in ascending order in the new group.
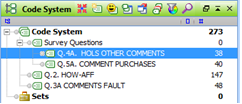
Figure 5.8.8 – Re-ordering the survey question codes inside the new group
Figure 5.8.8, above, shows the screen part way through this operation. Questions 5A and 4A have both been dragged into the group and appear inset to the right beneath the Survey Questions header, while Questions 2 and 3A have yet to be moved.
TIP: You need to make sure that the header code is highlighted with a blue bar when you release the button at the end of the dragging procedure for the code to be moved into the hierarchical group. If the code icon remains in line (vertically) with the header code it is not in the group but is following it.
TIP2: When you have got all four question codes into the group it is possible to reorder the whole group into alphabetical order with a context menu option “Sort subcodes” after a right-click on the group header code.
Adding the question wording with code memos
It may prove useful later in the analysis to be able to see the wording used for each question. This can be done quite simply in MAXQDA11 by using a memo attached to each code in the Code System window.
Select the code label for “Q.2. HOW-AFF” so that it is highlighted in the Code System window, then right-click on it to bring up the context menu and select “Code memo” from near the top of the menu. This opens a new dialog into which you can type the full wording of the original question that was asked in the survey instrument (“How have you been personally affected by the financial crisis?”). This is illustrated in Figure 5.8.9 below:
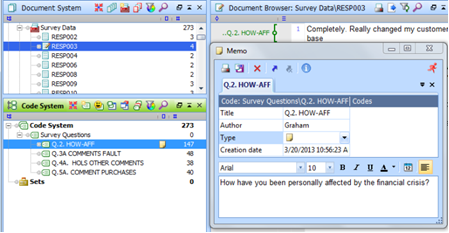
Figure 5.8.9 – Using a code memo to store survey question wording
In Figure 5.8.9 note the small memo icon which has appeared alongside the label for this question in the Code System window. Whenever this code is visible in the Code System window it will be possible to read the memo simply by holding the mouse pointer over this icon, the question wording will then appear in a small temporary panel in that part of the screen.
Importing Newspaper files
The routines for importing the newspaper files are essentially the same ones as were used to import the focus group transcripts. This operation will now provide some useful additional practice in some related functions.
At Exercise 3, earlier, we suggested that you create 3 document groups to hold the newspaper files. These groups were “International News”, “National News” and “Local News”. During the import routines now it is probably best to import one group at a time directly into its correct location in the Document System. Note that if any document is incorrectly identified and located it can be dragged to another group to correct the mistake. Note also that it is quite possible to rename a document inside MAXQDA11 to resolve any ambiguities.
TIP: It is not necessary to open documents with a word-processing program to check their contents or to rename their files before importing them into MAXQDA11, both of these operations are easily done within the project.
We suggest that all of the files with “CNN”, “NYT” or “USA” in their names, along with the internet blogs are imported into the International News group. Those with “BBC”, “Sun”, “Mirror” or “Guardian” in their names go into the National News group. And those with “NE”, “EG”, “NG”, “LT” and “TIL” go into the Local News group. Part of the resulting set-up in the Document System is illustrated in Figure 5.8.10 below.
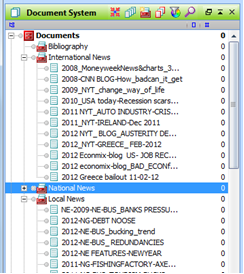
Figure 5.8.10 – Newspaper file groups
In Figure 5.8.10, note that the group for national news documents has not been expanded, but a click on the “+” box to its left will enable all of its contents to be seen.
Amongst these files is a document which is currently labelled as “2011_27-10-11 Eur dilemmas”. This name is ambiguous, giving no clue as to which group it should belong in, and this may prove unhelpful during analysis later. If you open it with a double-click a quick check in the Document Browser will show that it is a BBC News item. If it was initially put in the international group you can drag it into the national group. It can also be renamed by using an option from the context menu after a right-click on its current label, “Rename document” and inserting “BBC News” in place of the date “27-10-11”. If any other files are similarly unhelpfully named or misplaced you can correct them, too.
Importing the Bibliography document
The final document to be imported is the one containing a bibliographic list of books and articles already identified as relevant to the research project. The file “Case studyb_BIBLIOG-PART” can be brought into the “Bibliography” group in the Document System. After importing this document it should be opened inside the project to see how a couple of example html links to external data sources have been imported successfully.
Tip: You can also import the file (like every document MAXQDA can handle) with drag and drop from the Windows Explorer into the Document System window.
There is another Exercise which follows immediately – but this is replicated in the Chapter 12 exercises. It is all about organizing speaker sections and assigning attributes to individual speaker-based codes. These are quite advanced steps. You can do this now (some intermediate exercises may refer to things achieved here) or you can easily wait and do it later.
So from here you could go in many directions –
to Chapter 6 exercises to work at data level, annotating data, linking and searching ,to Chapter 7 to begin coding, to Chapter 12 exercises to begin organizing the focus group speakers by auto coding and assigning attributes.
MAXQDA11 and Case Study B – Adding speaker attributes
The first step in adding the personal attributes of the various participants in the focus groups is to apply a unique code for each speaker to all of their contributions to the discussions. The second step is to add their attributes to these codes. It will then be possible to use those attributes to retrieve sections of the transcripts selectively.
Coding focus group transcripts to identify the speakers
The outline procedure is as follows:
- In the Document System of your MAXQDA project, open the first focus group transcript
- For that first transcript/focus group, identify the speakers and the IDs used for them
- In the Code System, create a header code called “FG Speakers”, and then a code for each respondent in the focus group beneath it
- Use the lexical search function to identify all the paragraphs beginning with one speaker’s ID and then autocode that set of segments with the code for that speaker
- Repeat step 4 for each speaker in turn
- Check the transcript to locate uncoded text, identify the particular error which arose in each of these segments, correct that error where possible and correct the coding
- Repeat steps 2 to 6 for each remaining focus group transcript, but make all of the speaker codes as sub-codes of the single header code
Some more detailed notes on these steps follow:
Step 1: Open the document
Expand the Document group “Focus groups” by clicking on its “+” box (if it is not already showing the five transcript documents). Double-click on GP1 and see it appear in the Document Browser window.
Step 2: Identify speakers
When you start to look at the speaker identifiers in the transcripts you will observe that several different naming conventions have been used (“R-RP24”, “R..16”, “R-X064”, “R-RUR08” & “R-EMP19”). This is not a problem, so long as there has been consistency within each group’s transcript. It is recommended that you use some more standardised convention for the code labels that you will attach to each speech so, at step 3 below, it may be helpful to include some demographic information in each code. For example in group 1 the code label for participant R-RP382 might be “#382-M-60s” and that for R-RP06 might be “#006-F-50s”. These code labels can always be displayed in the margin beside the transcript and in that way the age and gender of the speaker will be apparent.
Step 3: Create codes for the speakers
To create the header code, in the Code System window click on the top code (“Code System”) and start the new code dialog in any one of three possible ways:
1) Right-click and select “New code” from the context menu
2) Use the new code icon in the toolbar within the Code System window
3) Use the keyboard short-cut “Alt + N”.
Figure 5.10.1, below, shows the dialog with a suggested label and code memo completed.
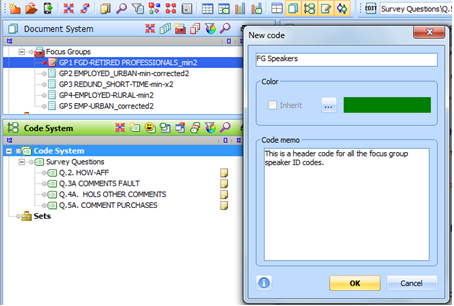
Figure 5.10.1 – Creating a new code for Speaker IDs
When the “OK” button is clicked a new code is created at the same level as the “Survey Questions” code. Click on this new code label now so that each new speaker code becomes a sub-code of this one, and start the new code dialog again.
By carefully arranging the screen and the dialog window you should be able to read the relevant data at the top of the focus group transcript to help you create the correct code label for each speaker. Figure 5.10.2, below, shows this towards the end of creating the codes for the first focus group.
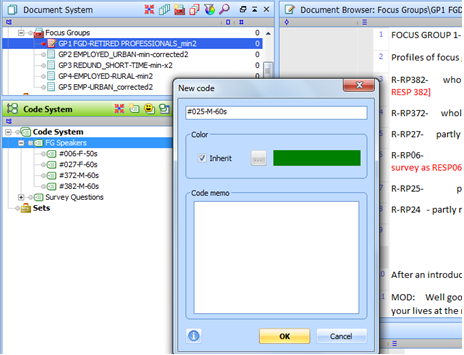
Figure 5.10.2 – Creating focus group ID codes
Note in Figure 5.10.2 how the new codes are ‘hanging’ under the “FG Speakers” header code, so that they are its sub-codes. (The “Survey Questions” sub-codes have been minimised to help keep the screen simple).
There is no particular advantage in changing the colour of the codes used to identify the speakers at this stage, they may as well simply inherit the default green colour. There should be more scope for creative uses of colour in the thematic coding of the analysis so, unless you have a particular idea in mind, it is recommended that you keep these structural codes all one colour.
TIP: Note that it will be a simple task later to change the colour of all the speaker codes to a different colour in one operation if they are all sub-codes of a single header code.
Step 4: Use lexical search and autocode to code one speaker’s statements
The lexical search function can be found in the “Analysis” menu, or by using its magnifying glass icon on the main toolbar. Before starting this option, first “activate” the transcript document to which you wish to apply speaker codes (Ctrl + click on its name in the Document System window or right-click on its name in the Document System and select “Activate” from the context menu). If this is the first time you have encountered the concept of activation in MAXQDA11 note that it is something like a filter and is not related to whether a document is open in the Document Browser window.
TIP: In Figure 5.10.2 above, the top focus group document has been activated and so its icon appears red in the Document System window and has a red diamond to its left.
An illustration of the Lexical Search dialog is shown in Figure 5.10.3. Note that the search string specified in the main box should be the one used for a particular speaker in the transcript. The tick in the option “Only in activated documents” works with the activation suggestion above to limit the search to the single document where that ID is expected to be found.
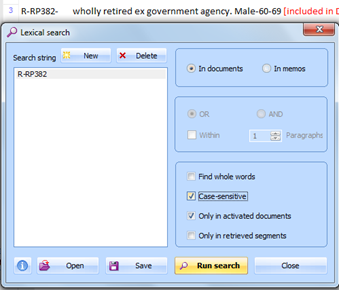
Figure 5.10.3 – Lexical Search for speaker IDs
In the dialog shown in Figure 5.10.3 note the following points.
- Use the Delete and New buttons at the top to clear a previous search and set-up the next one
- Use the exact IDs from the transcript for each speaker (“R-RP382” in this example) as the search string
- Tick the “Case-sensitive” box for this type of search
- The “Only in activated documents” option works with the activation setting to speed up the operation by restricting the search to just the documents where you expect to find this string. Without this option the program would search all of the data for every search, which would be much slower
- The “Run search” button at the bottom of the dialog will start the operation
- There is no need to save a search of this type, you would not expect to want to repeat it
When the search is run, a new window opens to display the results, this works interactively with the Document Browser panel to highlight the text of any selected ‘hit’ in its source context, so you can quickly check the accuracy of the search by checking a sample of the hits. See Figure 5.10.4 for an illustration.
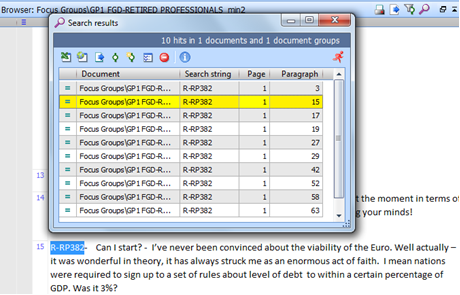
Figure 5.10.4 – Search Results window
The search results in Figure 5.10.4 show that the ID string was found 10 times in the one document that was searched (see the dark blue bar with “10 hits in 1 documents …” near the top). The 10 hits are then listed along with the paragraph number where each was found. One of these has been selected with a left-click, so it is highlighted in yellow in the results window and is shown in context in the Document Browser window (which is partly visible behind the results window). Note the paragraph number (15) in both places.
If necessary you can check each hit in turn by selecting it in the results window and reading it in the Browser window.
A click on the autocode icon (4th from the left in the Search results window) brings up the autocode dialog as shown in Figure 5.10.5. You need to select the correct code for this speaker in the drop-down menu within the autocode dialog (not in the main coding toolbar at the top of the screen – note in Figure 5.10.5 how these are showing different codes, and we need to use “#382-M-60s” for this set of search results and this appears in a white font in the blue bar within the autocode dialog).
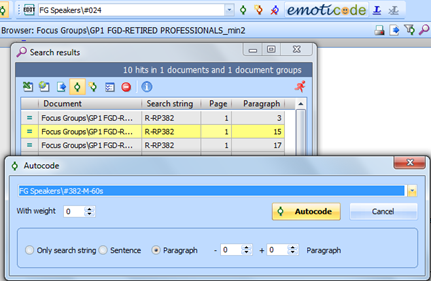
Figure 5.10.5 – Autocoding the speaker’s paragraphs
If the code you require is not available in the short list in the drop down menu (which shows the most recently created or used codes) simply cancel the autocode dialog, click once on the required code in the Code System panel, and then re-start the autocode command from the Search results window – the required code should now be offered in the dialog without any need to use the drop down menu.
It is important at this stage to select the “Paragraph” option as shown in Figure 5.10.5. This works with the hard return markers that were checked immediately before importing the transcripts into MAXQDA11. For each search hit, the code will be applied to all the text between the hard returns before and after the hit.
When you click on the highlighted “Autocode” button all of the hits in the current search results window will be coded with the same code and you will see a small dialog box telling you how many segments have been coded in this operation (in this example it is 10 hits). The Search results window remains open but you will now be able to see the green code brackets in the code margin within the Document Browser window beside each paragraph for that speaker. And the 10 applications of the code are represented by the number appearing beside the code in the Code System window. See Figure 5.10.6 below for illustrations of these points.
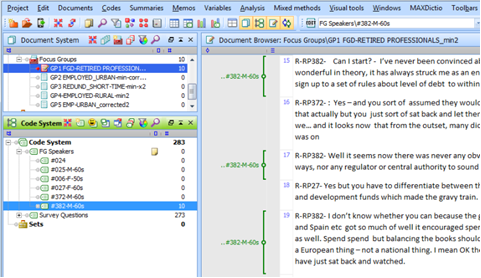
Figure 5.10.6 – After autocoding for one speaker
Step 5: Repeat step 4 for each speaker in turn
The next step is to autocode the speeches of the second participant in the focus group. You do not have to close the Search Results dialog after autocoding for each speaker as you open the Lexical Search dialog again. You will need to use the Delete button to clear-out the previous search string followed by the New button to set-up the next search string. When you click on “Run Search” the new set of result hits appears in the Search results window.
You may need to select the correct code for each speaker in the Code System window before clicking on the Autocode icon in the Search results window to make sure that it is available in the autocode drop-down list of recent codes.
Continue repeating the Lexical Search and Autocode routines for each speaker in the focus group transcript document.
Step 6: Check the accuracy of the autocoding process
After autocoding the 6 speakers in the first focus group, scroll down the transcript in the Document Browser panel and observe how most of the paragraphs have one code bracket showing. You may consider coding the moderator’s speeches (maybe with code “Mod”) so that they can be identified systematically later, possibly in order to exclude them from some later analysis.
But you should also observe that some paragraphs remain uncoded, for example paragraphs 33, 36 and 38 (paragraph numbers may be different in your data if you have edited more of the soft returns before importing the document). These represent data without a recognised speaker. In some places this is because a paragraph begins without any speaker identifier, in others it is because an identifier has been used that is not included in the summary at the start of the transcript. You may feel able to use your own judgement to edit these, in this example it seems clear that paragraph 33 is a continuation of the previous speech by the same speaker (RP027).
If you look in the Code System panel you should see that the code for speaker RP06 has only a single application (it is in the summary table at the top) so this person does not appear to have said anything in the meeting. But it also seems possible that the transcriber has mistakenly used ID “R-RP26” (who is not listed) in place of this person. You might consider manually applying the code for 06 to the two contributions attributed to 26 near the end of the document, if you think that such a mistake has occurred.
If you want to edit the actual text in the document this is possible within MAXQDA11. The Edit button in the coding toolbar allows you to toggle between edit mode and coding mode. When you click it to go into edit mode the coding icons disappear and are replaced with word-processing function icons. Any changes that you make are saved as you go along but there is an undo function available if you change your mind, however once you leave edit mode that undo function can no longer reverse edits made in earlier editing sessions.
Step 7: Repeat steps 2 to 6 for the remaining focus group transcripts
Before starting to repeat the above processes on the second focus group transcript take care to reset the activations (use the 4th icon from the left in the main toolbar) and then activate the next document as well as opening it in the Document Browser – remember that opening a document is not the same thing as activating it, these two actions have different meanings.
There seems to be little advantage to be gained from making separate sets of sub-codes for each focus group, so continue creating the new speaker codes as sub-codes of the “FG Speakers” code, and let them all inherit the default colour green.
There are several deliberate errors in these transcripts which may be used to practice the techniques of finding and correcting mistakes. In particular the number 8 has been used in three different focus groups (2, 3 and 4) but may not be the same person and so it will be necessary to adjust the code labels for these so that they remain separately identified.
If you make a mistake, say by hitting the Autocode button with the wrong speaker code, there is an “Undo” function for recent coding actions. The “Undo code” icon is on the main coding toolbar (a blue bracket symbol with a red X, just to the left of the Emoticode button) and this can undo all of the applications of a recent autocode operation very simply. (See Exercise 10 of Chapter 7 for more material on unlinking codes from data).
Adding attribute data to focus group speaker codes
When you have coded and checked all of the focus group transcripts to identify the speakers it is possible to set up code variables to hold the characteristics of those speakers in a way that the program can use for filtering and sorting operations. The basic stages in this procedure are as follows:
- Open the “Data Editor (code variables)” option from the Variables menu
- Toggle the display to the “List of Variables” view and then add new variables as required
- Toggle the display to the “Data editor” view and then populate the table with the appropriate values for each code which represents a focus group speaker
More detailed notes on the above steps are set out below:
Step 1: Open the Data Editor for code variables
The Variables menu has two sections in MAXQDA11, the top section is for document variables and the lower section is for code variables. Document variables are used when each document in a subset of the data can be identified with a single case, these variables then store the attributes of that case. Code variables are used when a set of codes have been set up to identify individual speakers in focus group transcripts, in this situation each code represents a case and these variables then store the attributes of those cases.
So select the main menu option “Variables > Data editor (code variables)”.
Step 2: Add new variables
The dialog box has two displays and it is easy to switch between them by using the fifth icon from the left in the toolbar within the dialog (with label “Variable view” when the mouse pointer hovers over it). In the “List of code variables” view, the sixth icon from the left is used to create a new variable – see Figure 5.10.7 below. New variables can be defined with a choice of types between string, integer, floating point, date/time, or Boolean, and there is an option to define a value for missing data.
TIP: In the “List of code variables” view it is useful to deselect most of the system variables in the column “To be displayed” so that more screen space is available to view the user-defined variables in the “Variable view” display.
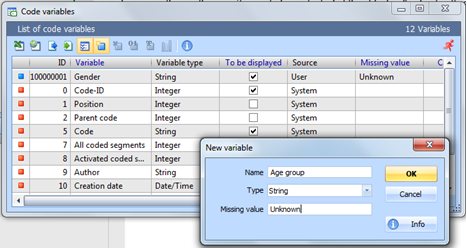
Figure 5.10.7 – Creating new Code Variables
Step 3: Enter variable values for each speaker
Having created new variables for gender, age-group, work-status, and job-title (all as type = string), then toggle the “Variable view” button to switch to the “Data editor” view. By carefully positioning this dialog box so that the header data for the first focus group can be seen in the Document Browser panel behind it, you should be able to read the necessary information as you need to enter it into the data fields in the dialog box. This is shown in Figure 5.10.8 below.
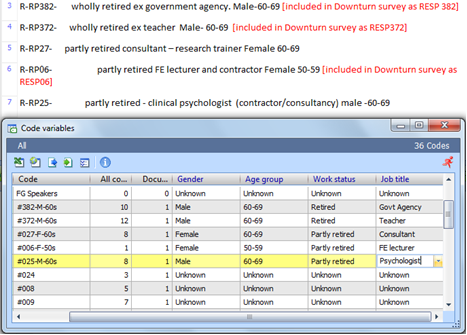
Figure 5.10.8 – Entering values for code variables
It is slightly more difficult to work along the rows in the Code Variables dialog than it is to work down a column, so you may prefer to summarise the data on a sheet of paper first. When a value has been typed into a variable once it becomes available in the drop-down menu for re-use with other cases (and will also be offered as a default when its first letter or two are typed). Also, you may find it useful to re-sort the codes by the first column (“Code ID”) so that they are listed in the sequence by which they were first created as that will match the order in the transcript documents.
It will soon become apparent that there are many gaps in the attribute data for the focus group participants but it is still worth recording what is available.
When all of the available data on the focus group speakers has been recorded in the Code Variables it can be summarised and checked with the menu option “Variables > Statistic of code variables”. On the first screen select all of the new variables that you have defined and move them into the box on the right-hand side under “selected variables” then click on “OK”. By default the first display is a frequency table of the first variable (probably gender). You can switch to the other variables with sideways scroll arrows or a drop-down menu, and you can switch to a graphical display by clicking on the “Chart view” button in the toolbar.
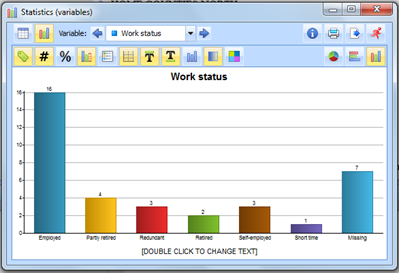
Figure 5.10.9 – Chart view of code variable statistics for Work status
The value of recording these code variables is that it is now possible to use the option “Activate by code variable” to extract all of the paragraphs spoken by participants who share some chosen characteristic, such as being retired, or male, or working in the health service. This will be even more useful at a later stage when thematic codes have been applied and can be used in the filtering process.
Graham Hughes and Stefan Radiker 2014
