Using Software in Qualitative Research
A Step-by-Step Guide
Chapter 5 – Getting Started (NVivo)
Incorporating Chapter 4 – Data preparation
In Chapter 5 to help get you started, we talk about productive things you can do in the early stages of setting up a ‘project’ in software. Experimenting with these processes where relevant in your chosen software will help to become familiar with useful entities which will help to manage your work and help in the analysis. We also incorporate here a certain amount of information discussed in Chapter 4 about getting data ready for import into NVivo. See all coloured illustrations (from the book) of software tasks and functions, numbered in chapter order.
Sections included in the chapter:
Creating the software project
Transparency
Getting organized
Importing data
Cross referencing
Literature management
A framework of memos
For semi structured and unstructured text.
5.2.1. UNSTRUCTURED TEXT
Unstructured free flowing prose is what it is, unless there are reasons for doing so (i.e. breaking it up or reducing it and then adding headers which explain that) there is no point in going to any effort to change the way it looks. If you can get this in Rich Text Format or in Word format, you can just import it as it is. In PDF format, you will not have a choice about changing the way it looks!
5.2.2. SEMI-STRUCTURED TEXT
Included in these types will be e.g. most in-depth interviews, some focus groups (especially where speakers are not successfully identified) and less structured field. Sentences are not identifiable by NVivo – but paragraphs are useful, see below.
5.2.3. PARAGRAPHS ARE USEFUL STRUCTURES
If not bothering with the use of heading levels for structured data (e.g. Focus group data) – be sure to make use of useful paragraph structures. This is because text search can be performed say on a word/content within a paragraph or for an identifier (or an element of the identifier)- and the results Spread – to include the paragraph surrounding and coded. Paragraphs are defined by Hard Returns (Keyboard/Enter – or forced line breaks - note that Shift/enter which is sometimes used to separate text on to different lines does not create a paragraph break) …. see also the possibility of auto coding speakers in focus group data or other structured data if Heading styles are used – see section below on STRUCTURED DATA
5.2.4 PARAGRAPH STRUCTURE USED IN CASE B – FINANCIAL DOWNTURN STUDY
R-RP372- Yes…I was teacher - retired early due to health issues so I not sure I’m relevant. I suppose I do feel that my pension has reduced in real value – but on the whole I feel a bit lucky that I retired when I did instead of like my wife – she’s a bit younger – she’s now been caught by all sorts of changes - in the retirement age for instance.
R-RP382- Now you say that – like you Jxxx – I’m quite glad I got out when I did – but that’s only with hindsight, in one way it was the best thing that could have happened to me. OK it would have been nice to have been able to top up my savings and pension with another 3 years of employment, but my finances are adequate…. I’m loving retirement so actually my morale is very good. I shouldn’t really complain.
5.2.5 STRUCTURED DATA LINK FROM CHAP 12 N2
i.e. with repeated questions or speaker identifiers (e.g. in a Focus group)
If data is genuinely structured with repeated headers or speaker identifiers which could usefully be autocoded – using the relevant tool in NVivo. Consider using heading level styles in NVivo since the auto-coding tool can identify matching text at matching heading levels across the data you choose to include in an autocoding exercise. In the example below the (shortened) questions are repeated across all files. See Figure 5.1 below

Figure 5.1
5.2.6. CASE STUDY “A “ SAMPLE BELOW (Young Peoples Attitudes to Sex Education)
– the interviews are not particularly structured but it was thought useful to apply similar heading structures (heading level 2) to speaker identifiers (to enable easy auto coding) see the discussion in Chapter 4 about creating a node for each speaker so that the interviewer or moderator’s text can be excluded in a text search or in later queries.
004-ENG-F-15
Missed the last bus, stay at his friend’s house and ring his parents, if his parents are able to pick him up, then pick him up or stay at his friend’s house
INTERVIEWER
If he rings his parents how do you think they will react?
004-ENG-F-15
Well most parents will always react as if you did it on purpose, so you need to be a good actor, you need to sound really upset, and you need to convince your parents that you’re really really sorry, that it won’t happen again
See Auto coding tool in Chapter 12 exercises
TIP: Always choose note to use Heading Level 1 unless you are absolutely sure that you will not wish to use or insert a higher level of heading (e.g Topic Headers) at some future stage of data processing.
5.3.1 THE RIBBON TABS AND RIGHT BUTTON MENUS

Figure 5.2
Ribbon tabs provide access to varying functions.
Basic ribbon tabs consist of File - Saving, Managing etc, Home - editing functions etc., Create - making new things External Data –various import options, Analyse - Coding, linking, annotating, Query - range of functions to vary queries and query views and output, Explore - Charting, queries, models, Layout – manipulating tabular outputs, View – altering what you can see, arrangement of windows, coding stripes etc.
There are a few aspects of work that are only accessible via the ribbon tabs (for instance some of the editing tools are only accessible from the Home Tab, varying Code stripe views is only available from the View ribbon tabs, Charts and other visualisations are only accessible via the Analyse ribbon tab). But there are many other functions which are accessible more easily from the right button in the List panes.
Some ribbon tabs only open up when you are in a particular function, for instance when you are in a Model, a specialized Model ribbon tab appears, but you create a new Model from the Explore Ribbon tab.
5.3.2. THE NAVIGATION PANE
The navigation pane (left hand portion of the screen) is the main way of moving around the main functional areas of the software, Sources, Nodes etc – and getting Into the right folder you need in order to see the relevant ‘list’ so that you can open individual items. When you select a function – a set of folders appears in the top half of the pane. Select a folder and the relevant List appears on the right. Double click on an item in the list and the relevant item opens up in the Detail pane below . Successive opened items are tabbed I along the central bar separating the List pane from the Detail pane.

5.3.5. HOW TO CREATE NEW THINGS
- You can either go to the Create Ribbon tab and use the various options there OR (and this is what we do mostly…)
- You can be in a function (via the Navigation bar) e.g. as illustrated below, in the Nodes function

Figure 5.4
- Select the folder you want to be in and then –
- e.g. right click in the List pane /New Node/ fill in details of the new nodes
5.3.6. FAMILIARIZE WITH THE SOURCES AREA
Sources folders
Sources can be any type of data file or memo, embedded or external to the project.
Sources can be text, multimedia and datasets. There are three main folders associated with
sources.
Internals folder is designed to hold all ready-made data (to be ‘imported’) that you wish to work with directly within NVivo.
Note the subfolders created for Case A in Figure 5.5 below. Sources within Internals
can be imported, ready-made, or can be created in the software.
Externals folder can house special proxy or stand-in files to represent different types
of material which it is not practical or possible to import directly.
Memo folder allows you to create any number of new documents as locations to write
notes and keep track of your analysis. If the new documents are created within or moved into the memo folder, the software sees them as memos and each memo can be linked to one document or node.
Material inside any of the above sources can be classified, coded, linked, and annotated according to needs of the researcher.
Memos can be linked to individual sources (1 per memo) – so that the memo related to a source can be opened at the source or vice versa.
5.3.7. CREATE FOLDERS TO HOUSE DATA
Using Case A – we illustrate a sample folder structure above; in a project consisting of different ypes of data we usually recommend folders could be based on the type of data. This choice will vary depending on the complexity and variety of types of data. If you only have Interview data for instance the project is longitudinal you might just make the folders based on phases of data collection.
TIP: Keep the folder structure simple - although you can scope and filter later queries by folder - folders cannot reflect all the different features of your data. The assignation of attributes (via node classifications) will eventually reflect things like socio demographic information about your data/respondents/cases etc
- Right click at the top level (e.g. Internals) /New Folder – provide a name for your folder.
Continue with this process to continue to make second level folders from Internals.

5.3.7 NODES – WHAT ARE THEY – WHAT PURPOSES DO THEY SERVE?
We cover this in Chapter 7 exercises – if you need to find out now go to Chapter 7.
There are different things enabled during the import of data. We begin to talk about these, but for now, the straightforward importing of data, whether it is Text, PDF or the full range of audio-visual data – can follow essentially the same process. You just have to be careful to tell the software what type of data you are looking for. See more below.
The import of survey data or social media data is more complicated. We recommend you follow the software’s help menu guidance in those cases.
5.4.1. IMPORT SOURCES
Remember that ‘data’ and sources in NVivo is any material at all which will help you to integrate all the information which feeds into your project. (See 5.6 for Importing multimedia data)
You can import using two options.
- Just import data and do not worry about how you will organize data (with attributes or socio demographic variables)
- You can build a structural framework prior to the imports – then take advantage of various things that the software will do at the same time as the import to start the process of organizing the data – (using the creation of Nodes on import and linking them to a ready made Node Classification).
If we were teaching you face to face we would talk you through the second option (it needs explaining carefully and might be better to take this on when you are feeling confident in moving around the software) So…because you might be using these instructions on your own – and in the context of the range of ‘Getting Started’ exercises we recommend, we keep it simple – just providing guidance for Option 1 above. (If you want to follow Option 2 See Chapter 12 Exercises where we follow this through)
- Select the folder you want the imported file to go in
- Either go via the External data Ribbon tab… or…right click in the List pane>Import >
Choose the correct media option e.g. Documents (or as in Figure 5.6 PDF’s) and find the file on your computer.

5.4.2. EDITING DATA
Edit mode/Read only mode: note that it is always possible to make changes to textual documents once you’ve imported them, but unless you change the default option, your files by default will be in protected Read only format when on display in the Detail pane.
It will not be possible to edit PDF files.
- To edit a source textual document see small Click to edit in bar immediately above the text in the detail pane. Tools such as spell-check are not available in NVivo 10. It is always advisable to make use of word processing tools in e.g. Word prior to importing data into NVivo. NOTE: IT IS MOST IMPORTANT that when working in teams where NVivo project work has been done separately on different work stations (with the eventual aim of merging work together in one large NVivo project) that data is never edited after import into NVivo.
One of the things we suggest you do in Chapter 5 is to think about the role of MEMOS in helping you manage your work in the NVivo project. Also consider the role of LITERATURE and whether there are things you can do to optimize the project in terms of helping to cross reference important literature with substantive data. Hence the data illustrated in Figure 5.6. above.
In Sources two other Folders in NVivo are relevant in terms of managing your analytic processes and ideas about literature see Figure 5.7: Memos and Externals.
5.5.1 MAKE MEMOS
Memos are related to planning, tracking processes and thinking out loud about what is going on in your data. With that in mind create a framework of memos.
OPTIONS
- You can create folders to organize different aspects of note-making as illustrated in Figure 5.7
- Or you can have the one predefine folder Memos, but within it name your memos carefully with standard prefixes which tell you and others what type of memo it is – “PROCESS-…”, “THEORY…”
- Create folders from the memos folder – Right click/New folder /name the folder as above
- Create memos within your chosen folder by using the Create ribbon tab along the tab/choose the memo icon - or alternatively as usual – you can select the correct folder and then right click in the List pane to create the new memo
- The new memo opens up in Edit mode so that you can begin work in it. If the memo closes, double click on the memo in the list, it will re-open but you will have to ‘click to edit ’ in order to write in it

5.5.2 MAKING EXTERNALS
The Externals Folder - See Figure 5.7above Externals are places to make new files – space to write about data that you cannot physically import into the software. As such they act as proxy files. This might be a good way to generate critical appraisals of literature you are not going to access directly in NVivo (books, for example). This aspect is emphasized when a bibliographic references data base (EndNote, RefWorks, Medeley etc) is imported in NVivo if there are no attached pdf files – an empty External file is created in the Externals folder – named after the reference – and a critical appraisal can be compiled here.
- Create a New External by being in the Externals folder – right click in the list pane / New External
- The dialogue boxes – see Figure 5.8 below allow you to add a title, description – to create a file link (if there is one)
- Or simply fill spaces to denote location (top shelf?), structures (Units) in the files, Start range/End Range of pages or chapters etc. The file will open in the detail pane.

Importing video and sound files is much the same. Importing graphics/pictures is straightfoward.
5.6.1 IMPORT VIDEO
- To import a video, audio or picture files you need to follow a similar process as described above concerning the import of text (except you must choose to import ‘video’ not ‘documents’. Then simply click OK – see next steps below and Figure 5.

Figure 5.9
|
Note: If audio or video files are larger than 40MB NVivo will recommend the files remain ‘not embedded’ (see left). This means they are not contained within the software project, but that NVivo simply reads them. This is to avoid the project file becoming too big. You need to be sure such files remain in the same location and are not subsequently edited or NVivo will no longer be able to read them. |
If the media file is not supported – take the offer to go to the help menu to find out if you can resolve this.
- If it is an audio or video file, you can then choose to play it from the tool bar buttons, the Media menu, by right clicking, or hitting F7
5.5.2. TRANSCRIBING AUDIO/VIDEO DATA WITHIN NVIVO
After you have imported your audio/video data you can transcribe your data inside NVivo 10.
See Picture 19 for illustrations of these instructions.
- Open the video file you want to transcribe by double clicking on the video icon
The video should open automatically along with an audio wave. A new ribbon called ‘Media’ will appear. This allows you to edit, analyse and control the video
- Note that there are 3 Play mode icons – hover over each to see what they are each for: to summarise
- Normal –will allow you to code the video
- Transcribe - will allow you to create time-coded transcript alongside the video
- Synchronise – allows the playback of video with transcript scrolling ‘in synch
- To start transcribing you need to be in Transcription mode: start playing the video and hit F7 or the Play/Pause icon when you are ready to transcribe; F7 will restart – when you have finished a segment of transcribing – F8 or the Stop icon will complete that segment and assign a timespan. Starting play again will create another row to transcribe into.
Transcription mode Transcribing
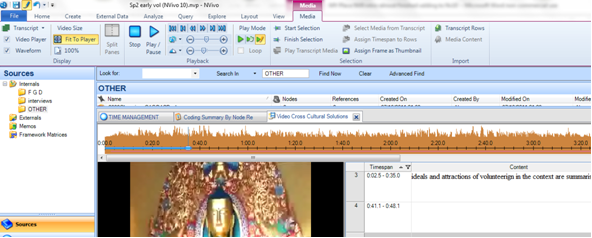
Figure 5.10
Having imported data and begun to get organized in terms of memos as places to write, you can now experiment with the types of exercises discussed in details in Chapter 6 – Working at data level – in order to get closely familiar with the data themselves. See Chapter 6 exercises
Ann Lewins, Christina Silver and Jen Patashnick. 2014