Using Software in Qualitative Research
A Step-by-Step Guide
Chapter 7 – Coding (HyperResearch)
Download the pdf for this chapter guide here.
Chapter 7 discusses coding, coded retrieval and coding schemes as key tools of qualitative analysis. We discuss the terminology and philosophies which underpin coding processes. Specific methodologies use particular routines when coding. More general thematic analyses or less code-based methods may use coding devices in ways which include data reduction strategies, indexing and marking data (also discussed in Chapter 6) See all coloured illustrations (from the book) of software tasks and functions, numbered in chapter order
Sections included in the chapters:
Inductive, deductive and abductive approaches
Theoretical coding
Grounded Theory
Visual data, coding directly or via a transcript
Exercises: qualitative coding in software
Coding forms the basis of the analysis you’ll perform later. Your codes are tags that represent certain ideas, which you apply to selections of the source material that show or exemplify that idea in some way. Then, during the analysis phase of your study, you’ll compare codes across your source material, look for relationships between codes, and test theories based on where codes occur in your sources. Essentially, the codes will serve as a proxy for the ideas expressed by the source material.
For a pictorial guide to the coding process for text sources, see Quick Start to Coding.
Basics of coding
The process of coding in HyperRESEARCH is straightforward. To code source material, follow these steps:
1. Make sure that your study window is showing the case you want to code to. (The case name appears near the top of the study window. For more information about navigating through cases, see the Study Window topic.)
2. Choose Sources > Open Text File , Sources > Open Image File, or Sources > Open Movie or Audio File and select the source you want to code. The source appears in a source window
NOTE: You can have only one source window open at any time. If you open another source, any currently open source window closes.
3. Select the source material you want to code
4. Apply one or more codes to your selection. You can apply a code in either of two ways:
• Drag one or more codes from the Code Book to your source window.
• In the Code Book window, select one or more codes, then click the Apply Code button at the top of the window (or choose Codes ![]() Apply Code).
Applying a code creates a code reference which appears in your study window, assigned to the current case
Apply Code).
Applying a code creates a code reference which appears in your study window, assigned to the current case
TIP: If you’ve chosen the On Selection coding option in the Options/Preferences window, the Code Book comes to the front automatically when you’ve selected a passage, and you don’t need to choose a menu item or press a key. For more information, see the “Code Book” section in the Options/Preferences Window topic in the HyperRESEARCH Help system.
Codes are the words or phrases you use to label selected segments of source material. A code summarizes the idea conveyed by the source selection, and coding source material helps organize its ideas and concepts for analysis. You can organize codes into groups and subgroups.
Codes are displayed and managed in the Code Book window.
Creating codes
You can create a new code at any time, whether you’re currently coding source material or not. You can create a number of codes before beginning the coding process, or let your codes emerge naturally from your source material, or a combination.

Creating new codes
To create a new code, choose Codes > New Code and enter the code’s name. A code should be a brief summary – a word or short phrase – that describes an idea or concept that you encounter in the source material.
Your code name can be of any length, and can include any combination of the following characters:
- letters a-z and A-Z • A-ring: å, Å • slashed O: ø, Ø • A or O with umlaut: ä, Ä, ö, Ö • numbers: 0-9
- underscore _ • period . • dash - • colon :
- backquote ` • tilde ~ • =, +, /, % • &, !, ?
The new code appears in the Code Book. (Codes are listed in alphabetical order.)
Adding code descriptions
Each code can have a description, which can include a definition of the code, a discussion of how the code shoud be used, or just your notes to yourself. The code description appears at the bottom of the Code Book when the code is selected

To add or change a description, click the code, then type into the Description section at the bottom of the window. The code description is stored with the code in your study.
Removing codes
To remove a code from the Code Book, select it and then choose “Delete Code” from the Edit Code popup menu at the top of the Code Book window.
When you remove a code, you also remove any code references that remove that code, so any coding you’ve done with that particular code disappears from your study. (If you want to assign those code references to a different code, see “Reassigning and renaming codes” below.)
TIP: To select more than one code in the Code Book window, Control-click (on Windows) or Command-click (on Mac OS X) each code you want to select. You can then delete all the selected codes at once by choosing “Delete Codes” from the Edit Code popup menu.
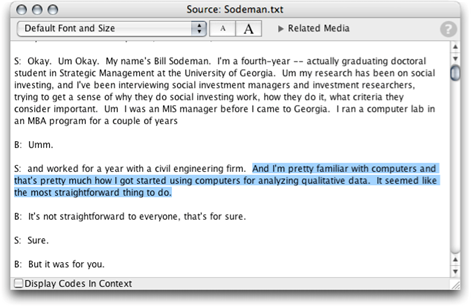
View Codes in Context
The Codes in Context box at the bottom of the source window highlights a code reference when you open a source by clicking the reference. If the Codes in Context box checked, the codes you have appear to the left of the main body of text. Clicking a code highlights the text associated with the code:

If you uncheck the Codes in Context box, the margin disappears, and you see only the text in the source window, without the codes:
TIP: When Codes in Context is checked, you can change the width of the margin by dragging the vertical divider between the codes and the text to the left or right.
For more information, please see the following tutorials (installed with HyperRESEARCH, in the Documents folder within the HyperRESEARCH folder in Applications (Mac) or Programs (PC):
HR Tutorial 1.pdf - Beginning a Study
HR Tutorial 2.pdf - Working with Codes
HR Tutorial 3 - Working with Cases
HR Tutorial 6 - Advanced Code and Retrieve Functions
Please note that HyperRESEARCH's Case and Code structures are quite flexible. If you're not sure how to accomplish a coding or organizational task witihin the software, please contact Researchware's expert technical support staff for assistance. There is a link to our tech support web pages in the Welcome to HyperRESEARCH screen within the HyperRESEARCH software.