Using Software in Qualitative Research
A Step-by-Step Guide
Chapter 9 – Coding Schemes (HyperResearch)
Download the pdf for this chapter guide here.
Chapter 9 discusses how the structures of coding schemes, alternate groupings are key to moving forward with analysis. The nature and structures of the coding scheme in a software application and how it can be used can make a difference to the processes of analysis. There are two key aspects – in order to feel confident about the potential of a software application to support particular working styles the inherent nature of the structures is significant; following on from that the ability to manipulate the coding scheme and extract the most from it will increase confidence in the software. See all coloured illustrations (from the book) of software tasks and functions, numbered in chapter order.
Sections included in Chapter 9
Project related factors
Is ‘coding scheme’ the same as ‘theoretical framework’?
Separating aspects of analysis
Escaping the confines of a scheme
Hierarchical
Non hierarchical
Better ways to collate or express theory – Sets and alternative grouping
CH 9 Exercises: managing and manipulating coding schema structures
There are two ways to export the information in your Code Book:
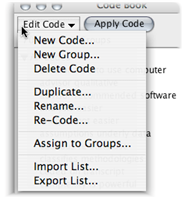
To export the Code Book as a text file, choose Export List from the Edit Code popup menu at the top of the Code Book. To re-use these codes in another study file, choose Import List from the Edit Code popup menu and select the previously-saved file.
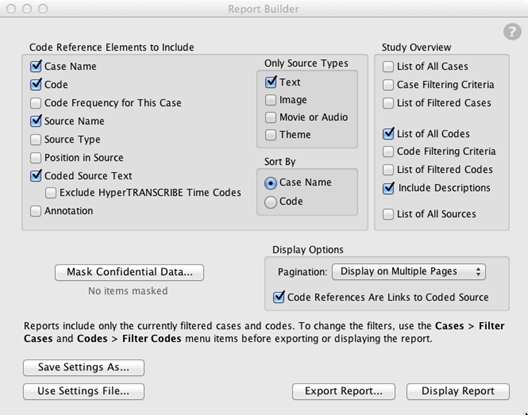
When using the Report Builder to generate reports, you can include "Study Overview" information (including "List of All Codes" or "List of Filtered Codes" if you're reporting on a subset of codes) on a separate page of the report. Simply check the appropriate "Study Overview" options before displaying or exporting the report. Be sure to check "Include Descriptions" so you have a record of your code descriptions as well.
You can share lists of codes between studies by exporting one study’s codes and importing them into another. This is a useful capability if you want to synchronize the code lists in multiple copies of the same study file (for example, for a team of researchers all coding in the same study), or if you want all your studies to start with the same core list of codes.
To export the codes from your study, choose Export List from the Edit Code popup menu at the top of the Code Book. This command exports the entire code list, along with the code descriptions and group memberships, to a text file.
To import the exported codes into another study file, open the other file, then choose Import List from the Edit Code popup menu and locate the exported code list from the first study. The code list is imported into the currently open study file.
(The imported list does not replace any codes that are currently in the Code Book. Instead, the two lists are merged: after the import process, the Code Book contains all the codes that were originally in the Code Book plus all the codes that were in the imported list. If a code appears in both the original Code Book and the imported list, it appears in the final Code Book only once, and is not duplicated.)
At times you may want to make changes to the codes used for already-coded source material. There are a number of possible reasons:
- Changing a code’s name to better reflect its meaning • consolidating several specialized codes into a more general code • removing a code used for temporary marking of interesting passages
You have three options: Rename, Re-Code, and Duplicate.
NOTE: The “Rename”, “Re-Code”, and “Duplicate” commands in the Edit Code popup menu change the code wherever it appears, while the commands in the Codes menu change only the selected code references. For more information about the distinction between the global changes you make in the Edit Code popup menu and the specific changes available in the Codes menu, see “The Codes menu versus the Edit Code menu” in the Code Book topic.
Changing a code’s name with the Rename command
To simply change a code’s name throughout your study, select the code, then choose “Rename” from the Edit Code popup menu at the top of the Code Book. This command changes the code’s name to the new name you enter. Any coding you’ve done with the old name is changed to refer to the new name instead.
Reassigning code references with the Re-Code command
To assign all a code’s references to a different code, select the code you want to reassign, then choose “Re-Code” from the Edit Code popup menu at the top of the Code Book. Then either select a code to reassign the first one to, or create a new one. All the first code’s references are changed to use the second code instead.
The main difference between Rename and Re-Code is that a renamed code is removed from the Code Book and replaced by the new name. When you Re-Code, the original code is still in the Code Book and you can continue to use it. You can also re-code more than one code by selecting all the codes you want to change in the Code Book. All code references for all the selected codes are changed to the new code you choose.
NOTE: The Rename and Re-Code commands both cancel any case filters, so they affect all cases in your study, even if you have set up a case filter.
Creating new code references with the Duplicate command
To make a copy of all the code references for a particular code, select the code in the Code Book, then choose “Duplicate” from the Edit Code popup menu. Then choose a code to duplicate the first one to (or create a new code and choose it).
For each of the first code’s references, a copy is created using the second code: for example, if there were five references to the first code, there are now five for the first code and five for the second code.
Refining code definitions
The Code Book's "Description" field can contain text of almost any length. Add your newest thoughts to the beginning of the Description field so they will be easily viewed in the Code Book. You can scroll down in the Description field to see your older definitions and memos concerning that code, and of course that information will be included in any report including your Code List and definitions.
Merging Codes
The “Rename”, “Re-Code”, and “Duplicate” commands may all be useful in merging codes. See above for more information.
In the Code Book, you can organize your codes by putting them into groups. You can create as many groups as you want. Groups can contain codes, other groups, or both—the same way that folders on your disk can contain files and subfolders. A group or code can be a member of one group or of several groups.
You can use groups to organize your codes conceptually (so that you can easily find related ideas), or for convenience in working with different sets of codes for different source material. Because a code can be in more than one group, you can organize your codes in several different ways. (For example, the code “chocolate pudding” can be in both the “chocolate” group and the “pudding” group, so you can organize your codes by flavor and also by food type.) You can also use groups along with the Filter Codes command to easily work with subsets of codes.
NOTE: A group is not a code; it’s a collection of codes. In some cases, this means its behavior is different. (For example, when you create a report, the report is listed by code name, not by group name.) If you later decide that a group should actually be a code in its own right, use the Duplicate command in the Edit Code popup menu at the top of the Code Book. Select all the codes in the group, then use the Duplicate command to create a code that will be applied to each code in the group.
The “All Codes” group
When you create a new study, the Code Book contains one group called “All Codes”. By default, new codes you create are placed in this group.
The All Codes top-level group always appears at the top of the list of codes. The All Codes group contains all the groups and codes in the Code Book, and cannot be deleted.
Creating code groups
To create a code group, choose Codes > New Group and enter a name for the group. (A code group can have any of the same characters as a code: see the section above on creating new codes. However, a group can’t have the same name as an existing code.) The new group is created in the All Codes group.
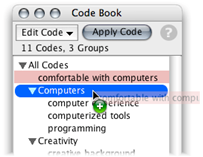
Groups have an arrow to the left of the group’s name. You can click this arrow to expand or collapse the group, showing or hiding the group’s contents.
Moving codes and groups into a group
To move a code into a group, simply click the code and drag it to the group’s name in the Code Book. You can drag codes from the All Codes top-level group, or from one group to another. The cursor changes while you drag to indicate whether it’s over a group
If you drag a group, instead of a code, it becomes a subgroup of the group you dragged it to. You can nest subgroups as deeply as you want.
To move a code or group out of its group, drag it to the special group “All Codes”.
Making a code a member of more than one group
A code (or group) can belong to any number of groups. To add a code to one group without removing it from the one it’s in, hold down the Alt key (Windows) or Option key (Mac OS X) as you drag. When you Alt/Option-drag a code, it is added to the target group, but remains in its original group also.
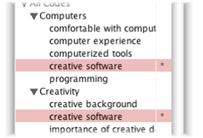
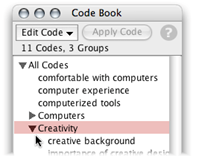
Codes that are members of more than one group display an asterisk (*) to the right of the code’s name.
NOTE: When you use a code that’s a member of more than one group, you must select one of the occurrences of the code in the list. However, HyperRESEARCH does not keep track of which group you selected from—only the code itself. Because of this, if you need to distinguish between a code in group A and a code in group B when you analyze your results, you should make two separate codes with different names, instead of placing the same code in both groups. This will ensure that you can treat the two codes differently when analyzing your results.
Managing codes in the Assign to Groups window
The Assign to Groups window lets you see and change which groups a code (or group) is a member of. In the Assign to Groups window, you can add a code to a group, remove a code from a group, or see the list of groups that a code belongs to. You can perform these tasks either in the Assign to Groups window, or by dragging codes as described previously, whichever is more convenient.
To open the Assign to Groups window, select a code or group and choose “Assign to Groups” from the Edit Code popup menu.
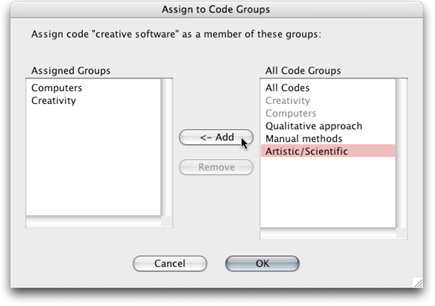
The Assigned Groups list on the left shows which groups this code, “creative software”, is already a member of: “Computers” and “Creativity”. The All Codes Groups list on the right shows all groups in this study’s Code Book. (Groups that already have the code as a member are grayed out.)
To add the code to another group, select the group in All Code Groups, then click Add.
To remove the code from one of its groups, click the group in the Assigned Groups list, then click Remove. (If you remove the code from all of its groups, it’s automatically placed in the top-level All Codes group. You cannot remove a code from the All Codes group if it’s the only group that the code is in.)
Renaming and removing groups
You change a group’s name or delete it in the same way you rename or delete codes: select the group’s name in the Code Book, then choose “Rename” or “Delete” from the Edit Code popup menu.
If you delete a group that includes codes or subgroups, those codes or groups are also deleted. If a code is also a member of another group, it remains in that group; otherwise, it is removed completely from your study, along with all code references that use that code. Because of this, you should remove code groups with caution.
Coding with groups
You can use a group to apply multiple codes to the same selected portion of source material. To apply all the codes in a group:
- Open your source and select the segment you want to code
- Either click the group in the Code Book and then click Apply Code, or drag the group to the selected segment in the source window
All codes in the group are applied to the selected portion of source material. (This includes codes that are in subgroups of the group you selected.)
Using groups as filters
When using a code filter, you can choose a group in the Filter By Name window. (For more information about code filters, see Filtering and Sorting Code References.) When you select a group, all the codes in the group are included in the filter. You can then create reports or perform analysis based on only the codes in that group.
NOTE: If a code appears in more than one group, then if you filter by one of the groups, all occurrences of that code will be filtered, regardless of which group you selected it from when coding your source material. The two occurrences are the same code (even though they are listed in two different groups), so they are treated as a single code when filtering.