Using Software in Qualitative Research
A Step-by-Step Guide
Chapter 6 – Working at Data Level (HyperResearch)
Download the pdf for this chapter guide here.
Chapter 6 in the book is all about working at data-level. Being immersed in the data for most researchers is part of familiarising with and analysing the data. You may need this before coding or to enrich and substantiate the coding process (chaps 7–9). Remaining close to the data will be more important for some researchers, but for all, the functions covered here may be key analytic processes in many different approaches to qualitative research. See all coloured illustrations (from the book) of software tasks and functions, numbered in chapter order.
Sections included in the chapter:
Annotating
Marking data
Data reduction
Text searching
Word frequencies
Text mining
Hyperlinking
HyperRESEARCH's annotation feature associates each annotation with a code applied to selected source material. Each code, in turn, is associated with a case.
To create a memo associated with a data segment, you will need to first assign a code to the selected segment. (This is true for all source material, whether the source file is text, image, audio, or video.)
When doing an initial review of your material, you can create general "memo" codes to keep track of the annotations you wish to associate with specific source material selections. This allows you to create annotations associated with specific data segments prior to beginning the actual coding process.
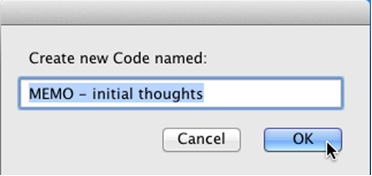
1. Create a "memo" code in your code book
Create one or more new codes to use when creating annotations and memos. Name each code in a way that a) indicates it is a memo and b) identifies the nature of the memo. This will allow you to analyze subsets of your memos based on the categorizations you use in naming y our memo codes. Examples include "MEMO – initial thoughts," "MEMO – methodology," "MEMO – To Do," "MEMO – relationship," "MEMO – category," and so on.
For this exercise, create a new code and name it "MEMO – initial thoughts".
2. Open the Sources List (Choose Sources >Sources List)
The Sources List shows all the sources that are referenced in your study. (See Exercise 8 in Chapter 5.) The list includes all files you have opened using the Sources menu while your study was open, whether or not you’ve coded material in the file.
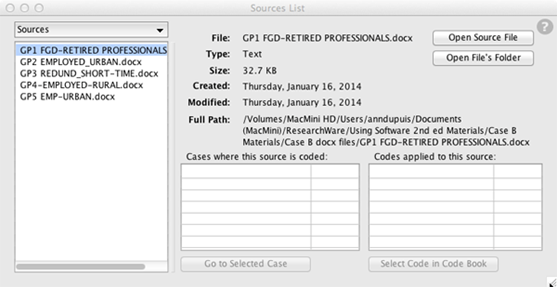
If the source file you would like to review is not listed, use the Sources drop-down menu, located at the top left of the Sources List window (above the source list), to add sources.

Use Add New Source File to add a specific source file to your list of sources. You can add any source that HyperRESEARCH can use (see File types in the HyperRESEARCH Reference section of the Help system).
If you prefer, you can use Add New Sources From Folder to easily add a large number of sources as a single batch. Select the folder that contains your source files. HyperRESEARCH adds all the readable text files in the folder. HyperRESEARCH does not look in subfolders of the folder you select, so to add your source files, they all should be on the top level of the folder
3. Select a source file to review.
Use the "Open Source File" button at the top right corner of the Sources List window to open the selected source, ready for reading and coding.
4. Adjust the source window to maximize readability.
You may move the source windiow, resize it, change the default font, or change the font size. (See the "Text Source Window" information in the "Windows" topic in the HyperRESEARCH Reference section of the Help system for more information.)
5. Select material to annotate
Follow these steps to record an annotation attached to specific source material in the text file:
a. Make sure that your study window is showing the case you want to associate the source file with. (The case name appears near the top of the study window. For more information about navigating through cases, see the Study Window topic in the Help system.) For example, if examining Case B's "GP2 EMPLOYED_URBAN.docx" file, navigate to the "GP Employed Urban" case so that your memo code will be applied to the correct case.
b. Select the source material you want to code (click and drag from the beginning of the passage you wish to select to the end).
6. Apply the "MEMO – initial thoughts" code (or whatever you have chosen to name your memo code)
Apply this to the source material selection in either of two ways:
1. With the appropriate source material selected, drag the "MEMO – initial thoughts" code from the Code Book to your Sources Window
Or
2. In the Code Book window, select the "MEMO – initial thoughts" code, then click the Apply Code button at the top of the window
7. Create the Annotation to be associated with the MEMO code
To open the Annotation window, click the code reference you just applied in the study window (the "MEMO – initial thoughts" or similar memo code) to select that code. Choose Codes > Annotate. The Annotation window opens for you to enter a note. The case and code for this annotation appear at the bottom of the Annotation window.
Click in the Annotation window and begin typing your memo. You can include any amount of text in an annotation.
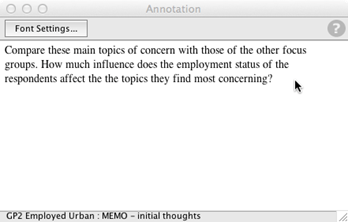
TIP: To automatically open the Annotation window when you click a code reference, check the View Annotation box at the bottom of the study window.
Each code reference can have its own annotation. Code references that have an annotation are marked in the study window with a † symbol.
To change the font or text size, click the Font Settings button at the top of the window.
Note: when working with audio or video files, the process is the same:
- navigate to the case you wish the source material and annotation associated with
- open the source file
- select a data segment
- apply a memo code
- add the annotation
Selecting a segment of audio or video to code:
There are several methods to select a portion of an audio or video source. Which one is best to use depends on how long the source is, whether you want to code while listening to or watching the source, and your personal preferences:
- On the controller bar, click at the start point, then click at the end point. The segment between clicks is selected.
- Drag the play head to the start point, press Shift-space to start playing, and when the source reaches the desired end point, let go of the shift key. The segment you played is selected.
- Begin playing the source. When you reach the desired start point, choose Sources >Media Playback >Set Selection Start (or use the keyboard shortcut Control-[ on Windows or Command-[ on Mac OS X). Then, when you reach the desired end point, choose Sources>Media Playback>Set Selection End (or press Control-] on Windows or Command-] on Mac OS X).
TIP: If you’ve finding it difficult to select the exact time to click because the controller bar is small, try making the source window wider. The controller bar (and, for video sources, the video player) increases in size to match the window size.
Whichever method you use, the exact time of the start and end points can be seen at the top of the window, in hours, minutes, seconds, and thousandths of a second. The selected segment is shown as a darkened section in the controller bar.
When you have selected the exact portion you want to code, apply the code or codes you want.
See the “Movie and Audio Source Window “ information in the "Windows" topic in the HyperRESEARCH Reference section of the Help system for more information on coding audio and video files.
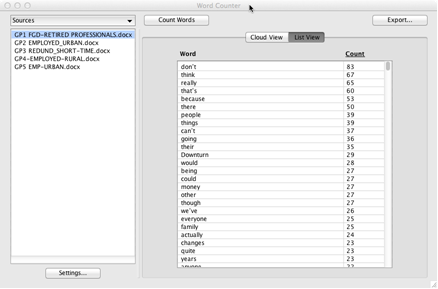
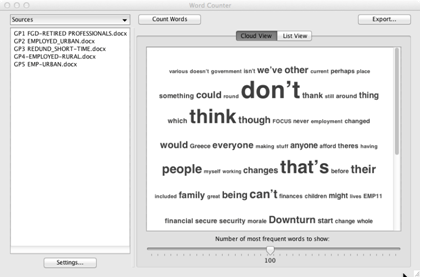
HyperRESEARCH's Word Counter tool allows you to explore your text source files with either a Word List (a concordance of words that occur in your source files, along with the number of times each word is used) or a Word Cloud.
A concordance can help you identify key terms, serve as a resource for creating your initial code list, and can even be used as an additional source file for your study or for a meta-study.
You create a concordance by using the Word Counter tool. To open the Word Counter, choose Tools --> Word Counter. (For additional information about the controls in the Word Counter window, see the Word Counter topic in the Help system.)
Creating a word list (concordance)
- To create a list of the words that occur in your source files, follow these steps:
- Choose Tools --> Word Counter to open the Word Counter tool
- Add or Remove source files (listed on the left side) until the Word Counter is showing all of the files you wish included in the word count. This allows you to look at word frequencies across all your sources, across a subset of your sources, or in one particular source file depending on your needs
- Click the List View tab
- Click Count Words to create a word list
All the words that appear in your source files are listed in order by the total number of times they occur. (To sort the word list alphabetically, click the “Word” header
Creating a Word Cloud
You can also view the list of words as a graphical word cloud. In a word cloud, the words are shown at different sizes depending on how often each word is used. Word clouds work very well when you want to quickly scan the material in order to get an idea of which words are most commonly used, and how one word’s frequency relates to another’s.
To see the list as a word cloud, follow the same steps as for a Concordance (word list), but click the Cloud View tab rather than the List View tab.
Excluding meaningless words in Word Counter
Common words (such as “and” or “will”) usually are not included in a concordance because they are so commonly used in a variety of contexts that they are not individually very meaningful. (The list of words you want to exclude from the concordance is sometimes called a “stop list” or the list of “stop words”.)
Change the Words to Ignore list by clicking Settings.
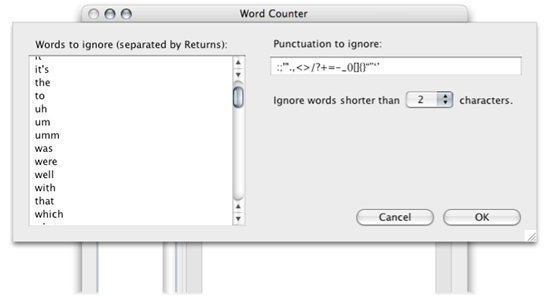
The Word Counter tool has a list of common words already entered. You can add or remove words from the Words to Ignore list and click OK, then click Count Words to re-create the concordance while ignoring the excluded words.
You can remove any word from the Words to Ignore list if you decide you want to include it in your concordance. (For example, if you are particularly interested in how often future words like “will” occur, as opposed to past words like “was”, you can remove both these words from the list so that they will be included in the concordance.) Your changes to the list are saved with your preferences, and will be used whenever you use the Word Counter tool.
If a certain word occurs frequently and is not helpful in your context, you can also add it and its variations to the Words to Ignore list. For example, if you are studying nurses, the word “nurse” can be expected to occur so often in your source data that it is not really significant, so it may be helpful to add “nurse”, “nurses”, and “nursing” to the list.
TIP: When you create a concordance, take a look to see whether any of the most frequent words are not meaningful for your context, and if so, enter them into the Words to Ignore list, then click Count Words to re-create the concordance. You can do this multiple times, if necessary, to create the word list that’s most useful for your purposes.
NOTE: When you change settings, you must click Count Words again to re-create the word list.
Exporting your results
The Export button exports the word list as a plain text file. You can open this file in most word processing and spreadsheet programs. When you export the word list, each word appears on a separate line, with the number of occurrences separated by a tab.
HyperRESEARCH offers three ways for you to explore your text sources by keyword:
- The Find command when the Source Window is active (to find keywords in a source file you're currently reviewing or coding)
- The Search Text Sources window (to find all instances of the specified keyword in one or more source files)
- The Autocode tool (which applies codes to selections containing the specified keywords)
Using the Find command
To quickly locate a word or phrase while coding a source file, use the Find command:
- With a text source window frontmost, choose Edit > Find.
- Enter the word or phrase you want to locate, then click OK.
The next occurrence of the word or phrase is highlighted in your source window. To continue finding the next occurrence, choose Edit > Find or use the keyboard shortcut Cmd-G [Mac OS X] or Ctrl-G [Windows].
Searching all sources
To search all your text sources at once for all occurrences of a word or a phrase, use the Search Sources window.
- Choose Sources > Search Text Sources....
- Enter the word or phrase you want to locate, then click Search.
Each occurrence is displayed, along with a snippet of the surrounding words, so you can get an idea of the context of the word or phrase.
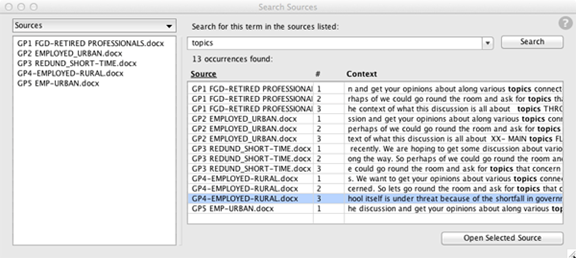
To see the word or phrase within the context of the entire source file, select the occurrence and click Open Selected Source. The source file opens and automatically scrolls to show the word or phrase, already selected for you.
If you want to exclude any of your sources from the search, select the source in the list, then choose “Remove Selected Sources From List” from the Sources popup menu above the list. The source file is removed from the search, but not from your study. To include a source that you previously excluded, choose “Add from Source List’ from the Sources popup menu, then select the source you want to restore.
Automatically coding based on search results
If you are coding a large amount of textual material, or if your text sources include standardized uses of the same word or phrase (such as multiple-choice survey results), it may be useful to search for certain words or phrases and automatically assign a code to them. You use the Autocode window to do this sort of automatic coding.
For more information, see the Autocode window topic in the Windows topic in the HyperRESEARCH Reference section of the Help system. See also Exercise 4 in Chapter 12's companion material for a guide to using the Autocode feature to apply variable codes such as identification (e.g. " R-RP382") or socio-economic information (e.g. gender) or other characteristics to your HyperRESEARCH cases.3
Go to chapter 7 for detailed exercises on coding based on your identification of themes and concepts in the data