Using Software in Qualitative Research
A Step-by-Step Guide
Chapters 7, 8 & 9 – Coding (QDA Miner)
Chapters 7, 8 and 9 discuss coding, coding schemes and coded retrieval as key tools of qualitative analysis. We discuss the terminology and philosophies which underpin coding processes. Specific methodologies use particular routines when coding. More general thematic analyses or less code-based methods may use coding devices in ways which include data reduction strategies, indexing and marking data. The structures of coding schemes, alternate groupings and basic retrieval mechanisms are key to moving forward with analysis. See all coloured illustrations (from the book) of software tasks and functions, numbered in chapter order.
Sections included in the chapter:
Inductive, deductive and abductive approaches
Theoretical coding
Grounded Theory
Visual data, coding directly or via a transcript
Retrieval
Filtering devices
Horizontal or Vertical cuts
Moving on
Quantitative overviews
Hierarchical and non-hierarchical coding schemes
How to escape the structures of your coding scheme
Sets and alternative grouping mechanisms
If you need reminding on how to create codes and your coding frame click here.
To assign a single code to a segment of text:
You can use several methods to assign codes to text segments.
Method 1 – Quick assignments of codes to whole paragraphs
- Select the code from the code list (bottom left of the screen) by clicking it and holding the mouse button down
- While holding the mouse button down, drag the mouse cursor over the paragraph you want to code
- Release the mouse button to assign the dragged code to the paragraph found under the mouse cursor
Method 2 – Highlight text and double-click the code
- Highlight the text segment that you want to code
- Double-click the code in the code list
Method 3 – Highlight text and drop the code
- Highlight the text segment that you want to code
- Drag an item from the code list to the selected segment
Method 4 – Using the code list tool button.
- Select the proper code from the list box located in the toolbar above the document
- Highlight the text that you want to code
- click the
 button
The last code used can be quickly assigned to a newly selected text segment by right-clicking in the document and selecting the CODE AS command from the shortcut menu.
To assign several codes to the same segment
If you hold the Ctrl key down while assigning a code to a text segment, the text segment will remain highlighted. You can then assign other codes to the same segment by double-clicking them in the code list or by dragging them from the code list to the highlighted segment.
To assign a single code to a graphic area
You can use several methods to assign codes to a graphic area.
Method 1 – Select the area and double-click the code
- Select the area of the graphic you want to code
- Double-click the code in the code list
Method 2 – Select the area and drop the code
- Select the graphic area that you want to code
- Drag an item from the code list into the selected area
Method 3 – Using the toolbar
- Select the proper code from the list box located in the toolbar above the image
- Select the area that you want to code
- Click the
 toolbar button
To assign several codes to the same area
If you hold the Ctrl key down while assigning a code to a graphic area, the selection will remain active. You can then assign other codes to the same area by double-clicking them in the code list or by dragging them from the code list to the selected region.
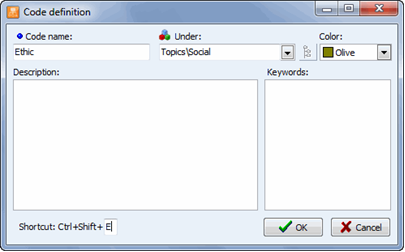
To attach a description to an existing code, highlight the code you want to describe in the CODES window, and select the EDIT command from the CODES menu. The following dialog box will appear:
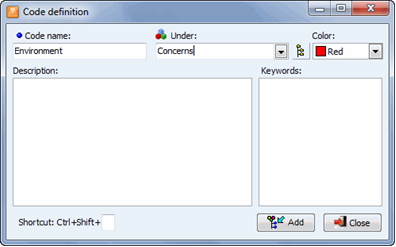
The DESCRIPTION edit box allows you to enter a definition or a detailed description of the code.
Once finished, click OK to apply the changes, or Cancel if you do not want to save the new description.
To create a printed version of the codebook, select the PRINT CODEBOOK command from the CODES menu. A Print dialog box like the one below will appear, allowing you to set various options of what and how the codebook should be printed.
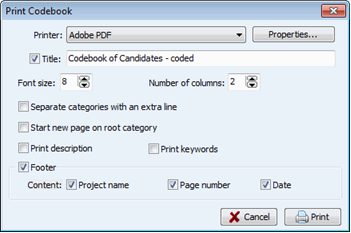
PRINTER Select the desired printer. To adjust the printer settings, such as the page size and orientation or printer resolution, click the PROPERTIES button.
TITLE Use this option to specify a particular line of text that will appear at the top of each page.
FONT SIZE This option is to adjust the font size used to print the dictionary items.
NUMBER OF COLUMNS The codebook may be printed with up to seven columns per page, allowing one to print large codebooks on fewer pages. Please note that when increasing the number of columns per page, it may be necessary to decrease the font size to prevent the overlapping of items in adjacent columns.
SEPARATE CATEGORIES WITH AN EXTRA LINE Setting this option skips a line every time a category name is encountered, allowing it to clearly delineate groups of codes belonging to the same category.
START NEW PAGE ON ROOT CATEGORY Root categories are the codebook categories still visible when the codebook is fully collapsed. Selecting this option instructs the program to start the printing of all items starting with each root category at the top of a new page.
FOOTER Enable this option to print a footer at the bottom of each page. A footer can consist of up to three items: The Project Name (printed on the left margin of the footer), the Page Number (located at the bottom center of the page) and the Date (printed on the right margin of the footer).
PRINT DESCRIPTION Select this option to print not only the code names, but also their descriptions. The description is printed in italics just below the code name.
PRINT KEYWORDS This option prints the keywords and key phrases associated with each code.
To resize a coded segment
- Select the coded segment that you want to resize by clicking its code mark
- Click a second time to display the shortcut menu
- Select the RESIZE command >
- For document variables, a small window like the one below will appear
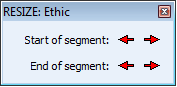
From this dialog box, you can move the starting or ending location of the selected segment by clicking the corresponding arrow button. Clicking a ![]() button moves the chosen limit of the segment back to the left and up while clicking a
button moves the chosen limit of the segment back to the left and up while clicking a ![]() button moves this limit forward to the right and down.
button moves this limit forward to the right and down.
- For image variables, the resizing dialog box will look like this:

From this dialog box, you can move the upper-left and lower-right coordinates of the selected area by clicking the corresponding arrow button.
You can repeat the same move several times by clicking and holding the mouse button down. Release the mouse button when you are done.
To remove coded assignments
Two methods may be used to remove codes assigned to text or image segments.
Method 1 – Using the coded segment panel
- Select the coded segment that you want to delete by clicking its code mark
- Click this mark a second time or right-click to display a shortcut menu
- Select the REMOVE CODING command
Method 2 – Using the code deletion dialog box
The Code Deletion dialog box allows you to delete one or more codes in the currently selected document or image.
- Click the
 button located on the toolbar of the document window. A list of all codes assigned to the current document or image will appear
 - Select the names of all the codes that you want to remove
- Click the OK button
When a code is assigned to a text segment or an image area, a bracket appears in the margin of the document window to indicate the beginning and end of the code along with the code name. To modify the color associated with a specific code, simply select the code or the category that you want to edit and then select the EDIT command from the CODES menu. A dialog box similar to this one will appear:
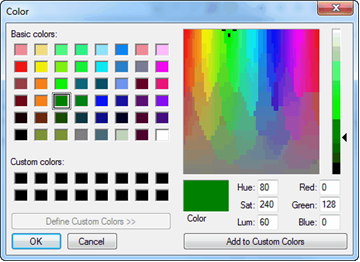
Click the down arrow key on the right side of the color list box to choose a different color. One can select from a set of 16 predefined colors or choose Custom... to bring a dialog box like the one below, allowing one to choose any color supported by your Windows system.
Once finished, click OK to apply the changes, or Cancel if you do not want to save any changes.
Normand Peladeau 2014