Using Software in Qualitative Research
A Step-by-Step Guide
Chapter 13 – Interrogating Data (HyperResearch)
Download the pdf for this chapter guide here.
Chapter 13 discusses interrogation of data that can happen at varied levels and at many moments during analysis. Already in Chapter 6 we referred to Text search tools where the content is explored. Interrogation can also happen in terms of coding work you have previously achieved. Discover relationships between codes which co-occur in some way in the data or compare them across subsets of data (indicated by the application of variables or attributes to data). Types of queries vary from simple to complicated tasks; summarized, charted information where the results are already available in the background is available in some software. See all coloured illustrations (from the book) of software tasks and functions, numbered in chapter order.
Sections included in the chapter:
Incremental and iterative nature of queries
Creating signposts for further queries
Identify patterns and relationships
Qualitative cross tabulations
Quality control, improving interpretive process
Tables and matrices
Charts and graphs
Exercises: interrogating the dataset
HyperRESEARCH's reporting features take your current Case Filters and Code Filters into account when generating reports. Set up your Case and Code filters and your code sorting preferences prior to running any report if you wish to interrogate a subset of your cases and codes.
HyperRESEARCH allows you to work with subsets of your cases by using case filters. When you filter cases, the subset of cases you’ve chosen is shown, and other cases are temporarily hidden. When browsing through your cases or creating a report or frequency report, HyperRESEARCH shows only those cases that are currently filtered. To remove the filter and show all cases, choose Cases Filter Cases > All Cases.
Tip: You can choose a case filter either from Cases Filter Cases or from the Filter Cases popup menu near the top of the study window.
All cases
The case filter default is All Cases. HyperRESEARCH will show all your cases unless instructed otherwise. To show all cases again after having filtered a subset of cases, choose Cases >Filter Cases >All Cases.
Filtering cases by name
By choosing Cases >Filter Cases >By Name, you can choose specific cases manually. HyperRESEARCH displays your case list. Click a case name to select it.
To select more than one case, click the first case, then Control-click (Windows) or Command-click (Mac) to select additional cases.
Filtering cases by criteria
By choosing Cases >Filter Cases >By Criteria, you can filter cases based on the presence or absence of codes you specify, and on specific code relationships.
By choosing items from the Build Criteria popup menu, you can filter cases based on whether they include one or more codes, or whether they don’t include a code (using the NOT operator). You can also choose a function that specifies a relationship between two codes.
See the Expressions and Filtering Criteria topic for more information on specifying criteria for case filtering.
Filtering only the current case
To hide all cases except for the one currently displayed in the study window, choose Cases Current Case Only.
Undoing all filtering and making all cases visible again
To show all the hidden cases, choose Cases >Filter Cases >All Cases.
Filter Cases
HyperRESEARCH allows you to work with subsets of your code references by filtering certain codes and temporarily hiding all others. When browsing through your code references, scanning the Codes in Context in a source window, or generating a report or frequency report, HyperRESEARCH shows only the currently filtered code references. To remove the filter and show all code references, choose Codes > Filter Codes > All Codes.
Tip: You can choose a code filter either from Codes ![]() Filter Codes or from the Filter Codes popup menu near the bottom of the study window.
Filter Codes or from the Filter Codes popup menu near the bottom of the study window.
Code filtering can be a powerful tool in analyzing your data, especially when used in combination with the case filtering tools. The analysis and reporting tools work with only those codes and cases currently filtered, making it easy to concentrate on certain portions of your data.
All codes
The code filter default is All Codes. HyperRESEARCH shows all your code references, regardless of which code you used for them, unless instructed otherwise. To show all code references again after having filtered a subset of codes, choose Codes > Filter Codes > All Codes.
Filtering codes by name
By choosing Codes > Filter Codes > By Name, you can choose specific code names manually. HyperRESEARCH displays a list of all codes in your study. Click a code name to select it. To select more than one code, click the first code, then Control-click (Windows) or Command-click (Mac) to select additional codes. HyperRESEARCH will display all code references that are assigned to any of the specified codes, and hide the rest of the code references.
You can also select a group instead of a single code name. Selecting the group filters all the codes in the group, so this is a useful shortcut when you want to analyze the codes in one or more groups.
Filtering codes by criteria
By choosing Codes > Filter Codes > By Criteria, you can filter code references based on which codes they use. You can also choose a function that specifies a relationship between two codes.
See the Expressions and Filtering Criteria topic below for more information on specifying criteria for case filtering.
Using the Code Map to filter codes
If the Code Map window is open and one or more codes are marked, you can choose Codes > Filter Codes > By Map to filter only the codes that have been marked with yellow highlighting. All code references that use any of the highlighted codes will be filtered. (The Code Map window must be open to use this option.)
For more information about using the Code Map and marking codes, see the Mapping Code Relations and Code Map Window topics.
Filtering codes by source type
You may filter code references based on the type of source material they’ve been assigned to. Code reference types include Text, Image, Movie or Audio, and Theme.
The Text, Image, and Movie or Audio types refer to the type of source file.
The Theme code type is a special type, not referring to any specific source material. The Theory Builder can add theme codes to the study. See the Testing Theories and Adding Theme Codes topics for more information about theme codes.

Hiding all code references
You can easily clear all filters by choosing Codes > Filter Codes >Unselect All. Although all your code references are of course saved (and easily retrieved by changing the code filter), they’ll be hidden and out of the way while you apply new codes to the case.
Hiding selected code references
You can hide one or more code references by highlighting the code reference in the study window, then choosing
Edit > Hide Highlighted. The selected code references are hidden from view. To hide all code references in the current case that are not selected, select the code references you want to keep in view, then choose Edit > Hide Others.
Undoing all filtering and making all codes visible again
To show all the hidden code references, choose Codes > Filter Codes >All Codes.
Sorting code references
Normally, the list of code references in the study window appears in the order you coded them: when you code a new selection of source material, its code reference is added to the bottom of the list. You can sort the list of code references to make it easier to scan, or to make it simpler to select multiple code references by grouping them together. (For example, if you want to delete all the code references to a particular source, it will be easier to select them all at once if you first sort by source name.) Sorting also affects the order in which code references appear in reports.
You can sort by any combination of the source’s name, its type (text, picture or media), the code you used, or the position of the coded selection in the source. (If you have filtered cases, only the code references in the filtered cases are sorted. Any other cases are unchanged.)
To sort code references, first choose Codes > Sort. The Sort Codes window open

Click one or more of the buttons on the left. Each sort criterion you click appears under “Codes Sorted By”.
Sorting by code
To put code references in order by the code name you used for each, click the Code Name button. “Code Name” appears in the Codes Sorted By box on the right. Then click Sort to re-order the code references in all currently filtered cases.
Sorting by source file name
To put code references in order by the name of the source file, click Source Name, then click Sort. (Remember that in HyperRESEARCH, you can use multiple sources in the same case, so the code references in a case might be from several different sources.)
Sorting by type
The type of a code reference is the type of source it refers to:
- Text (a plain text, RTF, Word, or HyperTRANSCRIBE file) • Image (an image file)
- Movie (an audio or video file)
- Theme (a code added by the Theory Builder, not linked to a source) To sort code references by their type, click Code Type, then click Sort
Sorting by the coded selection’s position
To put code references in the same order in which they appear in the source, click Code Position, then click Sort.
Sorting with multiple sort criteria
You might want to sort by several things at once. For example, if you’ve used several sources in one case, you might want to sort them by source name, and by position within each source.
To sort by multiple criteria, click the buttons in the Sort Codes window in the order you want. (For example, if you want to sort by type, and within each type by code name, first click Code Type, then click Code Name.) The criteria appear in order in the Codes Sorted By box on the right
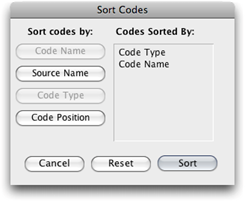
If you make a mistake, click Reset to empty the sort criteria, then try again. Once you’re satisfied with your sort criteria, click Sort.
Tip: You can sort code references, but cases always appear in alphabetical order in the study file. If you want to change the order of cases, try adding a number or symbol to the beginning of each case’s name to change its alphabetical order. For example, if you want case “Zeta” to always come first, rename it “- Zeta”.
Checking the frequencies with which you’ve used your codes can help in analyzing both your data and the progress of your coding tasks. HyperRESEARCH also performs statistical analysis of the frequency with which codes are used across the cases in your study, allowing you to see which codes are broadly used and which are concentrated in certain cases
Creating a frequency report
To create a report of the code frequencies in your study, choose Tools > Frequency Report
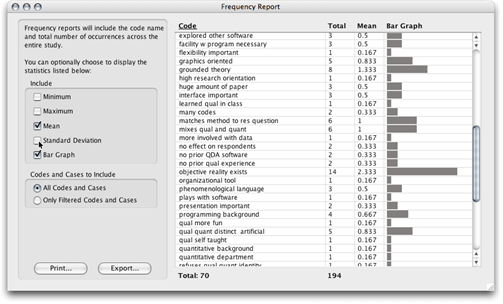
In the Frequency Report window, you can select which cross-case statistical analysis options to include in the frequency report. You can also choose to display a bar graph that shows graphically how often each code has been used.
The frequency report shows all the codes in the Code Book, along with the total number of times each code has been used in your study, and whatever additional statistics you have chosen.
Filtering and the frequency report
If you have applied a code or case filter to work with a subset of codes and cases, only those codes and cases are shown in the frequency report.
If you want to ignore the filter while creating the frequency report, choose the All Codes and Cases option under Codes and Cases to Include.
(For more about code and case filtering, see the topics Filtering and Sorting Code References and Filtering Cases.)
Statistical analysis of code usage across cases
The frequency report lists all the codes in the Code Book, along with the total number of times each code has been used in your study.
You can also optionally include statistical information about how the code is distributed across cases. These statistics are based on how often the code appears in each case in your study: the minimum, maximum, mean, and standard deviation of the code’s frequency of use.
Each option is displayed in a column of the frequency report. You can use all, none, or any combination of options. You can click the header of any column to sort by that column, so, for example, you can sort the list of codes by the minimum number of times each code is used.
Minimum
The smallest number of times this code has been used in any of your cases. If there are any cases in your study where the code is not used at all, the minimum is zero.
Maximum
The largest number of times this code has been used in any of your cases.
Mean
The average number (arithmetic mean) of the code’s use across all cases in your study.
Standard Deviation
The standard deviation of the distribution of this code across the cases in your study. The larger the standard deviation, the more variation there is in use of the code. For example, if a code is used the same number of times in each case, the standard deviation of its frequency is zero.
Code frequency bar graph
If you check the Bar Graph box in the Frequency Report window, a graphical representation of the Total column is included in the frequency report. Each row includes a horizontal bar whose length is proportional to the total number of times the code has been used in your study: the longer the bar, the more often the code is used.
This is the same information as in the Total column, but it’s presented in visual format to make it easier to scan.
Exporting a frequency report or code matrix
Once you’ve created the frequency report, you can print it or export it as a text file.
Exporting the frequency report
To export the report, click Export, then click Export as Shown and choose a name and location for the exported file. The file is exported as plain text (with a “.txt’ extension) in tab-delimited format, and can be opened in any word processor or text editor, or in a spreadsheet program.
When you export a frequency report, the bar graph is not included, but all other columns displayed are included.
Exporting a code matrix
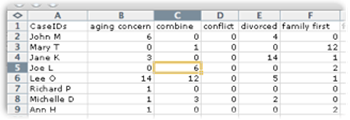
You can also export a code matrix, which can be used with spreadsheet software. This matrix includes a row for each case in your study, and a column for each code. (The first row contains the names of all the codes, and the first column contains the case names.) Your matrix might look like this when you open it in a spreadsheet program:
Each cell of the grid contains information about the use of that column’s code in that row’s case. In the example above, the highlighted cell shows that the code “combine” was used 6 times in the case named “Joe L”.
To export a matrix of your code data, click Export, then click Export Matrix. HyperRESEARCH displays the Export Data window.
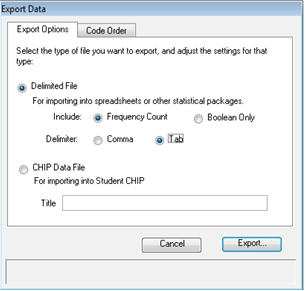
First, you’ll define the format of the exported file.
- In the Export Options tab, make sure the Delimited File option is chosen
- If you want to export a frequency count, as in the example above, choose the Frequency Count option. If you only want to export whether each code was used at all in a given case, choose the Boolean Only option. (In this case, each cell of the grid contains 1 or 0 (zero), depending on whether the code was used in that case or not.)
- Choose which character to use as the delimiter between columns: Comma or Tab. (If you’re not sure which to use, try Tab.)
Next, you can rearrange the order of codes. This step is optional, but it can be useful if you want to export only certain codes, or if you want the columns to be in some order other than alphabetical order. You rearrange codes in the Code Order tab
- Click the Code Order tab
- The list of codes is shown in the order that the codes will be exported. To move a code, click the code to select it, then click Move Up or Move Down until the code is in the desired position. Repeat this step for each code until the entire list is in the desired order
Finally, you’ll export your file:
- Click Export and specify a name and location for the exported file
Your file is now ready to open in a spreadsheet or database program.
(See also The Frequency Report Window information included in the exercises for Chapter 8.)
If you choose to filter cases or codes by criteria, or if you use the Theory Builder, HyperRESEARCH will ask you to build an expression that defines criteria to use in filtering your cases or codes.
When filtering cases by criteria, or creating a theory rule set, the expression you build may be a combination of codes and code relationship functions, all linked by Boolean operators (AND and OR). You may also test for the absence of codes by inserting the NOT operator before a code name or code relationship function in the expression.
Note: When filtering codes, the Boolean operators are not available. This is because when filtering codes, you are looking at each individual code reference and seeing whether it fits your criteria, rather than examining all the code references in a case.
Building expressions to filter cases by criteria
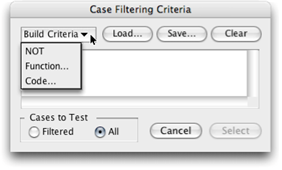
To specify the criteria for filtering cases, first choose Cases > Filter Cases By Criteria. In the Case Filtering Criteria window, you’ll use the Build Criteria popup menu.

Building the expression
When you first begin building your expression, the Build Criteria menu includes NOT, Function, and Code:
- Choose NOT if you want to test cases for the absence of a code or code relationship function. (You’ll specify the code or function next.)
- Choose Function to have HyperRESEARCH test cases for the presence of certain code relationships based on their proximity to one another. In the Select a Function dialog box, choose the function you want to test for (Equals, Excludes, FollowedBy, Includes, Overlaps, or PrecededBy). Then choose the first code for the function, followed by the second code for the function. (See the Code Relationship Functions topic for more information about these functions.)
If you first choose NOT before choosing Function, HyperRESEARCH will look for cases that do not have code references that match the specified code relationship
- Choose Code to specify a code name HyperRESEARCH should look for. If you first choose NOT followed by Code, HyperRESEARCH will look for cases that have not been coded with the specified code
Once you’ve chosen a code or function, the Build Criteria menu changes to contain the Boolean operators AND and OR. Use these to define more complex relationships between multiple codes and code relationships for HyperRESEARCH to test your cases against
Continue selecting functions and codes, and relating them with the AND or OR operators, until your expression is complete.
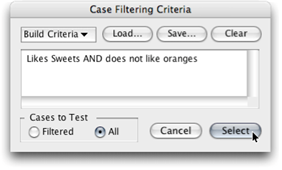
When you click Select, HyperRESEARCH filters all the cases for which the expression is true. Cases for which the expression is false will be excluded from the current case filter, and temporarily hidden from view. (You can show them again by choosing Cases ![]() Filter Cases
Filter Cases ![]() All Cases.)
All Cases.)
Adding parentheses
Make sure to clarify any ambiguous portions of your expression by putting parentheses around terms you wish evaluated together (sub-expressions). See the Boolean Logic topic for more information about how expressions are evaluated.
To place parentheses in your expression, you first enter the entire expression without parentheses, and then click the start and end of the parenthesized part of the expression. HyperResearch automatically detects that the expression may be ambiguous, and asks whether you want to place parentheses around the code or functions you've selected.
For example, suppose you want to create the following expression:
IF chocolate AND (ice cream OR pudding)
To enter such an expression, follow these steps:
- Enter the expression IF chocolate AND ice cream OR pudding without the parentheses, following the process described earlier in this topic
- Click “ice cream”, the first code that you want to put inside parentheses
- Click “pudding”, the last code that you want to put inside parentheses. The sub-expression “ice cream OR pudding” is selected
- Answer “Yes” in the dialog box. A pair of parentheses is inserted surrounding the part of the expression you selected
You can also nest parentheses, using the same technique: click the first code, function, or already-parenthesized expression that you want to enclose, then click the last
Tip: If your expression requires nested parentheses, work from the inside to the outside: first place the innermost set of parentheses, then the next, and so on until you reach the outermost pair of parentheses.
Re-filtering an already-filtered set of cases
You might want to filter a set of cases twice. For example, you might use Cases > Filter Cases > By Name to work with only the cases for your female subjects, and then later filter again by criteria in order to work with only the subset of subjects that are not only female, but have a particular code relationship.
If your cases have already been filtered, and you want to use the Filter By Criteria dialog box to work with a subset of just the filtered cases, use the Filtered option under Cases to Test. If you use the Filtered option, only the cases that are currently filtered and also meet the new criteria you entered are shown. (In our example, cases with male subjects are not shown even if they fulfill the code relationship you specify, because those cases weren’t already filtered.)
To ignore any current filters and apply your new filter to all the cases in the study, select the All Cases option under Cases to Test.
Building expressions to filter codes by criteria
When filtering codes by criteria, the expression you build will simply be a series of code names and/or code relationship functions. HyperRESEARCH will select every code reference that matches any of the code names or any of the relationship functions you’ve specified. (See the Code Relationship Functions topic for more information about these functions.)
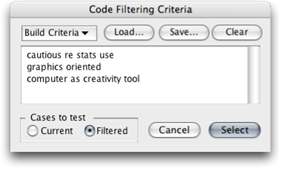
You can choose to filter the code references in the current case (choose the Current option under Cases to Test), or the code references in all filtered cases (choose Filtered).
Tip: If you just want to filter codes by name, and you don’t need to use the code relationship functions, choose Codes > Filter Codes > By Name instead of Codes Filter Codes By Criteria. The By Criteria option will let you filter codes by name, but using By Name is simpler.
Building expressions in the Theory Builder
The Build Expression popup menu in the Theory Builder works the same way as the Build Criteria menu in the Case Filtering Criteria dialog box (see “Building Expressions to Filter Cases by Criteria” above). The only difference is how the expression is applied to your data.
When evaluating expressions in a theory, any case for which the expression is true will be subject to the actions specified in the THEN section. Cases for which the expression evaluates to false will not have the associated actions performed.
See Tutorial Four: Testing Theories installed in the Documentation folder in the HyperRESEARCH folder for more information.
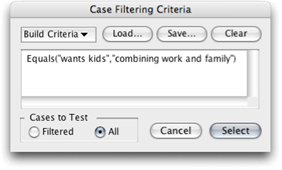
When filtering codes or cases by criteria, or testing theories, one of your options is to have HyperRESEARCH look for code references based on their relationship to other code references. You do this by including a function in your filtering criteria or expression. The code relationship functions are Equals, Excludes, FollowedBy, Includes, Overlaps, and PrecededBy.
How code relationship functions work
Each function compares the positions of each code reference of one code against the positions of each code references of a second code. (A code reference’s position is the location of the coded segment in the source.)
A code relationship function is defined as follows:
Function(Code 1, Code 2) For example, the function that describes the codes “wants kids” and “combining work and family” applied to exactly
the same segment of source material is:
Equals("wants kids","combining work and family")
The functions
The Equals function looks for code references for the two codes that exactly match each other. (Code references include the source type, source name, and position of the coded material within the source. All these must match for the code references to be considered equal.)
The Excludes function looks for code references for Code 1 that do not overlap any code references for Code 2 in any way – with not even one character (for text sources), pixel (images), or frame (video) in common.
The FollowedBy function looks for code references where the beginning of Code 2 comes after the end of Code 1: • For text sources, there must be at least one character between the end of Code 1 and the start of Code 2. • For image sources, the rectangle for Code 2 must be either below or to the right of the rectangle for Code 1. • For audio or video sources, Code 2 must start at least one second after the end of Code 1.
The Includes function looks for code references where Code 1 completely encompasses the material coded with Code 2. The source material for the Code 2 reference must be entirely contained within the source material for the Code 1 reference. (The Includes function will also look for exact matches, as with the Equals function.)
The Overlaps function looks for code references for Code 1 that overlap or intersect the code references for Code 2 in any way. The shared source material may be as little as a single character, a single pixel on an image, or a single fraction of a second of audio or video. If any portion of the source material has been coded with both Code 1 and Code 1, the Overlaps function will select those code references.
The PrecededBy function looks for code references where the end of Code 1 comes before the start of Code 2. Note: Except for the Excludes function, when filtering code references by criteria, HyperRESEARCH will look for all references for both codes (whichever codes are specified as Code 1 and Code 2) that match the specified function.
Filtering cases by criteria using functions
A single match in a case is enough to filter that case. When filtering cases by criteria, any cases for which one or more Code 1 references and one or more Code 2 references match the specified function will be selected. For example, if you filter cases based on the Excludes function, the case will be filtered even if there’s only one Code 1 reference that does not include any part of the source for Code 2, and even if the case contains other references to these two codes that do overlap.
To filter cases where all the references to Code 1 exclude any reference to Code 2, you would have HyperRESEARCH test for
NOT Overlaps(Code 1, Code 2) (in other words, cases where there are no overlapping code references between Code 1 and Code 2).
To filter cases where every reference Code 1 overlaps at least one reference to Code 2, you should have HyperRESEARCH test for
NOT Excludes (Code 1,Code 2) (in other words, cases where there are no Code 1 references that don’t overlap Code 2).
Adding new code relationship functions
Researchware releases additional code relationship functions from time to time, which you can download and add to your copy of HyperRESEARCH. In the Program tab of the Options/Preferences window, you can use the Add button to add code relationship functions to the standard set provided with HyperRESEARCH (Equals, Excludes, FollowedBy, Includes, Overlaps, and PrecededBy).
For more information, see the “Programs” section in the Options/Preferences Window topic.
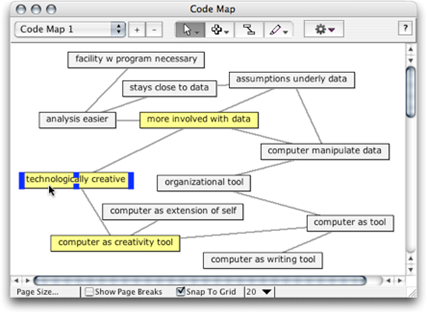
Selecting codes with the code map
HyperRESEARCH includes a Code Map feature. One of the most powerful ways to use a code map is to use it to select a subset of codes to work with. (For more information about selecting subsets of codes, see the Filtering and Sorting Code References topic.) Start by marking the codes you want to work with.
![]() To mark a code, click the Mark tool. Then click each code you want to select. Marked codes are highlighted in a bright yellow color so they’re easy to see.
To mark a code, click the Mark tool. Then click each code you want to select. Marked codes are highlighted in a bright yellow color so they’re easy to see.
To unmark a code, just click it again with the Mark tool.
Once you have marked the codes you want, click and hold down the mouse on the Mark tool to display the Markmenu. Then choose Apply Marked Set to Study Window from the Mark menu. (This action is equivalent to choosing Codes ![]() Filter Codes
Filter Codes ![]() By Map.) The code references that correspond to the marked codes are displayed in the study window, and all other code references are temporarily hidden
By Map.) The code references that correspond to the marked codes are displayed in the study window, and all other code references are temporarily hidden
The HyperRESEARCH Theory Builder lets you create a model of the relationships in your data, and test the validity of that model by checking how codes are related in your coded data for each of your cases. Using the Theory Builder can help determine whether or not the data supports any assumptions and inferences you may have concerning your study.
For an introduction to the Theory Builder as used in an example study, see Tutorial 7: The Theory Builder.
Before working with the Theory Builder, you must develop a theory about your data. Once you have formulated a theory, you must express it in terms HyperRESEARCH can understand. You can then work out the best way to define each rule in the theory in terms of codes.
Each rule in a HyperRESEARCH theory consists of two parts; one or more antecedents (IF statements, assumptions to check for) and one or more consequents (THEN statements, actions to take if the IF statement is true).
Both antecedents and consequents can be expressed in terms of codes and code functions. The antecedents are codes that define your assumptions. The consequents are the consequences that result when an assumption is borne out by the data. HyperRESEARCH treats a set of antecedents and consequents as a rule, and checks a rule’s validity against the available data (that is, your coded source material) whenever you test the theory.
If a rule’s antecedents prove true, HyperRESEARCH can then use that rule’s consequents, or actions, to support further Rules. It does this by temporarily adding or removing specified codes from the case being tested. A code added as a result of a rule’s consequents is a Theme, and may be added permanently to the case if you check the Add Themes to Cases box. Theme codes are based on the presence or absence of given codes rather than any statements inherent in the source material. (For more information about theme codes, see Adding Theme Codes.)
To open the Theory Builder window, choose Theory>New Theory

The Theory Builder window consists of two main sections: the Theory Rule List in the top half, and the Rule Editor in the bottom half. The triangle labeled Show Rule Editor hides and shows the Rule Editor. The Theory Rule List simply lists the rules you’ve defined in the Rule Editor. These rules translate your theory into terms that HyperRESEARCH can understand.
The Theory Rule List
The Theory Rule List displays the rules you’ve defined in the Rule Editor.
When you have finished building and adding new rules, click Export or Display to test the theory. If you click Display, the results are shown in a window. If you click Export, the results are saved in a text file whose name you enter.
Click Cancel to close the Theory Builder window.
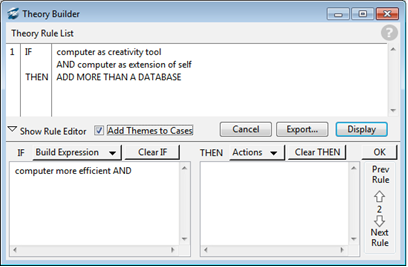
The Rule Editor
The Rule Editor has two main parts: the IF section, where you create the expression to test, and the THEN section, where you specify what to do if the IF expression is true. When you have finished specifying both the IF and THEN sections, click the OK button at the upper right of the Rule Editor section to add the new rule to the Theory Rule List in the top of the window.
Rule Editor: The IF section
In the IF section, you create a statement about codes in your study, using the Build Expression popup menu. The content of the Build Expression menu varies depending on the context. When you begin, the menu contains the items Function, Code, and NOT. After you add a code or function, the menu changes to contain AND and OR.
The Build Expression menu has the following menu items:
Function
Chooses one of the functions Equals, Excludes, FollowedBy, Includes, Overlaps, or PrecededBy. (For information about these functions, see the Code Relationship Functions topic.)
Code
Selects a code from the Code Book.
NOT:
Adds NOT to the rule. The boolean operator NOT looks for cases where the statement following is not true. For example, if you choose NOT, then choose a code, the rule specifies all the cases where that code is not used.
AND:
Adds AND to the rule. The boolean operator AND looks for cases where the statement before and the statement after AND are both true. For example, if you choose a code, then AND, then another code, the rule specifies all the cases where both codes are used.
OR:
Adds OR to the rule. The boolean operator OR looks for cases where either the statement before OR or the statement after or both are true. For example, if you choose a code, then OR, then another code, the rule specifies all the cases where one or both codes are used.
The expression you are building appears in the box below the Build Criteria menu. (For more information about building an IF statement, see the Expressions and Filtering Criteria topic.)
To remove the entire expression and start over, click Clear IF.
Rule Editor: The THEN section
In the THEN section, you specify what to do if the statements in the IF section are found to be true, using the Actions menu:
Add Goal
A goal is a final endpoint in a set of rules. If the statement in the IF section is found to be true for a case and a goal is added, HyperRESEARCH considers the theory to have been proven for that case. (Most theories have only one goal, although it is possible to include multiple goals in a single theory.) Therefore, you usually use Add Goal in the final rule of your theory.
Add Code
Temporarily adds a code you specify to any case where the IF statement is found to be true. You can use this temporary code in other, later rules in the same theory. Adding a temporary code is a handy way of marking a case for later use, and it also lets you specify a code as functionally equivalent to a statement being true: if the code is in a case, you know that the theory is true for that case.
If the Add Themes to Cases box at the bottom of the Theory Rule List section is checked, the code is permanently added to the case and can be seen in the study window. Otherwise, the code is only temporary, and is not seen in the study window.
Remove Code
Temporarily removes a code you specify, for any case where the IF statement is found to be true. Temporarily removing a code is a handy way of hiding the code from other, later rules in the same theory. This command affects only the rules in the current theory. It does not change the Code Book and does not remove any code references from your study. Unlike the Add Code command, the Remove Code command cannot be made permanent by checking a box. It is always temporary.
Adding Theme Codes
The Theory Builder temporarily adds theme codes to a case. Normally, these additional codes exist only during the test itself; they are not permanently added to the case. However, by checking the Add Themes to Cases box in the Theory Builder window, you can add these codes to the case as codes of type “Theme”.
Themes are not derived directly from your data in the coding process. Rather, they’re based on the presence or absence of certain codes in the case. They don’t point to any underlying source material (of type “Text”, “Image”, or “Movie”). They represent themes you’ve inferred from existing coding. A code of type “Theme”, unlike other codes, does not have any source material associated with it. It is part of the case, but has no source file or source reference.
For example, in the QDA Software study (found in the Documentation folder installed with HyperRESEARCH), the following inference may be made in the rule editor:
IF computer more efficient AND stays close to data AND NOT distant from data THEN NOT FRANKENSTEINS MONSTER
That is: if during the coding process you found source material that warranted the codes computer more efficient and stays close to data, but you didn’t find any source material that supported the distant from data code, then it’s logical to infer that the respondent doesn’t consider qualitative data analysis software to be a Frankenstein’s Monster. If you place this rule in the Theory Builder, and check the Add Themes to Cases box, then the code NOT FRANKENSTEIN'S MONSTER is added to each case that meets the criteria.
You can use any code as a theme code, even codes you’ve already used in your study for coding. If you want your theme codes to be distinct from your normal codes (to be applied only as themes, rather than assigned directly to the data) you may prefer to name them in all upper case (e.g. NOT FRANKENSTEINS MONSTER). This will help them stand out in the Code Book, the study window, and in reports.
These theme codes may be manipulated and analyzed in the same ways as regular codes. They appear in the Code Book and can be duplicated, renamed, deleted, and so on.