Using Software in Qualitative Research
A Step-by-Step Guide
Chapters 7, 8 & 9 – Coding
Download the pdf for this chapter guide here.
Chapter 7,8, 9 discuss coding, coding schemes and coded retrieval as key tools of qualitative analysis. We discuss the terminology and philosophies which underpin coding processes. Specific methodologies use particular routines when coding. More general thematic analyses or less code-based methods may use coding devices in ways which include data reduction strategies, indexing and marking data. The structures of coding schemes, alternate groupings and basic retrieval mechanisms are key to moving forward with analysis. See all coloured illustrations (from the book) of software tasks and functions, numbered in chapter order.
Sections included in the chapter:
Inductive, deductive and abductive approaches
Theoretical coding
Grounded Theory
Visual data, coding directly or via a transcript
Retrieval
Filtering devices
Horizontal or Vertical cuts
Moving on
Quantitative overviews
Hierarchical and non-hierarchical coding schemes
How to escape the structures of your coding scheme
Sets and alternative grouping mechanisms
First remember that memos are part of a continual cyclic analytic process. We revisit that process before sarting to think about thematic codes. Remember to create the Research Journal but also think about a framework of other memos which will help to manage thematic work
In ATLAS.ti you can create so called free memos and memos that are linked to quotations, codes or other memos. A research process journal or research diary usually is a free memo.
- To create such a memo click on the main menu Memo / Create Free Memo. Alternatively, you can open the Memo Manager first and create a memo there
Depending on your settings, ATLAS.ti opens the memo editor immediately or first asks you to enter a title. If the memo editor is opened immediately, ATLAS.ti enters an automatic title starting with ME and followed by the date. As this is not very meaningful, I usual recommend changing the memo settings so that you are prompted to enter a title first (see exercise 2). The title already being entered often leads to users forgetting to enter a meaningful title. If so, they may end up with titles like:
ME – 25.11.2012
ME – 25.11.2012 (2)
ME – 25.11.2012 (3)
if they for instance create three memos on one day.
- Depending on what you see, enter a new title like “Research process journal” or replace the default title
Apart from the title, memos also have a second attribute – a type. ATLAS.ti comes with three default types: memos, commentary and theory. You are free to add other types. This can be best done in the settings windows, which will be described in exercise 2. Memo types can be used to sort and to filter memos.
As the purpose of writing a research process memo is to remind you of what you have been doing, there is no need to change the default type “memo”.

Figure 1: Writing a research process journal memo
- Before writing a new entry into your dairy, press the key combination Ctrl + D, or select Insert / Insert Date/Time from the Memo Manager menu
- Write down some notes
- Just pretend to make a second entry on another day and insert date and time again.
- Save the memo by either the menu option Memo / Save, or click the key combination Ctrl+S, or click on the Save button in the tool bar

Adjusting memo settings
To adjust the memo settings,
Click on the Preference button in the main tool bar. ![]() This immediately opens the General Preferences window (rather than selecting the main menu option Tools / Preferences / General Preferences)
This immediately opens the General Preferences window (rather than selecting the main menu option Tools / Preferences / General Preferences)
- Click on the Memos tab
- Activate the option “Prompt for title”
- On the right hand side of the window add other types you may need like “Analysis”. Just type over the current entry. Don’t worry this does not overwrite any of the other types
- Click on the Add button. The new memo type will be added as new global type. This means it will be available in all other HUs on your computer as well
- Most likely, analytic memos will be your most frequently used type. Make it your default type by activating the option below the Add/Remove button
- Delete the type "Commentary"

Figure 2: Adding and removing global memo types
It is not a good idea to use memos as comments. A memo is more than just a comment. Think of the simple fact that a memo has a title. If you just want to write a comment, it is probably difficult to think of a title as well. Memos might start with just a few ideas, but over time they are developed into more lengthy analytic texts. For further ideas on memo writing, see Friese (2012) or Corbin & Strauss (2008).

Figure 3: Setting memo preferences
ATLAS.ti does provide a comment feature as well. This will be discussed in the next exercise.
If you use a deductive approach to coding, you may already have a list of codes that you want to import to ATLAS.ti. ATLAS.ti offers two ways of doing it – the official option is via the Memo Manager. Another possibility, albeit not an intended one, is via the survey import function. The latter allows you to include code descriptions as well.
Creating a list of free codes via the Memo Manager option
- Open the Memo Manager: Memos / Memo Manager
- From the Memo Manager's menu, select Memos / Create Free Memo
- As title enter “code list”, as memo type select for instance “memo”
- Add your list of code words, one per line
- Save the memo: Memo / Save or Ctrl+S and close it
- Highlight the memo in the Memo Manager and select the option Miscellaneous / Create Codes from Selected Memo
Importing Codes and Their Description via The Survey Import Option
In exercise x, we explained how to prepare survey data for import. Twisting this functionality a bit, we can use it to import codes plus definitions. You simply prepare an Excel spreadsheet that contains one row. In each cell you enter a code name plus its definition separated by two colons (::). In Excel the entries look like this:

Save the spreadsheet in csv format. If saved as xls(x) file, you would need to enter a pseudo case for it to work
- Open an existing Hermeneutic Unit or create a new one
- Select Documents / New / Import Survey Data. Select the Excel file you prepared. ATLAS.ti informs you if the import has been completed successfully
- Open the Code Manager to check whether everything has worked as expected. See Figure 2 for an example

Figure 2: Imported code list including code definitions
The most common operations on primary documents – especially when starting a project – are selecting data sections and assigning codes. The exercises below introduce the most common procedures on how to create and assign codes. You will learn how to code text documents and video data. We will work with case study B to practice the coding of text documents and with case study C for coding video data.
Coding text documents
Coding with new Codes
- Open the project file “Case study B_not coded.hpr7”
- Load “P2: GP2 EMPLOYED_URBAN”
- Select paragraphs 12 to 17 starting with “MAIN TOPICS FALLGED UP”
- Right click within the highlighted area and select Coding / Enter Code Name(s)
- Enter the code name “main issues” and click OK

Figure 4: Coding a data segment with a new code
You see a grey bar and the code label in the margin area. In addition, you find a new entry in the quotation and code list (see {C}Figure 5{C}{C}{C}{C}{C}{C}{C}{C}{C}
). Each quotation has a number by which it can be identified. Information about the start position and length of a quotation is provided in the Quotation Manager.
The numbers behind the code indicate the frequency of how often a code has been applied and the so called density. The density count shows how often a code has been linked to another code. Linking codes is mostly done at a later stage in your analysis when you recognize how the various issues related to each other. Codes can be linked in various ways. Mostly it is done in the network view editor. You will learn more about that in chapter 9.

Figure 5: Entries in the quotation and code list fields
- Open the Quotation Manager by double clicking on the button “Quotes” next to the list field to see what type of information is provided by ATLAS.ti about a quotation:

Figure 6: Information provided by the Quotation Manager
The ID 2:1 means that this is a quotation in Primary Document 2, and it is the first quotation that has been created in document 2. The second number follows a chronological not a sequential order. The reason for this is that one often does not code in a sequential order. When adjusting and recoding the material you move across the data set and if the order were sequential, ATLAS.ti constantly would need to recalculate the IDs. If it is necessary for your type of data that the order is sequential, you can change it under the Quotations / Miscellaneous sub menu: Renumber all to Docflow. This is for example a handy option when coding the video in case study C.
As Name the first 30 characters of the quotation are used. The next two columns list the name of the primary document and the code or codes that have been applied to the quotation. Further you see start position and the size. For textual documents these are provided in form of paragraph numbers. Thus, quotation 2:1 starts at paragraph 12 and has a length of 6 paragraphs.
The density count tells you that the quotation is currently linked to 1 other object, the code in this case. The name of the logged in user (author) who created the quotation is Susanne.
- Open the Code Manager by double clicking on the button “Codes” next to the list field n to see what type of information is provided there:

Figure 7: Information provided by the Code Manager
To the right you see the “families” column. As long as you do not have families, you can also hide the column by selecting View from the Code Manager’s menu; deactivate the option “Show Side Panel”.
In the Name column, you see the code label, followed by the groundedness and density count. As above, the author is also indicated (i.e. the name of the currently logged in user). All entries are also time stamped (creation and modification date). If you later group codes into families, you find this information in the Families column.
The information shown in Figure 6 means that the code “main issues” has been applied 1 time, it is not yet linked to any other code and has been created by the user Susanne. The code is not yet sorted into a family.
Now let’s enter a few more codes:
- Read through the next paragraphs (ideally you read the entire focus group session first before you begin with coding). How could you code the statement of respondent R.09 in the following paragraphs?
- ·Highlight the segments you want to code and proceed as explained above to code the segments with a new code (see Figure 8 for an example)
Note: If you want to enter more than one code word for a segment, click with the mouse into the second entry field. You can enter as many codes as you like, there is no technical limit.

Figure 8: Example coding
Drag & drop coding
If you continue to read the text, you will note that respondent R.53 also talks about job security. If you want to re-use an existing code, it is best to work with the Code Manager.
- Open the Code Manager by clicking on the Codes button
- Highlight the section in the response of R.53 that is about job security
- Left-click the code “job security” in the Code Manager and drag it into the text pane. There is no need to drag it on top of the highlighted area

Figure 9: Drag & Drop coding
Note: When coding PDF files or other media, it is necessary to drop the codes onto the selected section that you want to code.
In Figure 9 above, you see that the view settings for the Code Manager have been changed. For day-to-day coding you do not need all of the detail information that is provided in the default view. What you see in Figure 9 is the code name and the groundedness and density count. This is all the information
you usually need. It allows you to reduce the size of the Code Manager to and work with your screen space more efficiently.
Changing the view settings
- Click on the View menu in the Code Manager and select the Single Column View
Using the Coding Buttons
In the Code Manager, you find a code button that you can also use for coding ![]()
- Assume that you want to code a segment with the already existing codes “morale” and “public sector job”, highlight these codes by holding down the Ctrl-key and click on the coding button to code the selected data segment with both codes. You can of course also use the coding button when only selecting one code

Figure 10: Another option is to use the coding button to code
In the vertical tool bar you find a number of coding buttons. If you move with your mouse over a button, a short help text is displayed.

Figure 11: Coding options in the vertical tool bar
- Try out the various options and select the ones that you find most convenient for you. You will probably end up using a mixture of all of them depending on the task at hand
Coloured bars and Colouring Codes
As you can see in Figure 8, overlapping codes are displayed in different colours in the margin area. These colours help you to distinguish which bar belongs to which code word. If you were to add even more layers, the next two layers would be displayed in violet and blue. After that, silver is used again. The colours do not contain any information about the different code levels in the sense of higher or lower ranked categories. When you delete a quotation, the colours may change.
It is possible to set your own colours for codes, but not for the bars marking the length of a quotation. To colour your codes:
- Select one or more codes in the Code Manage and click on the coloured circle in the tool bar
- Select a colour and click OK
The first effect is that the code colour changes in the Code Manager. If you find to see the user-defined code colour in the margin area as well, do the following:
- Right click on a blank space in the margin area and select Use Object Colors


Figure 12:Making user-defined code colours visible in the margin
In-Vivo Coding
Use in-vivo coding when the text itself contains a useful and meaningful name for a code.
In-vivo coding creates a quotation from the selected text AND uses the selected text (trimmed to 30 characters) as the code name. If the selected text’s boundaries are not exactly what you want for the quotation, modifying the quotation’s “spread” is often the next step after creating the in-vivo code.
In-Vivo coding can only be applied to textual primary documents.
Note: The term "in-vivo" in this context stems from grounded theory, which draws the researcher's attention to expressions used by the interviewees themselves.
- Mark the text passage that you want to use as an in-vivo code. Bear in mind that the code name is created from the text selection’s first 30 characters
- Click the In-Vivo coding button in the vertical tool bar or right click on the selection and select Coding / In-Vivo Coding from the menu
- If needed, change the newly created quotation’s boundaries (see next exercise)
Modifying Quotations
This feature lets you change the boundaries (start and end position) of a quotation.
- Activate the quotation that you want to change, if not already selected
- Select a data segment that you actually want to use as this quotation. When increasing the size of the quotation, you can simply highlight the text that you want. If you want to reduce the size of the quotation, you need to deselect the selection first by clicking somewhere above or below the highlighted area. Then select a smaller section. When resizing PDF quotations, you can conveniently use the handles at the upper left and lower right-hand corners
- Click the modify button, located to the left of the text window or choose Modify Boundaries from the main Quotations menu

Figure 13: Modifying quotation boundaries
The quotation will be changed reflecting the new boundaries.
Unlinking a code
Just as you can erase a pencil mark in the margin of a paper document, you can “erase” a code in the margin area on screen as well. The digital equivalent is called unlinking. It is mostly used when a segment is coded with more than one code.
- To unlink a code, right click on the code in the margin area and click on the Unlink option.
When you unlink a code from a segment that only has one code, the bar remains in the margin. If you want to “erase” both the code and the quotation, you need to proceed as explained below.
Deleting a coded segment
- Activate the quotation by clicking on the code in the margin area. Right click on the highlighted area and select Delete
- Confirm that you want to delete this quotation

Figure 14: When deleting a code segment, you are asked for confirmation
Replacing a code
- If you want to replace a code, simply drag the code that you actually want to use from the Code Manager and drop it on top of the code in the margin area

Figure 15: Replacing a code
Merging Codes
When developing a coding schema, it happens at times that two or more codes essentially mean the same thing. You can clean up those synonymous codes by merging them:
- Save the HU before merging codes
- In the Code Manager select the “target” code into which one or more codes are to be merged
- Right-click and select Merge Codes from the context menu
- In the multiple choice window that opens, select the codes to be merged into the selected target code
If the code had a comment already, then information about when and what was merged into the target code is entered into the comment field of the target code including the comment(s) of the merged code(s). If no code comments have been written yet, you may want to add a few lines to remind you of what you did.
Retrieving Coded Quotations
There are several ways to retrieve your coded data segments. During the process of initial coding, the easiest and most frequently used method is to simply double click on a code in the Code Manager.
- If there is only one quotation, it will immediately be displayed in context
- If more than one quotation is associated with the code, a pop-up list opens. Select a quotation with a single click to display it in context (see Figure 16)
You can use the next and previous button in the Code Manager to browse through all quotations for a selected code. 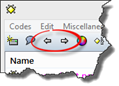

Figure 16: Retrieving coded segments
Coding audio and video documents
Open case study C, the Coca-Cola project, for the following exercises.
- Load the 1980s commercial for Diet-Coke - Diet-Coke Break.
- Move your mouse pointer on top of the audio wave and mark a section by clicking on the left mouse button where you want it to start. Then drag the cursor to the end position
- To preview the selection, click the start button as shown in Figure 17

Figure 17: Previewing a video selection
- If you are satisfied with your selection, Rright-click and select the option Coding / Enter Code Name(s)
- Enter a code name (e.g. “my first coded video segment) and click OK

Figure 18: Coding a video segment
A new quotation is listed in the Quotation Manager. The default name for audio and video quotations is the document name. In addition, start position and length of the segment in form h:min:sec: is provided. Audio and video quotations can be easily recognized by their special icon. Below you see how a video quotation entry in the Quotation Manager looks like in single column view:
![]()
Figure 19: Video quotation entry in Quotation Manager (single column view)
Each quotation can be renamed. This is especially a useful feature when working with audio and video files. To do so, right click on the quotation name in the Quotation Manager and select the Rename option. See also the exercises on writing comments and memos in chapter 5.
Note: When coding video data, I often prefer to create a quotation first and to code it in a second step. Below you find some information on how this works and I provide some tips on how to set start and end positions for video quotations precisely.
Activating and Playing Audio and Video Quotations

Figure 20: A coded video segment
- To play the coded video quotation, double-click on the quotation bar
- If you want to move the play head to the beginning of an existing quotation, hold down the Ctrl-key and click on the quotation bar. You can also move the play head pointer with the mouse. As soon as you move it either over the start or end position, the pointer snaps
Using Short-cuts to set start and end positions
There are two alternatives to mark start and end positions by using keyboard short-cuts.:
- Move the play head pointer to the desired start position. Select < or , to set the starting point
- Move the play head pointer to the desired end position. Select > or . to set the end point of a segment
Note: Depending on your keyboard one of the two option (<> or ,.) is more convenient to use.
Tips for setting accurate start and end points for video quotations
As you saw in the above exercises, coding video or audio segments works more or less in the same way as coding text. Selecting the appropriate segment, however, is different as we are not dealing with a static file. Also at times, you may want to code very small segments, maybe just a few seconds long. Then it becomes difficult to make the selection with the mouse pointer.
Zooming in
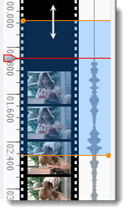
The first thing you probably want to do is to zoom in to just the part of the video that you currently want to code. When you move the mouse pointer over the full preview of the bottom of the video, two orange sliders appear.
- Move the left slider to the right and the right slider to the left, to zoom into the area you want to work on. For the next exercise zoom into the second and third preview image as shown in Figure 21
Note that the vertical preview images next to the margin area change and you only see the part of the video you have just selected

Figure 21: Zooming in
Creating quotations for each time and break announcement
Your next is to create exact quotations for each notice that it is 11:30 and for each “diet coke break” announcement.
- The first segment shows a lady with blond hair at her desk, who just had taken a look at her watch. Toughly highlight this part of the video. Make it intentionally too large. It is then easier to snap play head and start/end position
- Move the play head to the start position and then move it slowly to where you want to set the start position
- Now, move the end position to the play head. When the two are on top of each other, they snap
- Move the play head to the approximate end position. You need to find the last frame before the camera turns to the lady on the phone. This can best be achieved via the right and left cursor keys. They allow you to move frame by frame
- Move the current end position to the play head position until they snap
- Click on the “Create Quotation” button or the letter q

Figure 22: Create a video quotation without coding
- Continue creating quotations for the next two time notices and the three diet coke break announcements. To mark a new section, click once somewhere in the preview image area below or above the current selection
One option you may need is to modify the length of an already existing quotation:
Adjusting the size of audio or video quotations
To adjust or change the length of the quotation:
- Change either/or both start and end positions to the desired place
- Click on the Modify Quotation button in the vertical tool bar on the left hand side of the screen,
 or click once again on the Create Quotation button by holding down the Ctrl-key
Code the predefined segments:

Figure 23: Video file with the six predefined segments, ready to be coded
- Review the six quotations and think about how you want to code them. Here are a few ideas:
- Type of woman portrayed
- Activity
- Voice
- Facial expressions
- What is said: Time notice / break announcement
The repeat option loops the clip. This may help you to think about how you want to code a selection.

Figure 24: Use the repeat button to loop a selected video quotation
Susanne Friese 2014