Using Software in Qualitative Research
A Step-by-Step Guide
Student Resources
Chapter 6 – Working at Data Level (MAXQDA)
Download the pdf for this chapter guide here.
Chapter 6 in the book is all about working at data-level. Being immersed in the data for most researchers is part of familiarising with and analysing the data. You may need this before coding or to enrich and substantiate the coding process (chaps 7-9). Remaining close to the data will be more important for some researchers, but for all, the functions covered here may be key analytic processes in many different approaches to qualitative research. See all coloured illustrations (from the book) of software tasks and functions, numbered in chapter order.
Sections include in the chapter:
Annotating
Marking data
Data reduction
Text searching
Word frequencies
Text mining
Hyperlinking
MAXQDA11 and Case Study B – Embedding notes in the data
Creating Document memos
A single memo can be created for each document in the Document System, and this memo can be added to as often as you like with a toolbar button to insert the current date and time as an aid to separating developing ideas within the memo.
The document memo can be opened with the right-click context menu option “Document memo” when the cursor is held over the document label in the Document System. The first time this is done for a document a new memo is opened, subsequently the same option re-opens the existing memo.
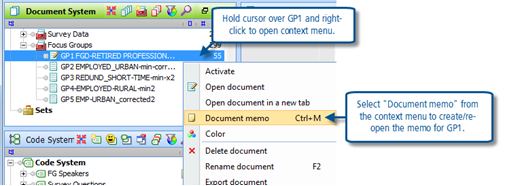
Figure 6.1.1 – Opening a document memo
The precise location of the cursor is important in order to make sure that the memo is attached to the correct document but, as the context menu is opened, the blue highlight bar will jump to the document involved providing a visual indication of that. Note that the document concerned does not have to be open in the Document Browser or activated when its memo is accessed. There is also a short-cut keystroke for this operation (Ctrl+M) as can be seen in Figure 6.1.1 above.
The text of the memo is typed into the main field of the dialog, just like in any other type of memo. Figure 6.1.2 shows an illustration of this.
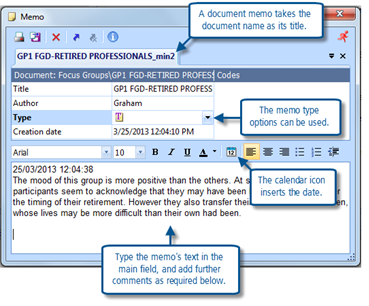
Figure 6.1.2 – Adding text to a document memo
TIP: As soon as the memo is created a “post-it note” icon will appear alongside that document’s label in the Document System window. When you hold the cursor on top of this symbol a temporary panel appears showing the first few lines of text in the memo, this can be a useful quick reminder and so you should try to keep the most important ideas at the top of the memo (if possible) where they will show up in this way. This is illustrated in Figure 6.1.3 below.
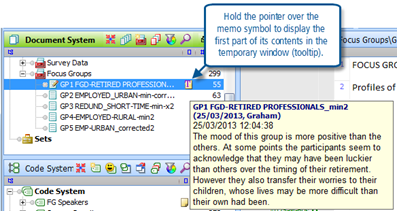
Figure 6.1.3 – Revealing the start of a memo
The comments that you add to a document memo should ideally be those that relate to the document as a whole. Where you want to add a note or annotation about a particular passage of text within a document, then that should be done with a memo that is attached to that paragraph.
Inserting memos in a document in the Document Browser
The procedure for adding a memo inside a document is quick and intuitive. When an idea comes into your head, you want to make a note of it as simply as possible. All that is needed is a double-click in the margin immediately to the left of the text where you want the note to be connected. The standard memo dialog box appears immediately and you can start typing straight away to capture that fleeting insight before something else distracts you. After getting the main idea down you can edit the fields at the top of the memo dialog to add a short title and maybe alter the post-it note symbol to one of the 10 coloured designs.
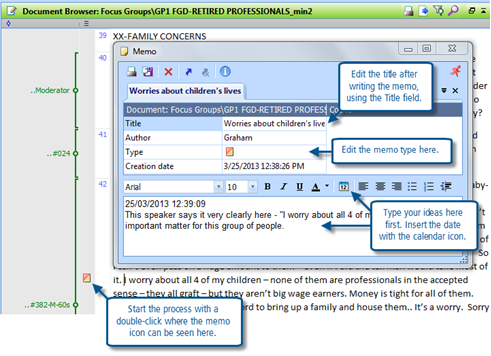
Figure 6.1.4 – Adding a memo inside a document
TIP: There is no need to highlight any text as an anchor for the memo. The memo will be attached to the beginning of the line that is level with where you double-clicked in the memo margin or, if you have clicked somewhere along that line immediately before opening the memo, at the point where the cursor was blinking in that line. If you alter the width of the Document Browser window you should be able to see the memo ‘moving’ to stay attached to its line.
As with code memos and document memos described elsewhere in these materials, when you hold the pointer over the memo symbol a temporary panel opens and displays the first few lines of the memo as a reminder of its content.
Retrieving memos
It may be noticed that the ways in which memos can be created and displayed remind one of the ways this task might have been done manually (with coloured sticky tags and pencilled notes in the margin) and this is not accidental. However a huge advantage with the computer memos is the number of ways that they can be retrieved subsequently. Figure 6.1.5, below, illustrates one of these methods. With a document open in the Document Browser window select the option “Memos > Memos of the opened document” to display a list of all the memos attached to that one document.
The display is not very exciting at this early stage, with only 3 memos attached to this document, but the principle should be apparent. When a memo is selected in the list in the lower half of the Memo Manager window its full text is displayed in the upper half, and the location where it was attached in the document is shown in the Document Browser window partly visible behind it. Later in these materials we will show how a lexical search can be made in memos, to find where a key word has been used and thus locate a half-remembered idea from another part of the analysis – that would be much more difficult in a manual system.
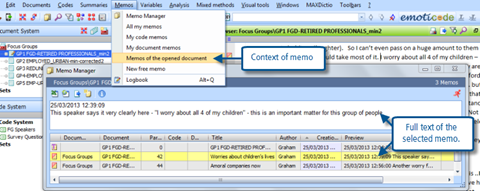
Figure 6.1.5 – Finding all the memos attached to one document
The other options in the “Memos” menu (visible in Figure 6.1.5) may be used similarly to locate ideas previously recorded in document memos, code memos, or in all memos. And the table displayed from any of these options can be sorted into ascending or descending order on any of its columns by clicking in the column header bar at the column to be sorted.
Adding comments to coded segments
It is also possible to record a brief comment attached to a coded segment. Such a comment might indicate why a particular code has been attached to this segment (if that is not obvious from the text itself) or that this segment is a good example of what this code represents, for example. There is a limit of 127 characters for such a comment, which might prove restrictive, so this is probably not the best location for important insights or theoretical developments.
To add a comment to a coded segment, first apply the appropriate code(s) to the segment, then right-click on the code bracket in the code margin and select “Edit comment” from the context menu. A small dialog window opens with a simple comment field, see Figure 6.1.6 below.
TIP: Alternatively you can double-click on a coding stripe to create a comment for a coded segment.
When the comment has been completed with the OK button, the small circle in the middle of the code bracket is filled-in with solid colour as an indication that there is a comment. If you hold the cursor over that coloured disk the comment will be displayed in a temporary panel, just like other annotations in MAXQDA11.
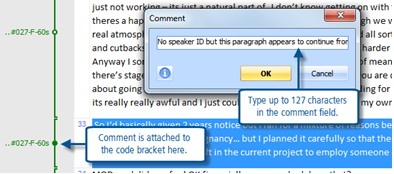
Figure 6.1.6 – Adding a comment to a coded segment
Comments on coded segments can be searched for and used with the menu option “Codes > Overview of coded segments”. This generates a table listing of all coded segments, and one column in this table shows the associated comments. A right-click in the header of that column brings up a context menu, from which the “Search” option can be used to locate the comments that include an entered keyword. Figure 6.1.7 illustrates this for the same example as above.
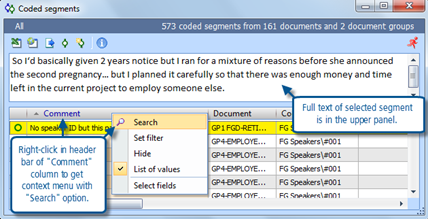
Figure 6.1.7 – Overview of coded segments display
TIP: Note that the comments on coded segments are quite different from the memos which can be attached to a line within the coded segment. The comments are limited in size (to 127 characters) while the memos are not. The comments are organised within the Codes menu, whereas the memos are organised under the Memos menu where they can be found along with document memos, code memos and free memos. So care should be taken to ensure that methodological notes and insights arising from the data are placed in memos, while the comments on coded segments routine should be used for recording the reasons why particular codes have been applied in specific locations.
MAXQDA11 and Case Study B – Marking useful data segments
There are two sets of coding tools in MAXQDA11 that can be helpful in marking useful data segments without having to label them with a topic or theme. One is simple highlight colouring, the electronic equivalent of using a highlighter pen on a hard-copy print-out. The other is a new feature called “Emoticodes” whereby a symbol selected from a wide range of icons can be attached just like a code but without necessarily carrying any specific meaning.
Highlight colour coding
Any passage of text can be highlighted in one of 5 system colours, selected from a toolbar designated for this purpose. Figure 6.3.1, below, illustrates how to open this toolbar:
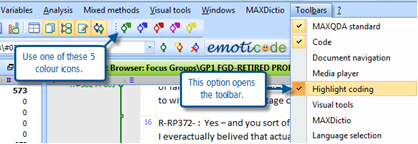
Figure 6.3.1 – Highlight coding toolbar
The highlight colour buttons are shown at the right-hand end of the upper row of toolbars in this illustration. This section of toolbar can be toggled on or off with the menu option “Toolbars > Highlight coding” as also illustrated in Figure 6.3.1. The 5 colours are labelled as green, blue, red, magenta and yellow.
TIP: The colours only appear in the highlight coding toolbar when a passage of text has been selected, at all other times the 5 buttons appear greyed-out.
To apply a highlight colour for the first time, simply click and drag the cursor over the relevant passage of text in the Document Browser window (initially highlighting it in blue) then click on the required colour button in the toolbar.
The full effect of the highlighting does not become apparent until you click the cursor away from the selected passage. Then you will be able to see that the whole selected passage has a bright shading in the selected colour, a code bracket with the name and shade of that colour has appeared in the Code margin, and that colour code name has been added to the Code System (at the top level and the top of the list) with 1 application.

Figure 6.3.2 – Highlight coding
Thereafter, to use the colour again in another segment the procedure is the same as for thematic coding: select the required passage of text in the Document Browser and drag the required colour code from the Code System to drop it onto the selected passage. Alternatively, after selecting the required passage of text, use the coding toolbar where the most recently used colour label will be showing, or select a colour with a click in the Highlight coding toolbar.
To undo a colour coding application, maybe because you change your mind about it, use a right-click on the coloured coding bracket in the Code margin and select “Delete” from the context menu there.
TIP: Other ways of undoing coding applications are described in the materials in Chapter 7 after thematic coding has been discussed in full.
Because the 5 colour codes have most of the functionality of thematic codes it will be possible to use them in different ways later in the analysis. It is not possible to rename a colour code in order to turn it into a thematic code, but it is possible to retrieve all of its occurrences in order to apply a new thematic code to them in a single step (in addition to the colouring) and then the colour code may be deleted from the system leaving just the thematic coding in place. This will be described in more detail in Chapter 7.
Applying “Emoticodes” to selected text passages
A new feature in MAXQDA11 (that was not available in version 10) is that of “Emoticodes”. These are over 300 different icons and symbols that may be used just like ‘normal’ codes but without requiring a descriptive name or label. Clearly it is unlikely to be helpful if 300 or so different code symbols are all used in a single project, so the range and variety have been created to give you a wide selection to choose from in the hope that most researchers will find some items that particularly appeal to them. But, if you feel that just 5 colours of highlighting is not really sufficient for distinguishing those initial ideas of what appears to be relevant in the data, then this range should certainly offer you plenty more choices.
To apply an emoticode, or initially to inspect the tables of possible symbols, select a passage of text in the Document Browser window and then click on the large “Emoticode” button in the Coding toolbar (visible in Figure 6.3.1 above). This opens a dialog where the icons are organised in several groups.
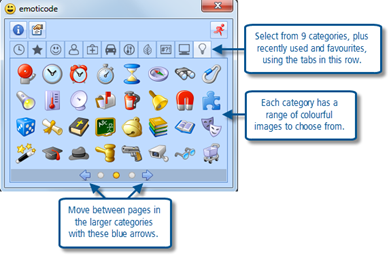
Figure 6.3.3 – Emoticode selection
Clicking on any symbol in these pages will apply it as a ‘code’ to the passage of text already highlighted. The emoticode icon and its associated (neutral) label will be added as a top-level code in the code system, and the icon only will appear beside a green bracket in the Code margin alongside the marked text. When you click away from this passage the highlighting will be removed, but it can be made to appear once more by clicking on the bracket in the Code margin.
The exercises in Chapter 7 include more details about applying, adjusting, merging, splitting, renaming and deleting codes so those are not duplicated here. Just have a go at using a few of the emoticodes in confidence that you are not wasting your time because you are making the first steps in your analysis with these colourful symbols.
MAXQDA11 and Case Study B – Hyperlinking
A hyperlink in MAXQDA11 is a simple connection between two segments of data. Once a link has been created it can be used to view the segment at the other end of the link in a temporary panel, or to jump to the connected location in the other location to see it in full context and then return. Hyperlinks can connect text to an image, or a section of an image, or to a location that can be viewed in Google Earth.
Linking two segments within one document
The simplest hyperlink, and the first one to practice, involves connecting two passages of text in the same document – possibly useful when a speaker appears to contradict himself.
In summary the steps required are as follows:
- Select one passage of text to be linked
- Click on the “Set link” button in the coding toolbar (or use “Insert text link” from the right-click context menu, or use Ctrl+L)
- Select the second passage of text to be linked
- Click on the same “Set link” button in the coding toolbar (or use one of the other methods in step 2)
When a link has been created both segments of text are shown in a blue font and underlined. Holding the cursor over either of these marked segments causes a temporary panel to open and display the location and text at the other end of the link. Clicking on a segment of linked text jumps the cursor to the segment at the other end of the link.
A simple passage in the Group 1 focus group transcript may be used to illustrate this. Speaker RP382 appears to contradict himself quite easily in paragraphs 27 and 29 over the timing of his retirement. Mark the last part of paragraph 27 (as shown in Figure 6.4.1 below) by dragging the cursor over it with the left button depressed, then click on the blue “L” button in the coding toolbar (highlighted in Figure 6.4.1 – and with the toolbar tip showing) to create the first part of the link. You could alternatively use the option “Insert text link” from the context menu or the short-cut key stroke Ctrl+L for this operation.
As you create the link the selected text gains an underlining. When you click away from the selected text the display switches from white font against a blue background to blue text on a white background with the underlining also in blue – this is the way this segment will always be displayed in the Document Browser as an indication that it is hyperlinked.

Figure 6.4.1 – Setting a text link
Now scroll down the document to the next paragraph for that same speaker and highlight/select the first sentence (as shown in Figure 6.4.2 below) and create the second part of the link in the same way as before (click on the “L” button, or “Insert text link” from the context menu, or Ctrl+L). Once again the selected text will change display to indicate the presence of the link.
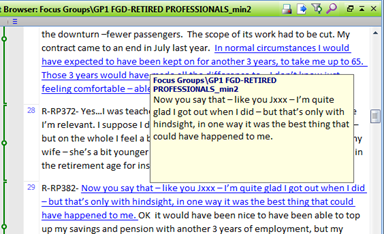
Figure 6.4.2 – Hyperlink within one document
As shown in Figure 6.4.2, where both ends of this example hyperlink can be seen, when you hold the mouse cursor over one linked segment you can read the text in the other linked segment in the temporary display panel that opens. Clicking on one of these linked passages causes the cursor to jump to the other and highlight it once more in reverse colour (white text on blue background).
TIP: There is no ‘direction’ involved in a text link in MAXQDA11. Neither end of the link is ‘first’ or in any way more important than the other, they are just two ends of an invisible connection.
Linking two segments in different documents
The value of a text link becomes more apparent when the two ends are in different documents. The facility to be reminded of a connection that you have previously made between two segments of data that are more remote from each other than the previous example is an important one.
The procedure for linking across documents is very similar to that just described but with an extra step of navigation between the first link and the second.
- Select one passage of text to be linked
- Click on the “Set link” button in the coding toolbar
- Open the document containing the second passage of text to be linked
- Select the second passage of text to be linked
- Click on the same “Set link” button in the coding toolbar
As an illustration of this procedure we will link a segment in the transcript of Focus Group3 about paying the mortgage with a segment in the Guardian online newspaper about house repossessions. You will probably find it helpful as part of this exercise to have both documents open at the same time in the Document Browser. Open the “GP3 REDUND_SHORT-TIME” transcript first and scroll down to paragraph 41 where speaker R-X064 answers the moderator’s question about how his life has been changed (you may see slightly different paragraph numbers if you have edited the source documents during the data preparation stage). Next open the newspaper article “2012_Guardian_repossession-online article 10Feb2012” using the context menu in the Document System “Open document in a new tab” (right-click on the required document name to get this option). You should now be able to see both document as tabs in the Document Browser window, and be able to switch between them by clicking on those tab labels (see Figure 6.4.3 below).

Figure 6.4.3 – Opening two documents at the same time
Note in Figure 6.4.3 that the Guardian article is displayed on screen, its tab is highlighted in the tabs bar, and its name appears in the green Document Browser header bar at the top. The Group3 transcript can be shown immediately by clicking on its tab. Both documents hold their scrolled position when you click between them.
TIP: To close a document that has been opened in a new tab you have to click on the “X” button on the blue tabs bar (level with the tab labels) while that document is displayed in the Document Browser window. When only one document is open it is closed as soon as another document is opened in the normal way. There is no “Document close” menu option.
Having arranged these two documents in this way, it is now a simple matter to set up a text link between R-X064’s comment that “Paying the mortgage is the whole priority” and Peter’s predicament in the Guardian article.
Highlight the segment in the focus group transcript, click on the “Set link” button. Change tab to the Guardian article, highlight paragraph 10 (showing in Figure 6.4.3) and click on the “Set link” button. The links are now created and can be used to display the related segment or to jump between them. To prove this to yourself, close one document (see tip above) and then use the link to go back and forth between the two segments from the other document and to read one segment while displaying the other in the Document Browser window.
TIP: The same process as the one just described above could also be used to link a segment of text in a source document to a reference in the Bibliography document or to an item in a literature review document within the project.
Linking a document segment to an external data source
It is beyond the scope of this exercise but it is worth noting that you can create a hyperlink from a text segment inside a MAXQDA project to a website or to a specific location in Google Earth. When such a link is utilised subsequently your web browser will be opened and the linked website accessed or, if a geolink has been used, Google Earth will be opened and flown to the specified place. More details of these functions can be found in the MAXQDA help file.
MAXQDA11 and Case Study B – Word frequency tools
The main word frequency tool for MAXQDA11 is part of the MAXDictio module, which is only available if “MAXQDA11 Plus” has been purchased, it is not part of the basic program. When this module has been purchased an additional menu option is available in the top bar of the MAXQDA11 screen as “MAXDictio”. This is shown in Figure 6.5.1 below after the MAXDictio toolbar has also been opened from the Toolbars menu.
A new feature in all versions of MAXQDA11 is to view a Tag Cloud for a single document or a set of documents. This has fewer facilities than the MAXDictio module but does provide an indication of the words appearing most frequently. The main features of this function are described at the end of this exercise.
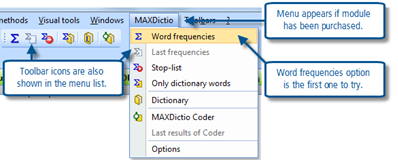
Figure 6.5.1 – MAXDictio menu/toolbar
To generate a simple word frequency calculation select the sigma icon from the MAXDictio toolbar or the “Word frequencies” option from the MAXDictio menu.
TIP: The methodology of using text counting tools, such as “dictionaries” in the text mining sense of that word, is complex and requires a significant investment of time and effort to yield meaningful results. This webpage will not explain those methods at all. We will merely describe how to use the word frequency tool to identify the most frequently used words in selected elements of a project as one way to identify commonalities in the data.
The dialog that opens when the Word frequencies routine is started is mainly used for choosing what subset of the project data is to be used in the calculations. There are two main ways of telling the program what data to use, activated documents or retrieved segments, and these are identified by check boxes as shown in Figure 6.5.2, the Word frequency dialog.
You will need to experiment with this routine a few times to learn how the various optional settings in this dialog affect the data in the results table. The settings shown in this illustration are a suggested starting point.
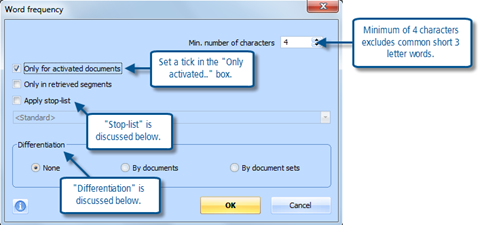
Figure 6.5.2 – Word frequency dialog screen
Activation
The concept of “Activation” was introduced in Exercise 10 of Chapter 5, but will be described again here. It is a key concept in MAXQDA11 and is used in many routines as a way of selecting the data elements to be used in analysis and queries. It is generally necessary to choose which elements are to be used in a particular routine by “activating” them before starting the routine. Sometimes documents need to be activated, sometimes codes need to be activated, and sometimes a combination of documents and codes need to be activated, depending on the routine to be used.
An individual item in the Document System or the Code System can be activated by either:
- selecting “Activate” from the context menu when you right-click on it, or
- using Ctrl + left-click on it
A group of items in either system window can be activated similarly by activating the group header and selecting “Activate all documents” from the context menu although it is simplest to use the Ctrl+left-click on the group header in either window. When an item has been activated its icon changes to a red colour in the appropriate system window and a red arrow appear to its left (see Figure 6.5.3 below).
TIP: Take care to expand groups of elements when activating them in order to be able to see that they have been activated as expected. In the Document System the group header does not necessarily indicate that all of its members have been activated when the list has been minimised. In Figure 6.5.3 below the Local News group has been activated but there is no apparent indication of this in this display.
At this stage it is worth starting to pay attention to the information that appears in the bottom bar of the MAXQDA11 screen. At the left-hand end of this bar there are three fields that summarise the numbers of activated documents, activated codes and retrieved segments. This can provide a useful warning that something is not right in the activations when these numbers are not as you expect.
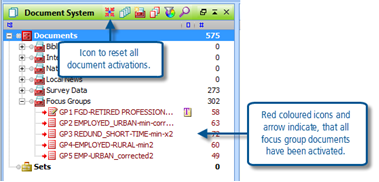
Figure 6.5.3 – Activating documents
Figure 6.5.4 provides an illustration when the five focus group transcripts have been activated along with just two of the speaker codes. The first field in the bottom bar shows a red document icon and the number indicates that 5 documents are activated. The second field shows a red code icon and the number indicates that 2 codes are activated. The third field shows two red code bracket symbols and the number indicates that 22 segments have been retrieved (this should make sense as the speaker codes have only been applied to the focus group transcripts, so all 12 of #372 and the 10 of #382 should be in those transcripts).
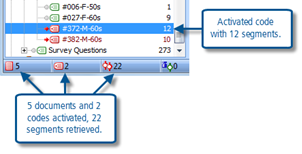
Figure 6.5.4 – Bottom bar shows activation quantities
Word frequency exercises
After this digression around the concept of activation, we need to return to the word frequency exercises. As a first trial of this routine you should activate just the 5 focus group documents (Ctrl+left-click on their group header in the Document System) but have no codes activated (Ctrl+left-click to de-activate any codes that happen to be activated) – so the numbers along the bottom bar should show 5..0..0 . Now re-start the Word frequency routine and set the first dialog to look like Figure 6.5.2 above, and then press “OK” in that dialog.
The results appear in a new window and should look something like Figure 6.5.5, below:
The summary statistics in the top bar tell us that there are 8,094 words in total in the 5 transcripts, and that 2,079 different words were used. These totals are affected by the minimum number of characters threshold, so there are 2,079 different words of 4 or more characters in the 5 transcripts.
This frequency table for the five focus group transcripts does not appear to be showing us much that is interesting. The problem is that we have not excluded the uninteresting words that crop up most frequently in conversation (“that .. they..what..with”) and so we have to scroll down the table to get to more interesting items. The first potentially useful word in this list is probably “work” with a frequency of 49.
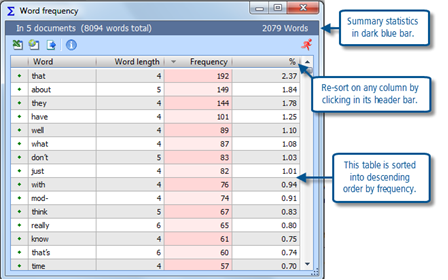
Figure 6.5.5 – Word frequency table
There are two ways of reducing the appearance of uninteresting words in this table, one is to increase the minimum word length (it was set at 4 characters for this illustration – see Figure 6.5.2) and the other is to use a “Stop list” (a list of specified words to exclude from the frequency count).
The problem with increasing the minimum word length to, say, 5 characters is that it would then exclude the word “work” which we probably do want to see. The problem with using a stop list is that we have to create it, word by word, before we can use it. Standard stop lists may be unhelpful to use because a word that is uninteresting in one project may be significant in another, so it is important to review any stop list before relying on a word frequency that has used it to exclude words from the count. MAXQDA11 has facilities to create and reuse as many different stop lists as you like, and to populate them directly from the word frequency table via a small context menu. These are not described on this webpage.
Before leaving this example you may like to explore the facility of differentiating the frequency table by document. Close the frequency table and then restart the Word frequency routine once more. This time in the parameter dialog try setting the “Differentiation” section to “By documents” by clicking on the radio button beside that (see Figure 6.5.2 where this was set to “None”), then run the calculation once more by clicking on “OK”. Expand the results window sideways to see that 5 extra columns have been added, these show the frequencies for each word in each of the 5 transcripts. If there are different patterns in the words used by the different groups then these may become apparent in this sort of display.
Word frequency in retrieved segments
A more interesting word frequency calculation can be run in this project by applying it to the responses in the survey to question 3A (whose fault was the downturn?). This requires a more sophisticated set of parameters to work correctly. The first step is to clear all the current activations in order to be sure of getting exactly the right subset of the data in the routine. There is a button on the standard toolbar called “Reset activations”, it is the fourth from the left, after it has been pressed the bottom bar should read “0..0..0” across the first three fields. (There are similar looking buttons in the Document System toolbar and the Code System toolbar and these reset those system elements separately.)
Now activate all of the Survey Data elements (Ctrl+click on the group header) and see “191” appear in the first field of the bottom bar. Next, expand the Survey Questions group in the code system and activate just “Q.3A COMMENTS FAULT” – see “1” appear in the second field and “48” in the third field of the bottom bar. The Retrieved Segments window now holds all of the 48 responses to the question about who caused the downturn, and these can all be read by scrolling down that window. But before you do that, try running a word frequency on these responses.
In the Word frequency dialog adjust the settings so that there is a tick in “Only in retrieved segments” (and no tick in “Only for activated documents” or “Apply stop-list”), set the minimum length to 4 characters, and click OK to run the calculation. You will probably not be surprised to see that many more of these survey respondents seem to hold the banks responsible than blame the downturn on Europe (20 mentions of banks to 7 mentions of Europe). A little more work can help to refine this. Having identified those two keywords, click on the header of the word column to create an alphabetical list of the same table and then scroll down that to see the further mentions of “bankers” and “banking” (5 and 1 respectively) making 26 in all for that category. Then scroll further to see more Europe related words, “euro” (4) and “Eurozone” (2), making 13 in all for that category.
There are lots more things that can be done with the MAXDictio tools, if the data is sufficiently rich and accurately captured, but this is just an introduction so will stop at this point. A later section will describe how to autocode the source documents directly from the frequency table.
Using Tag Clouds
If you have not purchased the additional MAXDictio module you can still use the Tag Cloud function. You start it by selecting a single document, a document group, a set of documents, or the entire project data set in the Document System window. A right-click on any of these objects opens a context menu from which you can select the Tag cloud option.
A new window opens showing a list of the most frequently appearing words in the documents that you had selected. The list is in alphabetical order and each word is shown in a different font size, proportional to its frequency. Initially it will probably be dominated by words of little value (such as “the”, “and”, “of” etc) but these can be put into a stop list to remove them from future tag clouds. There is only one stop list which will be used by all tag cloud operations, and there is no facility for excluding very short words, so this routine is much less flexible than MAXDictio. But with a little practice you should soon be able to identify the words of interest that appear most frequently in your data.
The buttons at the bottom of the Tag cloud window can be used to edit the stop list in MS Notepad, view a word-frequency table (from where words can be added to the stop list with a double-click, or a right-click context menu), or to copy the Tag cloud to another program.
MAXQDA11 and Case Study B – Text search tools
There is a text searching tool in the main MAXQDA11 program (in contrast to the word frequency tool described in the preceding exercise which is only available in the add-on MAXDictio module).
A basic lexical search
As a first exercise in using the search tool try locating all of the instances where the word “work” occurs in the focus group transcripts. The steps required are as follows:
- Reset all activations and then activate the Document group “Focus groups”
- Open the search tool dialog with the option “Analysis > Lexical search”
- Set the parameters to search for “work” using whole words only in activated documents only
- Click on “Run search” and then read the resulting hits in full context by selecting them one at a time
The above steps are now described in more detail:
Reset all activations and then activate the Document group “Focus groups”
It is good practice to use the global reset of activations before starting a new query or routine, this ensures that there are no analysis errors caused by accidentally including some unwanted data. The global reset activations button is the 4th from the left in the standard toolbar and after it has been pressed the first 3 items along the bottom bar of the screen should all be zero. (For more guidance on this see the preceding exercise about using word frequency tools).
To activate all of the focus group transcripts use Ctrl+left-click on the header “Focus groups” in the Document System (or select “Activate all documents” from the context menu when you right-click on that same header in the Document System). Check that all 5 focus group labels in the Document System are coloured red (if they are not visible then expand the group to display them), and that the bottom bar shows the number 5 in the first field.
Open the search tool dialog with the option “Analysis > Lexical search”
The standard menu approach to this routine is through the option “Analysis > Lexical search”, but there is a short-cut icon on the standard toolbar of a magnifying glass. This button is illustrated in the menu list and can be found as the 7th from the left on the toolbar. It is worth becoming familiar with the short-cut button as its use speeds up the process of refining a search.
Set the parameters to search for “work” using whole words only in activated documents only
The set-up of parameters for this first lexical search is illustrated in Figure 6.6.1 below. This dialog can be used for complex queries but you should experiment with its facilities to familiarise yourself with its possibilities.
This dialog requires you to build up the search string in the white field of the dialog, potentially using multiple rows for complex queries. The “New” and “Delete” buttons at the top apply to the rows in this white field of the dialog. The program always starts with the last search query that you ran and so you often need to delete that, row by row, before building another query. If it is blank, click on “New” to create a row where you can type the first search term, and then enter the word “work”, as shown here.
To the right you have a choice of whether to run the search in documents or memos, this is an either/or choice as you cannot use both at the same time. For this example use documents.
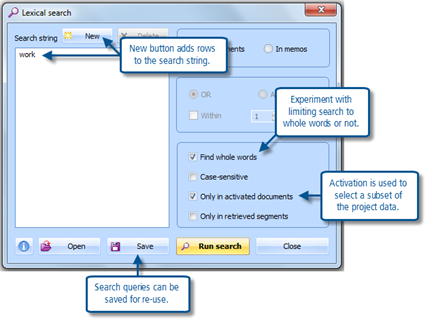
Figure 6.6.1 – Lexical search
The second section on the right is greyed-out in this illustration. It only becomes available when you create two or more terms in the search string.
The four options in the third section on the right should be considered in two pairs. The whole words and case-sensitive options impact on the details of how the search string is interpreted during the search. The other two options are used to determine how the data to be searched is limited. Almost any combination of these four options between no ticks and all four ticks is potentially possible (although you cannot tick “Only in retrieved segments” if “Only in activated documents” is not ticked) and each combination leads to different results. Initially place ticks in the first and third options as shown in Figure 6.6.1.
The buttons across the bottom of the dialog window can be used to:
- Access the help function for this routine.
- Open a previously saved search query.
- Save the current query for re-use another time.
- Run the current query as a search and display the results now.
- Close the current query without running it or saving it.
Click on “Run search” and then read the resulting hits in full context by selecting them one at a time.
When the rest of the dialog looks like Figure 6.6.1, click on the Run search button. The dialog disappears and is replaced by a new window showing the list of ‘hits’ located in the search. If you have used the same parameters as this illustration you should get the same set of hits as can be seen in Figure 6.6.2, below.
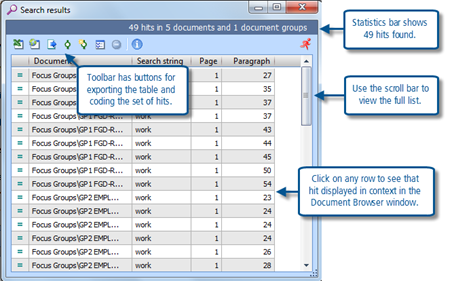
Figure 6.6.2 – Lexical search results
An important, and useful, function of the search results window is that any of the hits shown there can be viewed in its original context where its full meaning can be assessed. To view a hit simply click on it once and look in the Document Browser window where the search string word will be highlighted in blue. As you select different hits in this way, their source documents are opened and closed rapidly as required, in order to display each item. The row of the selected hit will be highlighted in yellow in the search results window.
TIP: You may sometimes need to move the results window (by clicking on its top bar near “Search results” and dragging it with the mouse button held down) in order to read the full context. If possible place the results window over the Document System window during this activity as you are unlikely to need access to that system at the same time as viewing search hits.
TIP: When you select a hit to examine that is lower down the list than the previously examined one, it will be seen at the very bottom of the Document System window. When you select another hit higher up the results list, then it will be found at the very top of the Document System window.
Experiment with different parameters of search
Having familiarised yourself with the basic operation of the lexical search, you should now experiment with changing the parameters.
To run a new search, close the results window (using either the windows “X” button, or the MAXQDA11 icon just below it – a red man running for the exit!), and re-start the search by using its icon on the standard toolbar (7th from the left).
NOTE: Although a similar icon to the Lexical search button may be seen in the toolbars at the top of each of the four system windows on the MAXQDA11 working screen, those other buttons each open a context search within their own window and are not what you need at the moment.
First of all, keep the same search string (just the word “work”) and try changing the options about whole words and case sensitive, while keeping the “Only in activated documents” unchanged. You should find that removing the tick from whole words gives you more hits (66 against 49 found previously), and this is because words like “working” and “worker” are now included.
Changing the case sensitive setting does not seem to make any difference with this particular word, it has only been used in full lower case in these transcripts. But now try removing all the ticks from this section of the dialog, while keeping the search term as “work”. Removing the tick from “Only in activated documents” means that all of the documents in the project will now be searched, and this finds 275 hits in 90 documents (including 1 hit in the Bibliography document). Now try putting the case sensitive tick back in (so you are searching for “work” in all documents, but excluding “Work”) and you should get only 267 hits, implying that there are 8 uses of “work” with at least one capital letter. Try finding those 8 words by creating a new search string as “Work”, keeping the case sensitive tick, and leaving no tick for “Only in activated documents” (hint – you will need to select the previous search string, press “Delete” to remove it, then press “New” to start a fresh string where you can type “Work”).
Finally, you should explore how the “Only in retrieved segments” option affects the lexical search. For this exercise we can leave the search string unchanged as we know that by keeping the case-sensitive option un-ticked the search will find all versions of the word. But this time try activating some of the codes in the “FG Speakers” group of codes (use Ctrl+left-click on individual codes to activate them). Figure 6.6.3 shows part of the Code System with codes identifying speakers in their 30’s activated (in later exercises we will explain how to use the code variable values to do this systematically).
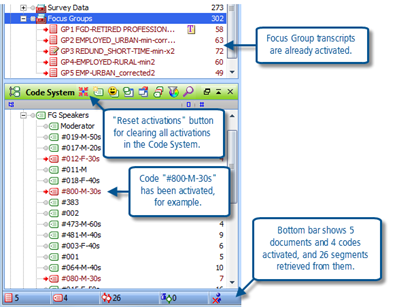
Figure 6.6.3 – Activating selected codes
The default setting for retrieving coded segments is “OR”. This means that a segment will be retrieved from an activated document if it has been coded to any of the activated codes (code1 OR code2 OR code3 OR …). So, now, in the Retrieved Segments window you can scroll down and read all of the 26 paragraphs contributed by the 4 speakers who were identified as being in their thirties.
If you now re-open the Lexical search dialog and set the options to “Only in activated documents” and “Only in retrieved segments” by ticking both (you will find that you can only tick the retrieved segments one after you have ticked the activated documents one), you will be able to search just this small subset of the project data – the 26 passages currently retrieved. By examining the hits one at a time you should be able to satisfy yourself that this is what has happened.
More complex search strings
So far the exercises have used a single word as the search string, but it is possible to search for multiple words. Keeping with the theme around “work” you could extend the search by including words like “job”, “employed” and “employment” in the same search. Figure 6.6.4 shows an illustration of the Lexical search dialog set-up to achieve such a search.
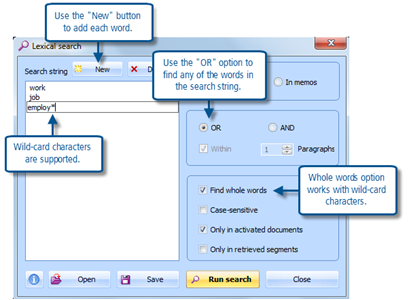
Figure 6.6.4 – Multiple word search
With just the focus group transcripts activated this search finds 131 hits in the 5 documents. You should be able to satisfy yourself that both “employed” and “employment” are picked up by the wild-card use shown in Figure 6.6.4.
The MAXQDA11 help function, which can be accessed from the button in the bottom-left corner of the Lexical search dialog, has more details about the particular wild-card characters which can be used in this routine.
The “AND” button is more restrictive, it is used to generate searches where the objective is to locate instances where both of the terms specified are found within a specified number of paragraphs of each other. For example, you might search for “self” and “employ*” arising together in one statement of a focus group speaker.
For those who need to progress to thinking thematically about the data – coding exercises in Chapter 7 exercises cover different ways to approach this process
Graham Hughes and Stefan Radiker 2014
Section title
Section content
