Using Software in Qualitative Research
A Step-by-Step Guide
Student Resources
Chapter 5 – Getting Started (TRANSANA)
Download the pdf file for this chapter guide here
In Chapter 4 the handling of multimedia is discussed in terms of direct and indirect analysis, modes of transcription and transcription assistance. In Chapter 5 to help get you started, we talk about productive things you can do in the early stages of setting up a ‘project’ in software. Experimenting with these processes where relevant in your chosen software will help to become familiar with useful entities in the software. See all coloured illustrations (from the book) of software tasks and functions, numbered in chapter order.
Sections included in the chapter:
Creating the software project
Transparency
Getting organized
Importing data
Cross referencing
Literature management
A framework of memos
Sections included below:
1. Introduction to Transana
2. Getting started with Transana - installation, making a Transana project
3. How to transcribe using Transana - Transcription as an analytic act
Preparing Data for Working in Transana by David K. Woods, Ph.D., Transana’s Lead Developer
1.1 Introduction to Transana
Transana is sophisticated qualitative analysis software for visual and auditory data, including video files, audio files, and still images. Transana offers a wealth of features designed to facilitate the process of making sense out of such data.
When working with media-based (audio and video) data, a transcript can serve as an important tool for navigating media data and segmenting it into meaningful sections. Different researchers transcribe very differently, ranging from using the transcript as simple map that describes and indexes the media data in a convenient, searchable form, through verbatim, descriptive or analytic transcripts, to conversation analytic transcripts using Jeffersonian Notation, and beyond.
Transana allows researchers to easily select, categorize, and code portions of their visual and auditory data as part of the analytic process. They can select small or large portions of their long video or audio files or large image files, and they can identify analytic significance in several different ways, depending on their theoretical orientation, analytic style, and qualitative methodology.
The program provides a number of text-based and visual reports, maps, and graphs for making sense of the coding and categorizing researchers do. For example, the Keyword Map shows coding across the time-line of a media file, and the Series Keyword Sequence Map applies this same visual layout standardized across media files, allowing researchers to explore changes in patterns of coding across files. The Search function allows researchers to explore relationships between codes applied to segments of media files and still images. The Collection Report presents important visual and textual information about portions of the data that have been grouped together by the researcher. In these reports, Transana keeps researchers as close to their original data as possible; the original video, audio, or image files are usually only a click or two away.
Transana facilitates the complex analysis of complex data in a variety of unique, innovative ways. Transana allows the synchronization and simultaneous display of multiple video files to facilitate understanding in data-rich environments, such as classrooms, which cannot be adequately captured with a single video stream. Transana facilitates using multiple simultaneous transcripts to allow researchers to look at several analytic layers within their data simultaneously. Transana pioneered collaborative qualitative analysis, allowing multiple collaborators to share the same data at the same time, seeing each other’s work in real time, even over a distance and between Windows and OS X computers.
Download Transana
Transana is available through the Transana web site at http://www.transana.org. There is a free Demonstration Version of Transana, and there are several different versions of Transana available for purchase.
- The Standard version of Transana is designed for researchers with straight-forward needs regarding the analysis of media data. This version is designed to meet the needs of researchers new to working with video and audio data, and can be an excellent tool for teaching qualitative analysis of media data. It forgoes some of Transana’s advanced features that many researchers that don’t require
- The Professional version of Transana is designed for researchers with more complex analytic needs. This version allows researchers to analyze multiple simultaneous media files. It allows researchers to use multiple simultaneous transcripts to analyze their media files in sophisticated ways. It allows researchers to add still images into the analytic process in order to enhance the analysis of their media-based data
- The Multiuser version of Transana allows research teams to work together, sharing the same data at the same time. This facilitates collaboration in the analytic process, enabling research teams to work together, even over a distance
- The Computer Lab version of Transana is designed for use in computer labs, where confidential data should not be stored on the computer being used for the analysis
Transana's free Demonstration Version is probably sufficient to experiment with the Case C (Coca Cola Commercials) data. However, the Demonstration Version limits the amount of data you can explore at one time, preventing you from loading all of the data files available in the case. We will limit the analysis described in these web pages to just five of the media files to accommodate people who do not have institutional access to one of the paid versions of Transana.
The demonstration version of Transana is available at http://www.transana.org/download/demo.htm . You can purchase any of the paid versions of Transana through the Transana Web Site by starting at the Purchase page at http://www.transana.org/download/purchase.htm.
Whatever version of Transana you choose, you can download Transana for either Windows or OS X, depending on the operating system on your computer. Please make a note of the location on your computer where you save this downloaded file.
1.3 Obtain the Case C (Coca Cola Commercials) data set
You can download the appropriate data for Case C, the Coca Cola Commercials,
It's probably easiest if you create a separate data directory for the data files, in your “My Video” on Windows or your “Movies” folder on OS X, or somewhere in your “Documents” folder. It is generally advisable to store all of the source media and image files for a single project in a sub-directory of its own (or a set of nested directories for larger projects) rather than putting media files from several projects together in the same directory. Because research video files can take up a lot of hard drive space, you may find it necessary in the future to move or delete data files from old projects as you bump up against the limits of the size of your hard disk. Maintaining separate directories also makes tasks like backing up the media files, moving data files to another location (such as an external or network drive), or sharing project data with colleagues easier.
1.4 Transana’s Analytic Philosophy Regarding Media Files
In the materials provided to software developers for the preparation of these web-based materials, Lewins and Silver state “(w)e assume you will not consider importing video or sound data unless at some level, your analysis relies on identifying interactions, dynamics or happenings which would otherwise be missed.”
We could not disagree more strongly with the sentiment behind this assumption. If you have video and / or audio data, why on earth would choose NOT to use so much of the rich information these data formats provide? Audio can provide crucial information about inflection, which can be critical to correctly interpreting the meaning of words that were spoken. It can sometimes be difficult to tell the speaker’s true meaning from a transcript but much easier to tell by listening to the original media data. The same words can take on the opposite meaning when spoken sincerely or when uttered sarcastically. Video can provide information about body language and posture which provide subtle, but sometimes essential, information about a participant’s meaning, intent, or emotional state. It’s possible you won’t need that information during your analysis, but it’s also quite possible that there will be some passages where hearing what was said and how it was said will allow you to avoid a misinterpretation of your data that reading a lifeless transcript would produce. Retaining the media data reduces the chance of such a misinterpretation of the data.
Transana, as much as possible, maintains a connection to the original media data, making it possible to see (for video) and hear (for audio and video) the original media data from many points in the program with as few clicks as possible. Granted, it used to be that such analysis was difficult and time-consuming, but tools such as Transana make it easier than it’s ever been before to retain the full richness of media data. We strongly advocate retaining the media files as part of the analytic process whenever possible. In fact, this was one of the driving forces behind Transana’s original development.
1.5 Test the Data Format
There are many, many ways to create video and audio files. Transana supports a wide range of popular video and audio formats. Unfortunately, not all media formats are compatible with all computers or with Transana. Therefore, Transana includes a Media Conversion Tool that is often useful if you have media files that are not compatible with Transana or with your computer. (The Media Conversion Tool is disabled in the Demonstration version of Transana due to media format licensing concerns.)
The Coca Cola media files in Case C are in MP4 format using “h264” video encoding and “aac” audio encoding. This is a common video format that should work on both Windows and OS X computers using the QuickTime Media Player. What this means is that if you are using the Case C media files, they should work for you without any further preparation or media conversion. You can stop reading this section if you don’t want to know about the details of media file construction and conversion.
If you are using your own data, you may wish to test one of your media files by following the instructions for adding data to Transana in the next chapter. There is a good chance it will just work with Transana. However, it is also possible you could run into problems playing your files within Transana if they are not in a format that is compatible both with Transana and with your computer. For example, WMV and WMA files do not play on Macintosh computers without installing a helper program. MPEG-2 video files require the installation of a piece of software called a "codec" on both Windows and OS X computers. Neither of these issues has anything to do with Transana. Flash Video, in FLV files, is popular on the Internet, but is not compatible with the media players Transana uses on either Windows or OS X. Some researchers find that High Definition video with large screen images such as 1920 by 1080 pixels doesn’t work very well for the purposes on analysis, as the video is too large and too demanding of their computer’s resources. If your video doesn’t play in Transana, or it doesn’t play smoothly, video conversion allows you to change the media format, lower the resolution, and reduce the video bitrate, which often solves the problem.
There are a number of ways of handling media compatibility issues, requiring varying degrees of knowledge, technical sophistication, and expertise. Transana's Media Conversion Tool is often a good option to try first, as it tries to make the conversion process as easy as possible. It won't work in every situation, but it does a pretty good job with many of the common problems that can arise, and it’s very easy to use.
To start the Media Conversion Tool, go to Transana's Tools menu and select Media Conversion. Use the Browse Button to select the media file you'd like to convert. If the Media Conversion Tool is able to understand the file, as indicated in the Information section of the form, change any settings you’d like from their defaults, then press the Convert button to start convert the file. (When in doubt, though, go with the default values!)
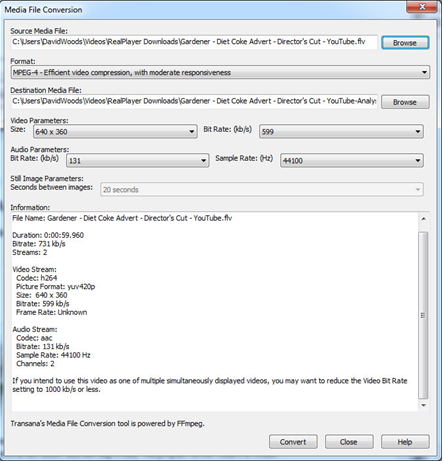
Media conversion can require some patience, whether it is being done using Transana’s Media Conversion tool or another program. It is not, however, as insurmountable a problem as people sometimes think it will be. If you have long media files, your conversions will take time, but so will other analytic tasks such as transcription and analysis.
If you have a number of media files to convert, try to develop the habit of starting a conversion every time you’ll be out of your office for a sufficient block of time (when you teach, eat, attend departmental meetings, or go home for the day, for example.) Often, you will find that you can convert files faster than you can analyze them. Another trick I often use is to set my laptop to work on converting media files while I am analyzing already-converted files on my desktop computer.
2.1 Install Transana
Locate the Transana installer you downloaded in section 1.2 of the last chapter. Double-click this installer file to start Transana's installation process, and follow the screen prompts. (We won’t detail the steps here, as they differ depending on your operating system, they are spelled out in the installer process, and they are pretty standard.)
NOTE: If you are on Windows, please make sure the free QuickTime Player, available at http://www.apple.com, is installed on your computer. Transana requires the QuickTime player, and will not start up correctly if the QuickTime Player is not properly installed.
2.2 Create a Project Database and Start Transana
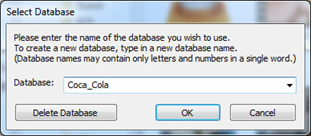
The first step for doing any analysis of media files with Transana is to create a project database. When you start Transana, you will see Transana’s introductory splash screen, followed immediately by the "Select Database" dialog box. (If you’re on Window and don’t see this, re-read section 2.1 about installing the QuickTime Player.)
If you want to work in a project you’ve worked on before, you can select that project's database name from the drop-down list of existing projects. If you want to start a new project, type a new database name in the dialog box. (If you are using Transana’s Demonstration version, you must use the database named “Demonstration.”) Please note that the database name must be a single string of characters. You can use letters, numbers, and the dash and underscore characters, but you should avoid most non-letter symbols. Spaces are not allowed in the database name. Press OK.
You should now see Transana's Main Screen for a new project.
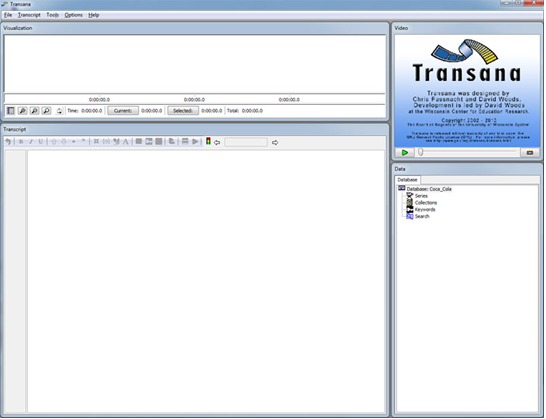
Transana’s main display is made up of five sections.
At the top of the screen is the Menu. Some operations in Transana are triggered by selecting items from these menus. As a general rule, these are operations that affect the whole program, although the Transcript menu provides some exceptions to that rule.
In the upper right corner is the Media Window. This is where video is displayed, and where audio and video playback can be controlled directly.
The window in the lower left portion of the screen is the Transcript Window, where transcripts are created, edited, and displayed. Transcripts can be linked to media files so that a highlight in the transcript moves forward as the media file plays, and so that a selection can be made in the transcript and the corresponding portion of the media file played.
The upper left portion of the screen is the Visualization Window, where different types of information such as a waveform of the video’s audio track and a graph of coding across the time line of a media file can be displayed in a visual format.
In the lower right corner of the screen is the Data Window, where the researcher adds project data and initiates a variety of analytic acts, including manipulating the analytic data and generating reports about the data.
2.3 Set the Video Root Directory
Media files tend to be very large, compared to text and analytic information. When working with Transana, you are much more likely to run into storage space issues for holding your media files than you are for storing the Transana database of analytic information. This is particularly true if you are working on a large project with hundreds, or potentially thousands, of video files.
When working in Transana, the raw data files, your audio, video, and still image files, are not brought into the project database. Given the size of the files involved, that would be wasteful of disk space and would slow down such processes as loading video files considerably. Instead, Transana stores the data file names and paths so that Transana can use the original data files as needed.
During the life of a project, there may be a need to move the data files due to disk space limitations. You may also want so share your data with colleagues who may want to use a different location for the media files. To make this process easier, Transana can separate file names into a common directory path, known as the Video Root Directory, and the rest of the file name (including directory information beyond the video root, the file name, and the file extension). When data is relocated, all you need to do is update the Video Root directory, rather than having to update the file location for every Episode, Media Clip, or Snapshot in the database.
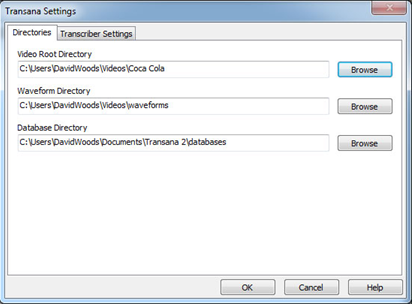
Therefore, the next step in starting a new project in Transana is to tell the program where to find the project media files. On Windows, go to Options > Program Settings. On OS X, go to Transana > Preferences. Use the first Browse button to set the Video Root Directory to the location where you saved the project data files. You should leave the default values for the Waveform Directory and the Database Directory unchanged. Press OK.
2.4 Transana’s Organizational Structure
Transana’s Data Window is where researchers add data to the program. It is helpful as you begin your first project to understand a bit about how data is organized in the Data Window. Data is presented hierarchically in a tree structure in the Database Tree in the Data Window. This tree starts with four root nodes, Series, Collections, Keywords, and Search.
The first branch in the Data Window’s Database Tree is the Series node. This node is where all raw media information is added, presented, and manipulated. The first level in this branch of the tree is called a Series in Transana. A Series is nothing more than an organizational place to store a group of related media files. Each separate media file (or set of simultaneous media files) you bring into your analysis is known as an Episode in Transana. Each Episode can have one or more transcripts associated with it. So for raw media, we have Series of Episodes with Transcripts.
The second branch in the Database Tree is the Collections node. This node is where all analytic information is collected, organized, and manipulated. Collections are groups of related analytic data objects. Analytic data includes Clips, which are smaller segments of media and transcripts taken from the larger Episode and Transcript combinations, and Snapshots, which are still images from image files or captured from video files. Clips and Snapshots can be coded analytically. So for analytic data, we have Collections which contain Clips and Snapshots, and Clips and Snapshots can be coded.
The Keywords node is the third node in the Database Tree. Keywords are what Transana uses for coding, and the Keywords node is where researchers set up and modify their coding schemes. Thus, Clips and Snapshots are coded in Transana using Keywords.
The final node in the Database Tree is the Search node. This is where results from Keyword searches are stored temporarily while researchers explores and manipulates them. If the researcher decides to, either the search specification can be saved for later reuse or the results of the search can be saved as a new Collection of coded Clips and Snapshots in the Collections node.
Finally, researchers can create Notes and attach those Notes to Series, Episode, Transcript, Collection, Clip, and Snapshot objects. This allows researchers to keep notes and analytic memos about different aspects of their analysis in a flexible way.
More information about Transana's organizational structure can be found in in Transana's built-in Tutorial (available from Transana’s Help menu) or online in the Transana Screen Cast called “Transana's Terminology and Analytic Model.”
2.5 Bringing Data into Transana
When using Transana, the researcher organizes raw media data into Series of Episodes with Transcripts. The act of bringing data into Transana starts in the Data Window in the lower right portion of the screen. This process is described in detail in the Tutorial, and a video demonstration of how to bring data into Transana can be seen in the "Adding your First Media File to Transana" ScreenCast on the Transana Web Site.
We want to create a first Series, which we will call "Video Files," to contain the 15 video files that make up majority of the Coca Cola data set. Had there been more media files, we could have chosen to create a more complex Series structure, perhaps creating a Series record for each decade of ads or creating different Series records for different types of ads, had the data set included radio and print ads in addition to television ads.
Sometimes it takes a bit of thought, or even some trial and error, to discover an “optimal” way to organize the data for a particular data set. If you are collecting a large amount of educational data from multiple classes at multiple schools, for example, you could organize your data by school, subject, teacher, class, curriculum, or date. Each of these organizational systems has strengths and weaknesses. Fortunately, it's very easy to reorganize your data if you decide you want to at a later time.
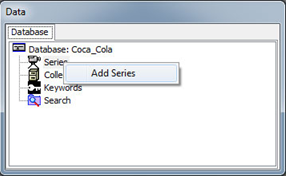
To create a Series in Transana, start by right-clicking the main Series node in Transana's Database Tree. (If you are using OS X on a Mac with a single-button mouse, pressing Ctrl while clicking the mouse button emulates a right-click.) When you do this, you will see a popup menu with only one item, “Add Series.” Select that item.
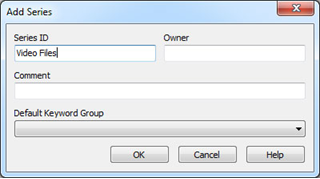
When you select the Add Series menu item, you will see the Add Series dialog box. Give your Series a name by entering a value in the Series ID field. This is the only information that is required, so press OK
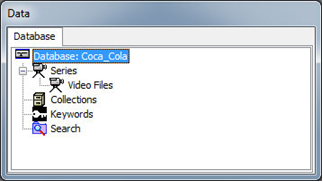
You will now see the Series record in the database tree.
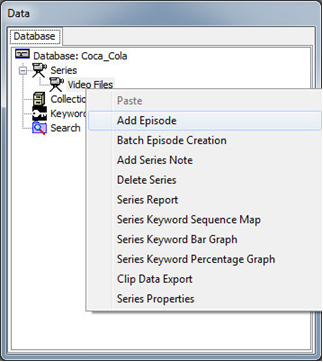
The next step is to create an Episode for the first media file we wish to examine. To create an Episode in Transana, right-click your "Video Files" Series record and choose the "Add Episode" option from the popup menu
You will see the Add Episode dialog box. Press the "Add File" button on the right side of the screen and select the video file called "1960s Coca Cola commercial.mp4". Notice that if you have left the Episode ID blank, Transana automatically suggests the first media file name as the Episode ID. You are welcome to change this if you'd like, but you won't need to if you've given your media files meaningful names. Press OK.
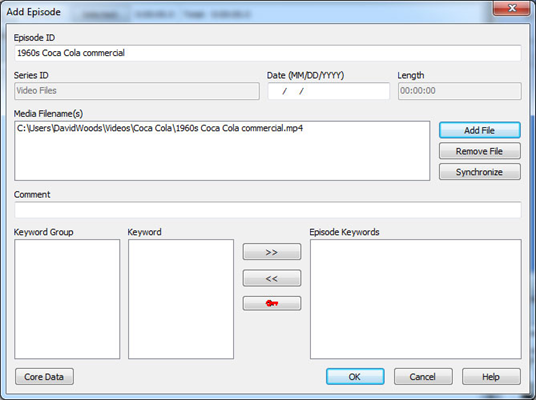
In Transana, you can't analyze a media file without at least a minimal transcript. A Transcript is a document, any document, which is connected with a media file. As you will see, Transana uses the term Transcript very broadly, for many different types of documents with varying levels of detail and varying analytic functions. The main thing all Transcripts have in common is that they serve as a guide or map to the media file. As such, they serves an essential role in the coding process by providing a mechanism to segment the media files into smaller chunks. This will all become clear later.
Because a Transcript is essential in Transana, the program automatically tries to create a first Transcript for each Episode. Therefore, you will see the Add Transcript dialog box. The first transcript we will create will be a "verbatim" transcript of the words spoken in this media file. Type the word "Verbatim" in the Transcript ID field. Type your name in the Transcriber field.
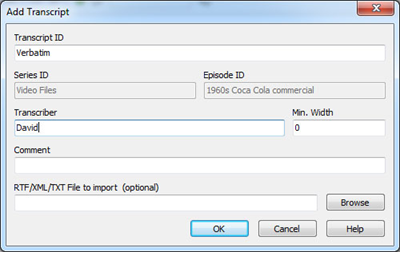
If we had an existing transcript for this media file in Rich Text Format, Transana's XML Transcript Format, or in plain text format, we could import that transcript at this time. Since we don’t have such a transcript, leave the “RTF/XML/TXT File to import” field empty. Press OK.
If this is your first time loading this media file in Transana, Transana will prompt you about creating a wave file. If you see the prompt displayed below, click Yes. (For the moment, let’s not worry about what this means!)
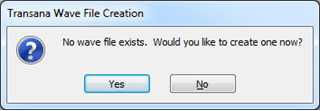
Transana will then load your media file, the blank transcript you just created, and a waveform representing the media file's audio track into its main interface.
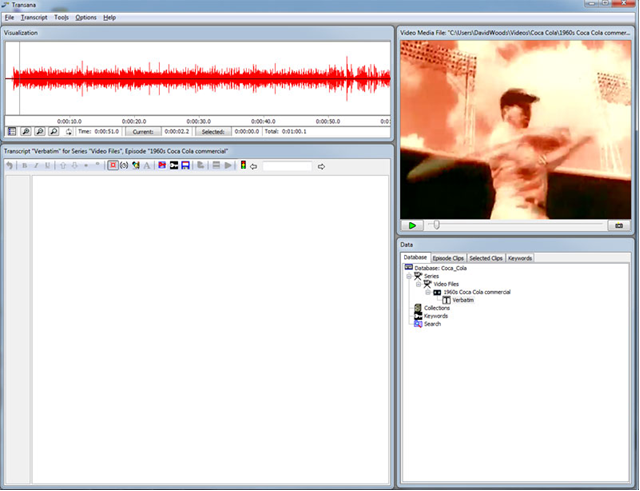
Before we talk about transcription or dig into analyzing this file, let's import the rest of the media files for the Coca Cola case.
2.6 Batch Episode Creation
If you have a small number of media files coming in slowly as you proceed with your qualitative study and analysis, you can follow the procedures described above to add files to Transana one at a time. But sometimes it's more convenient to add multiple media files to Transana in a single action. That's what Batch Episode Creation is for. Let's use Batch Episode Creation to add the rest of the media files in the Coca Cola data set to Transana.
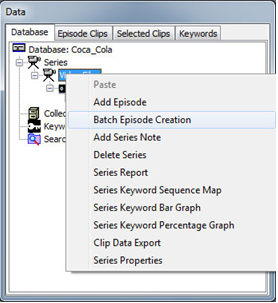
The first step in this process is to right-click the Series that will contain the Episodes for the media files we want to import, in this case the “Video Files” Series. Select “Batch Episode Creation” from the popup menu.
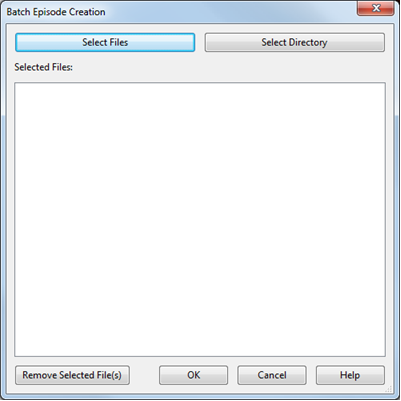
The Batch Episode Creation dialog box will be displayed. At this point, we can either press the "Select Files" button to select files individually or we can press the "Select Directory" button to bring in all of the media files from a directory.
If you are using the full version of Transana, press the "Select Directory" option and choose the entire Coca Cola directory. But we have already created an Episode for the first file in the list, "1960s Coca Cola commercial.mp4". Since we don't want to import that file again, we'll select that file in the list and choose "Remove Selected File(s)", and then we'll press OK.
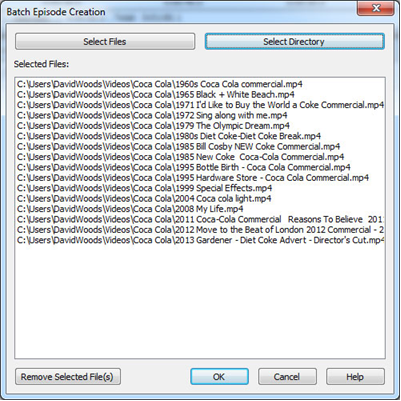
If you are using the Demonstration version of Transana, you are not permitted to import as many files as are included in this data set. In that case, press “Select Files” and choose these files from the list of files:
1985 New Coke Coca-Cola Commercial
1994 Diet Coke-Diet Coke Break
1995 Hardware Store Coca-Cola Commercial
2013 Gardener - Diet Coke Advert - Director's Cut
Once you are done selecting files, press OK.
A quick look at Transana's Data Window shows that Transana creates an Episode for each media file selected in the Batch Episode Creation interface, using the media file's name as the Episode ID. Transana has also created a blank Transcript for each media file, again using the media file's name. If we had a document in an appropriate format in the same directory as the media file and with the same file name (but a different file extension) as the media file, Transana's Batch Episode Creation utility would import that document as an initial transcript.
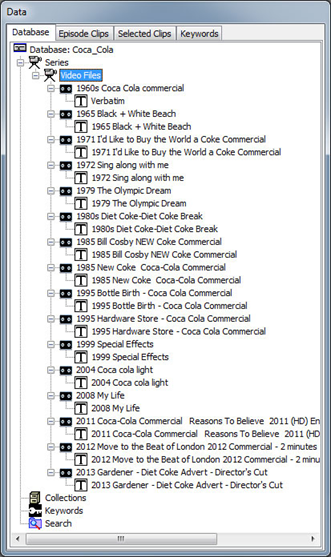
In the current analysis, the automatic transcript names may not be names we want to keep. Fortunately, it's easy to change the Transcript IDs if we want to. Just right-click the Transcript and choose "Transcript Properties", or click on the Transcript ID in the Data Window so that it becomes editable.
2.7 Background Materials – Bringing text-only documents into Transana
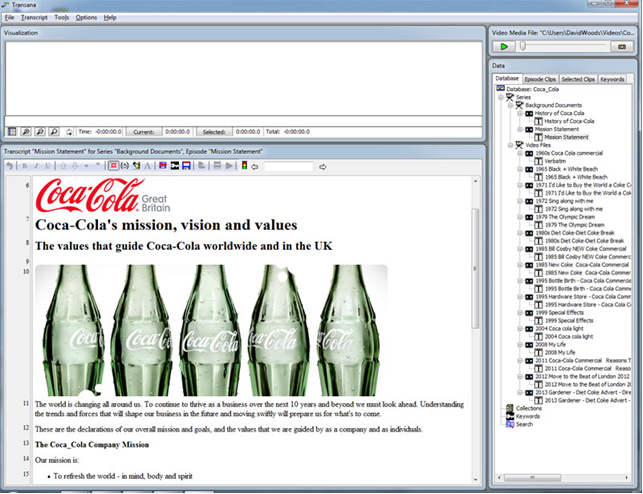
If you look through the Coca Cola data files you downloaded, you will notice there are two text documents that do not have accompanying media files, "History of Coca-Cola.rtf" and "Mission.rtf". It would certainly be nice to be able to bring these background materials into our analysis.
Transana is designed to facilitate the qualitative analysis of video files, audio files, and still images, not text-only documents. However, there is a trick you can employ when you want to bring a small number of text documents into a larger analysis of media files. Please note that this trick is not suitable for bringing a large number of text files into a Transana analysis.
First, right-click the Series node in the Data Window's database tree and choose "Add Series", creating a Series called “Background Materials”.
Second, right-click the “Background Materials” Series and select "Add Episode". Use "History of Coca Cola" for the Episode ID, and pick any media file. The media file selected for the Episode is irrelevant, as it's the text of the transcript that is the data of interest. You have to pick a media file – Transana requires it – but what media file you pick doesn’t matter.
Third, when creating the Transcript for this Episode, choose to import the "History of Coca-Cola.rtf" file. In essence, we are creating a dummy Episode for the text document contained in the Transcript.
Take a moment and create a Mission Statement Episode and Transcript for the "Mission.rtf" file from the data set.
2.8 Initial Analytic Memos
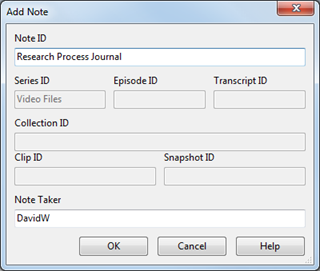
As you bring your first data files into Transana, you may want to add your first analytic memos as well. Right-click (Ctrl-click on the Mac) the “Video Files” Series and choose “Add Series Note” from the popup menu. Give your note the Note ID “Research Process Journal” and press the OK button.
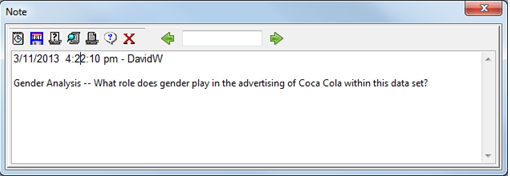
Once you’ve created your Note, you will be taken to Transana’s Note Editor. It’s good to develop the habit of automatically time stamping your work on your notes, so press Ctrl-T or the “Insert Date / Time” button on the Note Toolbar. This will automatically insert the date and time of your note. Enter any preliminary thoughts, insights, or ideas that would be appropriate to your Research Journal analytic memo, then close this Note window. You do not need to explicitly save what you have written. Transana will take care of that automatically for you when you close the Note Editor.
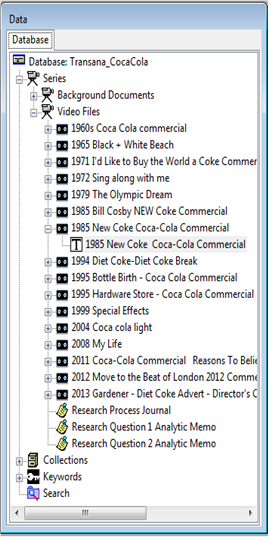
You can add as many Notes as you would like to your Series entry. Take this opportunity to create analytic memos for each research question you have, if that is appropriate to the analytic approach you are taking with your data.
If you wish to summarize each media file and keep separate analytic memos for each media file, you can create Episode notes by right-clicking each Episode and choosing “Add Episode Note”. In Transana, you can attach Notes to Series, Episode, Transcript, Collection, Clip, and Snapshot records, allowing you to select the scope that is most appropriate for any given thought, idea, comment, or other analytic memo.
2.9 Backing up and Moving Transana Projects
Backing up a database in Transana is relatively simple. Simply choose Tools > Export Database and enter a file path and name. Transana will create a Transana database export file, giving it a TRA file extension. This file contains all of your analytic data, including all of your transcripts, your coding system, your analytic markup for still images, and your analytic memos. This database export file, and can be loaded into another database on this computer or into Transana on another computer as long as the Transana version number is the same or higher.
It is important to note that your source media files and images are NOT imported into the Transana database, and thus, the Transana Database Export file does NOT contain your raw media files or images. To fully back up your data, you need to copy the Transana database export file as well as all of the video, audio, and still image files you refer to in your Transana database.
The reason for this is simple. Video files are HUGE. Audio files are pretty big too. Even still image files can be reasonably large, especially compared to the relatively small about of data required to store the text and formatting of even a long transcripts. It would be a tremendous waste of computer disk space to create multiple copies of the gigabytes and even terabytes worth of media files a large analysis in Transana can encompass. Because of the size of media data files, moving between computers is more laborious when analyzing video than when analyzing text.
There are a couple of common methods that people use with Transana when they want to work on their analysis on several computers.
One option is to store the Transana database and all media data on a portable hard drive, which can be transported easily between computers. This option works well for the individual researcher working alone. There is some risk of the portable drive being damaged, lost, or stolen, so frequent data backup to another drive is encouraged in this situation. Please note, however, that cloud storage tools like DropBox and Box are NOT compatible with Transana’s database files. While such tools may work perfectly well with media files, attempting to share Transana’s database files between computers using such tools can lead to database corruption and data loss.
Another popular option is to use Transana’s multi-user version. With this version, researchers can connect to their data from multiple locations, and multiple researchers can work on the data set simultaneously. Each researcher is able to see the changes that other researchers make to the database in real time on their screens. This is an excellent tool for collaborative analysis of data, and works even over a distance when research team members are distributed. See About the Multi-user Version of Transana on the Transana Web Site for more information about this option.
Transcription with Transana – A First Analytic Pass
by David K. Woods, Ph.D., Transana's Lead Developer
3.1 Transcription as an Analytic Act
As argued in section 1.4, a transcript is usually not a good substitute for an original media file in qualitative analysis. That being said, transcripts serve a central role in the analysis of media files in Transana. Transcripts don’t replace the media files in Transana’s model of analysis, but they enhance the process in a number of very interesting ways.
One of the vital roles a transcript serves in the qualitative analysis of media files with Transana is that the transcript serves as a kind of map or index to the contents of the media file. It can be challenging to find a particular instance or interaction of analytic significance by scanning through media files; it is much easier to find the desired location scanning through a transcript. Since transcripts and media files are linked in Transana, once you’ve found what you’re looking for in the transcript, you can easily play the corresponding portion of the media file.
A second important role that that the transcript serves in analysis with Transana is that transcription can be an analytic act. There are many types of transcripts that can be useful in conjunction with media data, including:
- Field notes
- A minimal index
- Partial, annotated, or abbreviated transcript
- Verbatim transcript
- Translation
- Descriptive, gestural, or other notation
- Image-based visual transcript
- A transcript from a particular viewpoint, one that represents a view of the data through a particular analytic lens
- Conversation, Discourse, or Interaction Analysis
- Phonetic transcript
Each of these textual representations can serve a different function in the analysis of media files. We will describe just a few of these options in this document.
Transcription is an excellent way to explore your media data and to familiarize yourself with it. Non-verbatim transcription is also an excellent way to embed notes in your data when dealing with media-based data.
3.2 Verbatim Transcription
The first step in understanding media data in Transana is to prepare a transcript. As mentioned earlier, a transcript in Transana serves as a kind of map for the media file, and serves a crucial role in the analytic process of selecting segments of the media file to code and analyze. While there are many types of transcripts that can be useful in the analysis of video and audio files, let’s start with the most commonly created form of transcript, verbatim transcripts.
Let's start by looking at the “1985 New Coke Coca-Cola Commercial.” This file contains more verbal content than many of the other commercials in this data set, making verbatim transcription a reasonable way to begin analysis of this file.
Expand the “Video Files” Series node in the data tree to show all of the Coca Cola commercials. Then expand the "1985 New Coke Coca-Cola Commercial" Episode to show the Episode's transcript. Double-click the transcript to load this Episode - Transcript pair into Transana's main interface. (NOTE: To load a media file in Transana, double-click a transcript associated with an Episode. The reason for this is that each Episode can have multiple Transcript records and Transana needs to know which of an Episode's Transcripts you want to see when opening an Episode.)
Push the "Play" button in the Video Window and watch the commercial. The visuals are pretty simple, just two cans, a can of Pepsi and a can of New Coke. The announcer talks and the announcer’s words scroll in the upper part of the screen. As the ad progresses, the New Coke can slides forward into a position of prominence and the Pepsi can fades away. These are nice images, but the real impact of this ad comes from the words being spoken. Let's create a transcript that captures those words.
Putting the spoken words into a transcript makes them more accessible for analysis. While it may seem trivial for so short a video sample in so small a data set, imagine you had a set of a dozen (or a hundred) interviews lasting 30 to 60 minutes. The more media data you have to work with, the more crucial a role the transcript plays in being able to find a particular passage in a particular media file.
Since you just played the commercial, the video position is set to the end of the media file, and we need to start transcribing at the beginning of the file. Reposition the video, either using the slider in the Video Window or by clicking at the extreme left edge of the waveform diagram in the Visualization Window. Either way, the Current indicator in the Visualization Window should indicate a position of 0:00.0.
There are differences in the way Transana should behave when we are transcribing compared to when we are analyzing video that has already been transcribed. While these differences can seem subtle at first, they are important for the program behaving in ways that are intuitive and logical. Therefore, Transana operates in two different modes, analytic mode and edit mode. By default, Transana opens in analytic mode, as you will spend more time doing analysis than you will transcribing.
The first step to editing a transcript in Transana is to put the Transcript Window into Edit mode. Press the Edit button in the transcript toolbar, which looks like this: {C}{C}{C}{C}{C}{C}{C}{C}{C}{C}{C}{C}{C}{C}
![]() {C}{C}{C}{C}{C}{C}{C}{C}{C}{C}{C}{C}{C}{C}
{C}{C}{C}{C}{C}{C}{C}{C}{C}{C}{C}{C}{C}{C}
. Transana is now ready for you to edit the transcript.
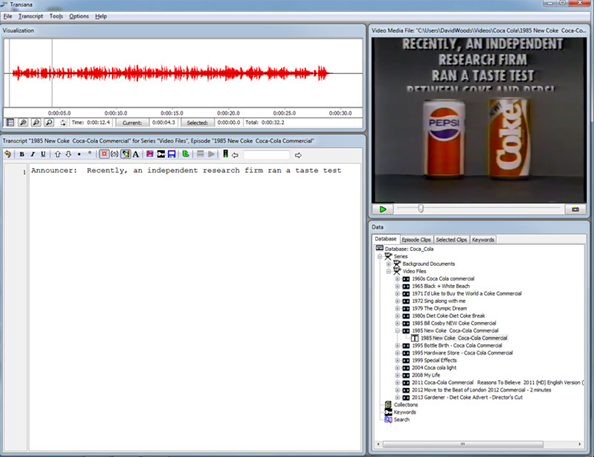
You can control media playback from within the Transcript Window. This makes transcription more efficient, as you don't need to remove your hands from the keyboard, and you can keep the program focus in the transcript window at all times. Press Ctrl-S to start playing the video file you have loaded. When the announcer has spoken the first few words, press Ctrl-S a second time to pause video playback. Now type what you heard into the Transcript Window. Your screen should look about like this:
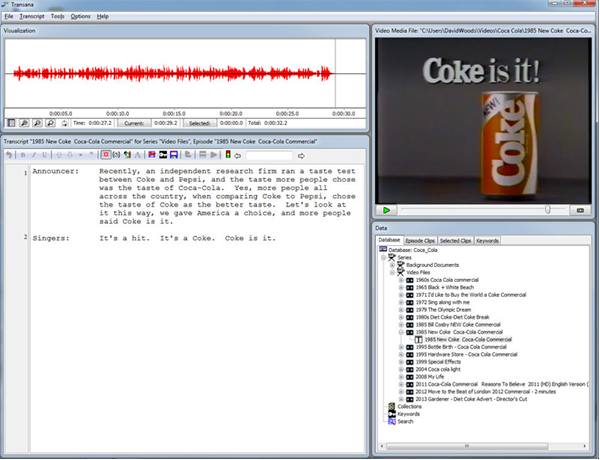
When you press Ctrl-S again to re-start video playback, you will notice that Transana rewinds by 2 seconds when it starts media playback using Ctrl-S. This brief automatic rewind is generally considered to be helpful by transcribers in maintaining the continuity and accuracy of their transcription. Press Ctrl-S to listen to small segments of the media file and to pause playback so you can type what you hear. Do this repeatedly until you have transcribed the 30-second media file. After adding some paragraph formatting, my transcript looks like this:
(For more information on transcript formatting within Transana, see the Transcript Formatting ScreenCast.)
Other key combinations that are useful during transcription include:
Ctrl-A Rewind 10 seconds and play
Ctrl-S Pause / rewind 2 seconds and play
Ctrl-D Pause / Play with no rewind
Ctrl-F Fast-Forward 10 seconds and play
A more thorough demonstration of transcription can be seen in the Transcription with Transana ScreenCast on the Transana Web Site.
3.3 Time Codes
In Transana, we can link the transcript to the media file, which can be very helpful. This is accomplished by inserting Time Codes in the transcript. A Time Code is a marker in a transcript that links a particular location in the transcript with a specific spot in the corresponding media file. Time Codes are often inserted into a transcript during transcription, but have been separated out here for teaching purposes and because this is such a short transcript.
Let's insert time codes between sentences in this video file. Make sure your transcript is in edit mode, not analytic mode, before getting started.
The first step in placing a time code is to position the video in the correct spot. Use the slider in the Video Window, or click on the extreme left edge of the Visualization Window to move the video position back to the beginning of the file. Press Ctrl-D (or Ctrl-S) to start the video playing, and press Ctrl-D or Ctrl-S again just as the announcer finishes the first sentence. If your pause position isn't quite correct, press Ctrl-S to automatically back up 2 seconds and try again. Sometimes, it takes several attempts to pause the video at just the right spot, although this will become easier with practice.
Once the media file is positioned accurately, click in the Transcript Window and move the transcript cursor to the point in the transcript that corresponds to where you paused the media file, the point between the first and second sentences.
With the media positioned and the transcript cursor placed in the matching spot, press Ctrl-T to insert a time code, linking the spot where the media is paused with the position in the transcript where the cursor is placed. Following the punctuation in the scrolling text of the ad, the first time code should be at 6.0 seconds into the media file.
Now repeat this three step process for each of the remaining sentences in the ad. Pause the video just after the announcer ends a sentence, place the transcript cursor in the corresponding position, and press Ctrl-T. I placed time codes at 6.0 seconds, 10.3 seconds, 17.7 seconds, 24.4 seconds (between where the announcer finishes and where the singers come in), 25.3 seconds, and 27.4 seconds. Your time code placement might vary a little, but shouldn’t be too different than this if you did it right.
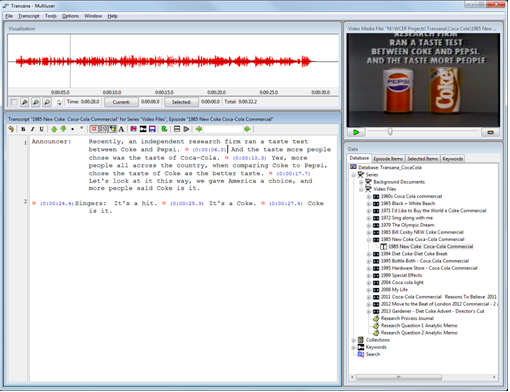
A more thorough demonstration of inserting Time Codes in Transana can be found in the Time Codes in Transana ScreenCast on the Transana Web Site. If you are having trouble with inserting time codes, I strongly encourage you to watch this ScreenCast.
The full importance of time codes will become clear later, when we discuss creating analytic clips. For now, just focus on being able to insert time codes accurately.
3.4 Analytic Mode
Press the Edit Mode button ![]() to take your transcript OUT of Edit mode and into Analytic mode. Use the slider in the Video Window to move the media file back to the beginning, or click on the extreme left side of the Visualization Window.
to take your transcript OUT of Edit mode and into Analytic mode. Use the slider in the Video Window to move the media file back to the beginning, or click on the extreme left side of the Visualization Window.
Once again, press the Play button in the Video Window. If you did your time codes correctly, you should see a blue highlight in the transcript that moves along with the media file, highlighting each sentence as it is said. If the highlight does not always move at the correct place, you may need to delete and replace some incorrect time codes. (If your time code placement isn't initially perfect, don't be too concerned. Time Code placement sometimes takes a little practice.)
Once the video stops playing, click your cursor anywhere in the transcript. You may notice that the video automatically moves to match the location where you click. If you now right-click in the Transcript, the Transana should play the segment of the media file that falls between the time codes on either side of your transcript cursor.
To summarize the differences between edit mode and analytic mode:
- In Edit mode, you can change the transcript. In Analytic mode, you can't
- In Edit mode, you do not see any highlighting as the video plays. (This would alter your cursor position, which you don’t want to do while editing a transcript.) In Analytic mode, the highlight moves between time codes in the transcript as the video plays
- In Edit mode, clicking in the transcript does not change the media position. In Analytic mode, it does
- In both Edit and Analytic modes, right-clicking the transcript will cause Transana to play starting at the time code preceding the transcript cursor position, and continuing to the time code following the transcript cursor position
3.5 A Word about Editing Transcripts
In section 5.8 of the book, Lewins and Silver warn about not changing the text of text files being analyzed, particularly when working as part of a team. In general, when working with text files, there is rarely a reason to change the text.
The same is not true with transcripts when working with media files. As a general rule, revision and refinement of transcript associated with media files is a common, desirable, and expected analytic activity. Repeated exposure to media files often leads to hearing and understanding new details and subtleties in the data which should be reflected in the transcript. In Transana, feel free to enter Edit mode and improve the transcript any time you want to.
(Later in analysis, after you’ve started creating Clips, you may want to look into the issue of transcript change propagation, as described in the Transana Manual, available in the program’s Help menu.)
3.6 Episode Notes
Now that all of the data from the Case 3 Coca Cola Data Set is in Transana and we've learned to do simple transcription and time coding, let's return to the 1960s Coca Cola commercial file we started with.
If needed, expand the Video Files Series node in the data tree to show the 1960s Coca Cola commercial Episode. Then expand the "1960s Coca Cola Commercial" Episode to show the Verbatim transcript. Double-click the transcript to load the Episode - Transcript pair into Transana's main interface.
Push the "Play" button in the video window in the upper right hand corner of the screen and watch the this commercial. Listen to the jazzy music. Watch the young athletes engaging in a variety of sports. Let the quick images of cool, refreshing Coca Cola wash over you.
Perhaps you have some initial impressions you would like to record in an analytic memo about this media file before you begin transcribing it. Such thoughts might belong in the analytic memos you have already created as part of this project (see section 2.8), but you might also want to record some thoughts specifically about this media file. In that case, creating an Episode Note, an analytic memo specifically linked to the media file, would be appropriate.
To create an Episode Note, right-click the "1960s Coca Cola Commercial" Episode and choose "Add Episode Note" to create a note attached to this Episode object.
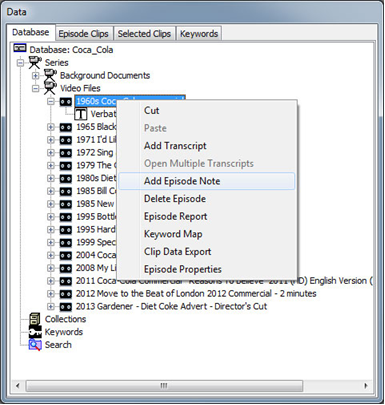
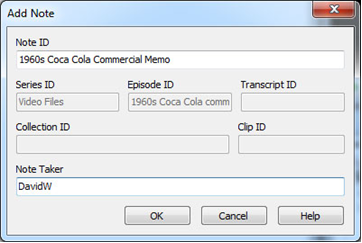
You will now see the Add Note dialog box. Give the note a name that will allow you to recall what the note is about when you have created many such notes and press the OK button
After completing the transcript, I decided that my initial transcript name of "Verbatim" doesn't really reflect the function of this transcript well. Therefore, I renamed the transcript "Audio" to reflect that it can cover music as well as the spoken words. This can be done by right-clicking the transcript and changing its name under Transcript Properties.
It is not a very exciting transcript, and it certainly does not allow access to so much that is interesting about this commercial. No, what is interesting about this commercial, at least initially, are the sports images, the product images, and their juxtaposition. That is not really reflected in the commercial's spoken audio track. So let's create another transcript for this Episode, called “Visual,” which we can use to explore the visual layer of the ad. To do this, right-click the "1960s Coca Cola commercial" Episode and choose Add Transcript. Enter "Visual" as the Transcript ID and press OK.
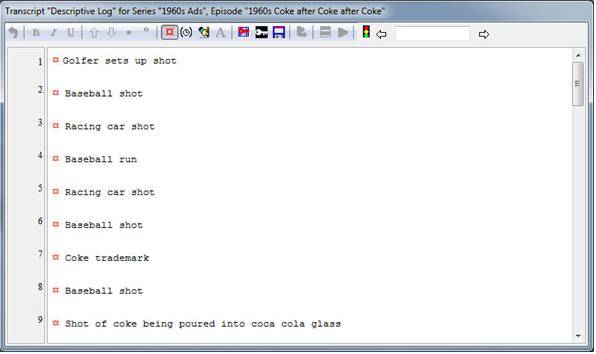
There are several ways we can approach the creation of the visual transcript. One option is to type a text-based description of each visual portion of the ad.
Another option Transana offers is to create an image-based visual transcript. As they say, a picture is worth a thousand words.
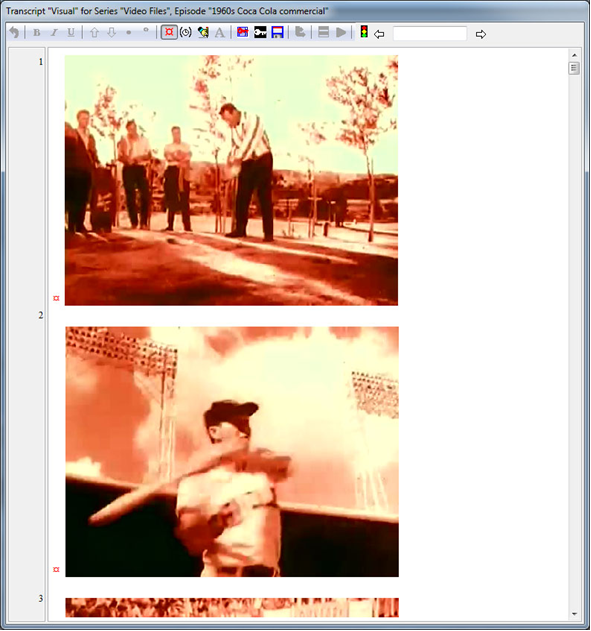
There are two special considerations in the creation of this transcript. First, we want to find a good image that represents each segment of the video well. This requires being able to move through the video file in very small increments. And second, we know that some of the segments are extremely short, such that they have an almost subliminal effect. This means we want to have extremely precise time codes and will need to be more accurate that is usually necessary in inserting our time codes.
Once the Episode and Visual Transcript are loaded into Transana's main interface, press the Edit Mode button ![]() to go into Edit mode for the Visual transcript.
to go into Edit mode for the Visual transcript.
In Transana, the Visualization Window allows very precise movement through the video file, and for this particular transcript, we will move through the video literally frame by frame for selecting our images and placing our time codes.
Click in the Visualization Window. Make sure the video is positioned at the beginning, so that the Visualization Window's "Current" time indicator is at 0:00.0. If you are on Windows, hold down the Ctrl key. If you are on OS X, hold down both the Ctrl and Cmd keys. When you have the Visualization Window selected and the correct modifier keys pressed, the Cursor Left and Cursor Right keys allow you to move exactly one frame within a video file in Transana.
Move exactly 8 frames to the right from the beginning of the video file by holding down the modifier keys and pressing Cursor Right 8 times. (The Current Time indicator will read 0:00.3 seconds. If the video doesn’t move, you probably don’t have the Visualization Window selected.) You will see that the ad is fading from black into the first scene of the ad in this frame. Press Ctrl-T to insert our first time code. (We are being frame precise with all of our timings in this transcript. We don't want our first segment to be "padded" with the black frames at the beginning of the file.) Click back on the Visualization Window. (Inserting the time code switched the program focus to the Transcript Window in anticipation of our typing something following the insertion of the time code.)
Now, holding the Ctrl (and Cmd on OS X) key down, use cursor right and cursor left to find a frame of the golfer that you think represents this shot in the ad well. When you've selected the image you want, use the mouse to press the "Snapshot" button ![]() in the lower-right corner of the Video Window. Press OK on the Media Conversion Tool screen so Transana can complete the screen capture procedure and insert the first screen capture image into the transcript.
in the lower-right corner of the Video Window. Press OK on the Media Conversion Tool screen so Transana can complete the screen capture procedure and insert the first screen capture image into the transcript.
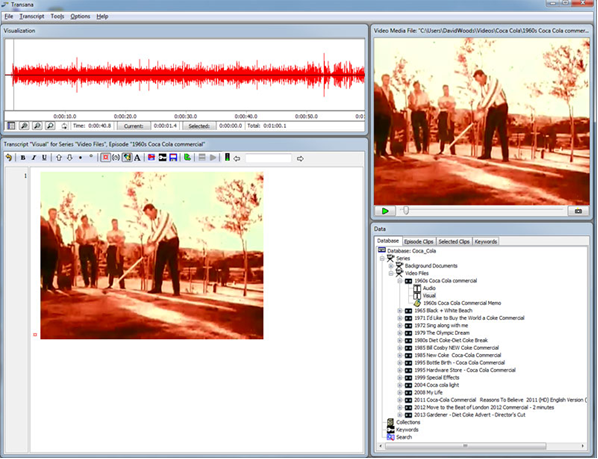
In the Transcript Window, move the cursor to the right of the captured image, then press Enter to add a carriage return following the image.
Now click in the Visualization Window and use Ctrl (and Cmd on OS X)- Cursor Right to find the transition between the opening golf scene and the baseball scene that follows. This transition occurs at 0:02.1 seconds into the media file. Press Ctrl-T to add a Time Code at the first frame that shows the baseball player.
Click back in the Visualization Window and move to the right until you find a good image for the baseball player scene. Insert that image into the transcript by again capturing the frame from the video as you did above. Then find the next transition, between baseball and auto racing, and insert a time code. Continue this pattern of adding images and time-coding transition frames for the rest of the video. I ended up with 81 time-code and image pairs in my image-based visual transcript, although you may make slightly different analytic decisions than I did and may end up with a slightly different number.
This process may seem rather tedious as you work your way through the 60 second ad. However, careful work up front during transcript preparation will pay off later when we move on to analyze this video. See the coding exercises in the Chapter 7 sections that follow.
3.8 Summary
There are, of course, many, many ways to create transcripts. This chapter has only tried to describe the creation of two types, the verbatim transcript and the image-oriented visual transcript. But most other types of transcripts can be created using the basic techniques discussed here.
If you take field notes during recording, you should bring your field notes into Transana as a transcript. Some researchers create brief "gisted" transcripts that provide enough descriptive information that the transcript can serve the role of allowing researchers to find the segments they are interested in within a video while taking less time to create than verbatim transcripts. Some researchers use transcripts to embody understanding of a media file from a particular viewpoint or using a particular analytic lens, such as looking at video from the differing viewpoints of director, cinematographer, and editor in cinematic analysis. (See Halverson, Erica; Bass, Michelle & Woods, David (2012). The Process of Creation: A Novel Methodology for Analysing Multimodal Data. The Qualitative Report, 17, 22.) In Transana, the transcript is a very flexible document that enables researchers to embody a view of their data through one or more particular analytic lenses, thus gaining further insight into their media files. Transcription is a very valuable tool in the process of analyzing media data.
The next steps might involve coding or creating clips see the coding exercises in the Chapter 7 sections that follow.
David K. Woods 2014
