Using Software in Qualitative Research
A Step-by-Step Guide
Chapters 4 & 5 – Data Preparation and Getting Started in the Software (HyperResearch)
Download the pdf for this chapter guide here.
In Chapter 5 to help get you started, we talk about productive things you can do in the early stages of setting up a ‘project’ in software. Experimenting with these processes where relevant in your chosen software will help to become familiar with useful entities in the software. See all coloured illustrations (from the book) of software tasks and functions, numbered in chapter order.
Sections include:
Creating the software project
Transparency
Getting organized
Importing data
Cross referencing
Literature management
A framework of memos
Do you have data prepared already? Go to Chapter 5 Getting started exercises
If you need some advice first about data preparation see in Chapter 4 where best practice for minimal transcription guidelines is discussed. These minimal steps can help to prepare for faster changes to any optimal software-specific requirements. In addition it discusses expectations for the handling of multimedia data, direct and indirect analysis and the assistance provided by various transcription software packages (HyperTRANSCRIBE as HyperRESEARCH’s sister program is a case in point).
The following exercises are designed to help you familiarise yourself with your chosen case study example, or to think about your own data in the context of these exercises. These exercises are focused on ensuring that data structures are consistent (as in case study A and case study B) and possibly experimenting with transcribing video data (case study C). For your own research project, there may be quite a lot of preparatory work required before you get started with using a software.
When using software to help analyse a qualitative dataset, it is often said that the first project turns out to be the learning ground for the next project (because of missed opportunities and mistakes made in preparation) So it is a good idea to spend the time on this now – even if it feels like you are delaying the "interesting" work – as it is usually more difficult and time-consuming to alter data formats later.
Exercise 1: Set Up the Data
a. If you’re using the sample data for the case study, download the zipped file to your computer. Then extract the data files and save them in a convenient location, such as a folder in your Documents folder.
b. If you’re using your own data, collect the data files in a folder and put the folder somewhere convenient.
Note: Keep in mind that your source files must be in a format that HyperRESEARCH can read.
Deciding where to store data files
Before you decide where to keep your source files, consider how you will be conducting your research. Will you be collaborating, or working alone? Do you plan to move the study between computers (for example, between home and office), or will you be doing the work on a single computer?
HyperRESEARCH keeps track of the location of your source files, so if you move them to another computer, the program will ask you for the new location of the files. If all the files are in the same folder, this can be done in a single step for all data files. Because of this, if you plan to move the study regularly between computers, it will be easiest to store all the data files in a single folder.
If you will collaborate with other researchers, you may find it helpful to keep your source files on a local network server or in a cloud storage service such as Dropbox or Google Drive. This allows you and your colleagues to access the same files from any computer. (HyperRESEARCH can access the files directly, without your needing to move them to your own computer.) If you will each store your own copy of the data files instead, and you will be frequently exchanging your work, it will simplify moving the files between computers if you store them all in one folder.
If you plan to move your work from computer to computer, the considerations are similar to those for collaborative work: you can store the data files on a server, store copies on each computer you work on, or store your study data on an external hard drive or USB stick drive which you carry from computer to computer.
c. Taking all these factors into account, decide where you prefer to keep the data files. Also decide whether they should be in a single folder, or in subfolders.
Exercise 2: Familiarize Yourself with the Data
a. Read the Abstract or Summary file for the case study you’re using. What is included in the abstract? Would different information be useful to you? List the information you find most useful in a study abstract.
b. If you’re using your own data, write an abstract for your study. The abstract should include a paragraph or two describing what the study is about, a set of research questions you want to investigate, and a brief description of the data files.
c. Look at the name of each file, then open the file to quickly scan the data. Does the name help you to understand the content of the file? Would you make different decisions about the name to give each file?
Exercise 3: Examine the Structure of the Data Files
Open each data file in turn, and look at how the data inside is formatted and structured.
a. Does the formatting and structure make sense to you? Do you see how it will be helpful to you when analyzing this data? (See the Case Study boxes in Chapter 4 that refer to formatting decisions for more information.) Would you change the formatting decisions if you were beginning to collect this data from scratch?
b. Do the files include different sections that might be useful to analyze separately? Are there analogous sections across different files, where you might want to analyze the same section in several files? Consider what units of analysis might be most useful for you, and how you might want to group parts of each file, or divide files into sections for analysis.
c. HyperRESEARCH can search source files for repeated phrases and code them automatically using the Autocode feature. You can take advantage of repeated phrases in each file using this feature. (For example, if a transcript identifies each speaker with a name or number, you can use Autocode to search for each speaker and mark their responses with a particular code, so you can easily see all that person's responses by retrieving that code.) What repeated structures can you use in this way? Make notes about how you might use Autocode while analyzing your study.
Exercise 4: Convert Files to Different Formats
HyperRESEARCH can read most types of computer files, including:
- Plain text (.txt or .text), rich text (.rtf), or Microsoft Word format (.docx)
- HyperTranscribe transcriptions (.htd)
- PDFs (.pdf – in HyperRESEARCH 3.6 or later)
- PNG (.png), GIF (.gif), or JPEG (.jpg or .jpeg) images
- WAV (.wav), AIFF (.aif or .aiff), or MP3 (.mp3) audio files
- any audio or video file that QuickTime Player can open and play
a. Make a list of all the file formats that are used in your data files. (The filename extension provides the format of the file. For example, if the file name ends in “.mp3”, the file is an MP3 file.)
b. Compare the list of file formats with the list above (or else open HyperRESEARCH, choose Help > HyperRESEARCH Help, and click the “File Types” topic to see a detailed list.) Are any of your files in a format that HyperRESEARCH doesn't read?
c. If you need to convert any of your files, first open the file in the program that created it and choose File > Save As. In most programs, a list of file formats appears, and you can choose one that is compatible and save a copy of the file in that format. (Some programs use an Export menu item instead of Save As.)
Exercise 5: Make Changes to the Text Files
When you begin coding a text file, HyperRESEARCH keeps track of where each coded segment is by counting the number of characters from the start of the file to the start of the coded segment. Because of this, if you change a source file after you begin coding, the position of coded segments may no longer be correct. (For example, if you add ten characters to the start of a file, any segments you have coded already will now be ten characters off.)
Because of this, if you need to change anything in a file – for example, if you need to add attribution data, change the format, or anonymize identifying information about participants – it’s best to do it before you start coding. Now is the ideal time to make any changes to your files.
a. Open a file that includes interviews or discussions. Use your word processing program to change the formatting – font size, bolding, color, and so on – to make it easier to see at a glance when the speaker changes. (For an example, see the “minimal” and “optimal” interview files of Case Study A.)
Original:

Reformatted:

b. If you are using your own data, would it be useful to add introductory material to the start of each file? (For example, you can add demographic data such as the subject's age, or information about the circumstances of the interview.) Open and scan each file, and add whatever information you think might be helpful.
c. Spellcheck each file and make sure there are no spelling errors that will distract you while coding or make the text hard to understand.
Splitting up large files
If a file is extremely long, it may be easier to code and analyze if you split the file into multiple parts.
d. If you are using your own data, check each file's length. Would any of the files be easier to work with if they were split up? More importantly, are there natural divisions in the files? (For example, a single file might cover several interviews, or multiple months of social-media data.) If any of your files should be split up, copy and paste to create multiple files from the single original file.
Exercise 6: Prepare to Work with Audio and Video
If you are using Case Study C, you will be working with audio and video files. Your own study data may also include audio and video recordings. In Chapter 5, you'll learn how to code audio and video data. But first you'll need to make sure you're ready to use data in audio or video form.
a. If you’re using Windows, make sure the QuickTime software is installed. It may already be installed on your computer. If not, you can download the software for free from the Apple website at http://www.apple.com/quicktime.
(QuickTime is built into Mac OS X, so if you're using a Mac, you already have QuickTime.)
b. Make sure your audio and video files are working and properly formatted by playing them with QuickTime Player. (In the exercises for Chapter 5, you’ll learn how to open these files in HyperRESEARCH and start coding them.)
Working with transcriptions
When you are working with audio or video sources (for example, if you are using Case Study C, which includes audio and video), you will need to decide whether to work directly with these sources or whether to transcribe their contents to a text file and work with that instead.
Both source types have advantages and drawbacks. Working directly with audio and video lets you analyze facial expressions, tones of voice, and other subtleties that don't come across in transcription. On the other hand, working with a text transcript lets you search, use Autocode, and quickly glance through the file for content.
c. Evaluate each audio and video file in your study data. Does the file need to be coded? Or will it be mainly used as background and information for you?
d. For audio and video files that you will code, will it be better to code the audio or video directly, or will coding the text work better in this case?
e. If you decide to transcribe the file and code the text, do you need to transcribe the entire file, or can you transcribe limited portions? List the files or parts of files that should be transcribed.
Exercise 7: Transcribe Audio or Video (optional)
You can use any word processing program to transcribe a file, simply by listening to and watching the file, and typing what you see and hear. You can also use professional transcribers, who provide this service for a fee.
Transcribing with a word processor
To transcribe using a word processor, you will need to play the file in one window (using QuickTime Player or any other software that will play the file) while entering the text in another window.
1. Open the audio or video file.
2. Open a blank document in Word or another text editor, and position the windows so that you can see both of them on the screen.
3. Begin playing the audio or video. As it plays, type what you see and hear into the document. (You may need to stop and start the audio and video so that you can catch up.)
Make sure to include the identity of each speaker (if the file has more than one person speaking). You can also include notes about facial expressions, tone of voice, interruptions, and other information that you think will be significant for your analysis. (This information is usually typed in square brackets [like this] so that you won’t confuse your notes with the actual speech.)
4. When you’re done, save the transcript in the same location as your other data files. The transcript now becomes part of your source data collection.
Using HyperTRANSCRIBE to transcribe
If you use HyperTRANSCRIBE (another Researchware program) to transcribe audio or video, HyperRESEARCH can work directly with the resulting HyperTRANSCRIBE file. In HyperRESEARCH, the audio or video appears alongside the text transcript, and embedded time codes let you click a section of text to move between the transcript and the corresponding section of audio or video. This lets you code the text while watching the video or listening to the audio, so you can capture subtle dynamics as you code.
1.Visit the Researchware website at http://www.researchware.com/products/hypertranscribe.html to download and install HyperTRANSCRIBE on your computer.
Note: You will need to purchase a license for HyperTRANSCRIBE in order to save transcribed files. Unlike HyperRESEARCH, HyperTRANSCRIBE does not have a Free Limited Edition, and the demo that you can use without a license lets you transcribe files, but does not let you save them.
2. Open a new HyperTRANSCRIBE document, then click “Media File” and choose the audio or video file that you need to transcribe. The video or audio file appears on the left side of the window.

1. To transcribe, you use the keyboard shortcuts to play the file, one piece at a time
- To play the first five seconds of the file, hold down the Shift key and press the space bar. As the first five-second segment is played, begin transcribing it in the right side of the transcription window
- To replay the segment, press Shift-space again. You can replay the segment as many times as you need to
- When you’re finished transcribing the first segment, press Tab to advance to the next five-second segment
Continue playing a segment at a time, transcribing each segment as you go. If you need to back up, press Shift-Tab to return to the previous segment.
2. To include a link to the current time in the audio or video, choose Insert > Time Code. When clicked in HyperRESEARCH, this link will start playing the audio or video at the specified time. This lets you mark any important moment in the file with a time code so you can go back and play that part of the audio or video while coding the transcript. You should also use a time code to mark any time that a speaker begins talking, or other significant transitions
3. When you’re done, save the HyperTRANSCRIBE file in the same location as your other data files. The transcript now becomes part of your source data collection
Also See in HyperRESEARCH Help
These topics in the HyperRESEARCH Help and the User Guide may be helpful in completing the exercises for this chapter:
- Organization: Preparing Source Material
- Organization: Working Collaboratively
- Organization: Backing Up and Securing Data
To find a topic, choose Help > HyperRESEARCH Help and look through the list on the left side of the Help window.
Exercise 1: Install HyperRESEARCH
You may download HyperRESEARCH from the Researchware website at http://researchware.com/downloads
The Free Limited Edition is fully functional, with the following limits:
- The Code Book is limited to 75 codes.
- A study is limited to 7 cases.
- Each case can have no more than 50 code references
System requirements
HyperRESEARCH is compatible with Windows and Mac OS X systems. The specific requirements are as follows:
for Windows:
- Windows XP or later • 30 MB free disk space • QuickTime 7.0 or later (for audio and video features)
for Mac OS X:
- Version 10.3 or later • 30 MB free disk space
Download the installer appropriate to your operating system.
To install, double-click the downloaded installer program, then follow the instructions to install HyperRESEARCH on your hard drive.
By default, the installer will install of HyperRESEARCH and its accompanying files, including documentation and tutorials and sample studies, in a folder named “HyperRESEARCH” within the Applications folder (Macintosh) or Programs folder (Windows). You may change the name and/or location of the folder during installation if you like.
Installing on a portable drive
When you install HyperRESEARCH, you have the option to create a zero-footprint installation on a removable drive such as an external hard drive, USB stick, or other portable device.
If you use the “Attached Removable Drive” option to install on such a drive, you can bring your removable drive to any computer and run HyperRESEARCH without leaving any preference files or other files on that computer. All files are stored on the removable drive with the application. Such a program is called “zero footprint” because it leaves no footprints behind on the computers where you run it. You can install HyperRESEARCH for either Windows or Mac OS X (or both!) on the removable drive, so you can run the program on any computer that’s available to you.
This option is useful if you need to use HyperRESEARCH on public lab computers, or other computers where you don’t want to leave tracks or extra files behind. If you keep your source files and study file on the same portable drive, you can work on any computer.
Exercise 2: Create a new Study in HyperRESEARCH
- Launch HyperRESEARCH
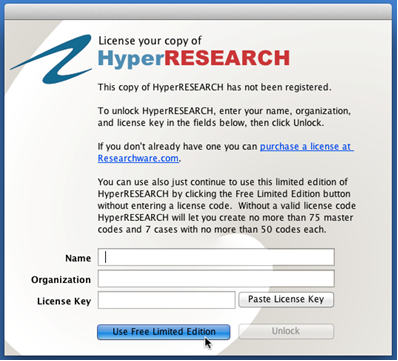
- If you have not yet licensed HyperRESEARCH, you will see the “License your copy” dialog. Please enter your information and license key OR choose “Use Free Limited Edition.”
-
HyperRESEARCH presents the Welcome screen. Choose the “Create New HyperRESEARCH Study” option
 HyperRESEARCH opens a new “Untitled” study. The Study window (on the left) will contain information on your cases and codes. The Code Book appears to the right. (Note: Most HyperRESEARCH windows are moveable and resizable, allowing you to customize what you see on the screen.)
 -
Save your study
Choose “Save” from the File menu.

Make sure you choose the location and name for saving your study file carefully, so you can easily find it again.
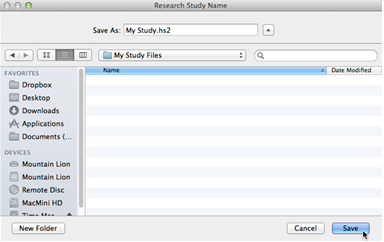
HyperRESEARCH saves your study file to the specified location and updates the name of the study from “Untitled” to whatever you named your study file.

Exercise 3: Create the empty structural framework within which to start working
When creating your study, you should first consider what a case will consist of. A case is the basic unit of analysis in a HyperRESEARCH study. In your study window, you can view one case at a time. You can navigate between cases, or temporarily exclude some of your cases so that you can work with a subset of your data.
When deciding what a case will consist of, consider how your study naturally breaks down. What are you comparing or contrasting? Each case can represent anything you like. Common ways of setting up cases include each case representing an individual; a group (students, faculty, staff, and parents); an organization (e.g. department, school district, corporation) or a time period.
Also consider the number of code references you will be adding to each case. If you will be adding more than several hundred code references to any case, this may be a sign that you should consider defining your cases differently.
You can add new cases to your study at any time, so you don’t need to decide on your complete list of cases at the beginning. But you should decide on the basic unit of your study so that you can set up your initial cases accordingly.
Tip: You can sort code references, but cases always appear in alphabetical order in the study file. If you want to change the order of cases, try adding a number to the beginning of each case’s name to change its alphabetical order. For example, if you want case “Zeta” to always come first, rename it “01 Zeta”.
Here’s how to set up cases in your HyperRESEARCH study:
1.Rename the Untitled Case
Choose “Rename” from the Cases menu (or “Rename Case...” from the drop-down “Gear” menu towards the top right of the Study Window).

Enter a new case name in the dialog box that appears, then press OK

HyperRESEARCH displays the new case name in the case menu in the study window.

2. Create additional cases as needed
Choose “New” from the Cases menu (or “New Case” from the drop-down “Gear” menu towards the top right of the Study window).

Enter a name for the new case.

HyperRESEARCH updates the study window to reflect that the new case is now the current case.

Repeat this as many times as necessary to create the cases you will be using to organize your codes.
Click on the Cases drop-down menu to see a list of currently available cases in your study. (Note that Case filters will affect which case names appear in the case menu.)

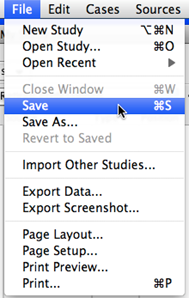
3. Save your study
You may save your study at any time while you work, using the “Save” command in the File menu (or “Save As” if you wish to save it in a new location or with a new name). HyperRESEARCH will also prompt you to save your study when you quit or exit the program.
Exercise 4: Journals, Notes, Memos in HyperRESEARCH
HyperRESEARCH supports memoing in several different ways:
- An “Annotation” is a memo associated with a specific code reference.
- “Code Descriptions” are memos associated with codes in your Code Book.
- “Memos” on a Code Map provide places for you to add text to your Code Map.
Any text file (including field notes, memos, summaries, journals, and the like) can be opened as a source document. Select appropriate selections from your memos and code them to the relevant case(s). (Please note that source files should not be edited or expanded after you begin coding that source file in HyperRESEARCH)
Exercise 5: If it is relevant for you, begin generating critical appraisals of key literature files
If you wish to use HyperRESEARCH to aid in your literature review, it may be best to create a separate study for this purpose. Begin a new study in HyperRESEARCH and save it as you would any other study, with a name indicating that it is your literature review. (You can merge it with another study at any time, or export reports from your literature review study to be coded in your main study, etc.)
You can open articles and papers as text source files within HyperRESEARCH and code them as you would any text source material. Develop codes that reflect the information you wish to glean by reviewing the literature (e.g. codes to identify the questions published studies have explored, codes to indicate data collection methods or other methodological information, codes to identify primary conclusions, and so forth). Create an annotation for each code you apply as a way to keep memos and notes on your thought processes.
You may also create text files containing your thoughts and notes as you review the literature. Open completed text files as source files and code them within your literature review study.
NOTE: If you will be using textual formatting (bold, italics, font size, underlining, colored text) for emphasis and clarity, please remember to save the file in Rich Text (.rtf) or Microsoft Word Open XML (.docx) format to be used as a source file in HyperRESEARCH.
With HyperRESEARCH's flexible case structure, you can organize the articles and your notes and memos in the way that makes the most sense to you. Examples include assigning each article or paper to a separate case; organizing your coding by topics such as methodologies and research questions and findings, or any other way that helps you keep track of the data.
Exercise 6: Backing up and moving your HyperRESEARCH Study
Despite all efforts to the contrary, sometimes things go wrong. Computers crash, disks fail, software errors occur, people make mistakes. For this reason, Researchware strongly suggests you regularly back up all your data.
The two most important pieces of your work with HyperRESEARCH are your source files and your study file.
Backing up source files
Your source files should be backed up before you begin work in HyperRESEARCH. (You should not alter any source files after you begin coding them in HyperRESEARCH; changes to source files may alter the data associated with any given code reference.)
Having one copy of each source file on your hard disk for use in your study and another copy backed up on permanent media such as CD should be sufficient. For maximum protection, you may want to keep two backup copies, with one copy of everything off-site (in case of fire or other unrecoverable disaster).
TIP: If you keep your study file, source files, and settings files in one folder, you can simply copy the folder to your backup device to back up everything in one step.
Backing up the study file
Your study file should be backed up regularly (after each session with HyperRESEARCH, daily, or weekly). Ideally, you should keep multiple backups, and include the date in the name of every backup study file.
Manual backups
You can easily back up your file manually by saving the file under another name at the end of a session. First, make sure you save the file to its normal location on your hard drive by choosing File Save. Then choose File Save As to save a copy of the file to another location (such as a file server, CD, or removable thumb drive).
Enabling automated backups
Sometimes an error will occur that will go undetected for a few sessions; having multiple backups with an easily recognizable dating system will aid in recovering data from before the error occurred. You can automate the backup process by turning on the Auto-Backup option in the Options/Preferences window.
To turn on automated backups, follow these steps:
- Choose Edit Options (on Windows) or HyperRESEARCH Preferences (on Mac OS X).
- In the Options/Preferences window, click the Backups tab.
- Check the box labeled Auto-Backup.
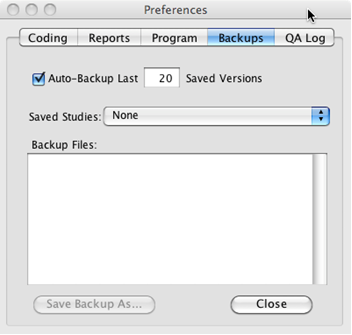
With Auto-Backup on, whenever you save a study file, HyperRESEARCH also saves a backup copy. (The backups are saved in your Preferences folder.) You can specify the number of saved versions.
Once HyperRESEARCH has backed up the total number you specified, it removes the oldest backup version every time it saves a new one. Because of this, the more often you save your work, the higher the number of saved versions you should store. This ensures that you’ll able to go back far enough to correct a mistake, even if the mistake happened a session or two ago.
Important! If the Auto-Save option is also enabled, an automated backup is made every time the file is automatically saved, as well as when it’s manually saved. Since you have only a limited number of automatically-backed-up versions, and Auto-Save replaces one of them every time it saves your study, we do not recommend using both options.
Recovering a backup copy
To go back in time and recover a backup created by Auto-Backup, follow these steps:
- Choose Edit Options (on Windows) or HyperRESEARCH Preferences (on Mac OS X).
- In the Options/Preferences window, click the Backups tab.
- Choose your study from the Saved Studies popup menu. The list of available backups appears under “Backup Files”. Each backup is labeled with the date and time it was made, in order by date, with the latest backups at the bottom of the list.
- Click the backup you want to recover, then click Save Backup As. Save the backup copy to the location you wish.
- Open the recovered study file as you normally would.
You should check the file carefully before replacing the current version of your study with the backup. If you’re moving to the backup because of a recent mistake in the study, double-check to make sure that the backup doesn't also include the mistake.
Automatically saving your study file
You can also automatically save your study file at timed intervals. If you normally save your work only when exiting HyperRESEARCH, this can help ensure that you don’t lose a whole session’s work if there is a problem or crash.
However, because this feature acts exactly like choosing File Save, it may prevent using the File Revert to Saved command to return to your original saved study if you make a mistake.
Important! Unlike the Auto-Backup feature, automatically saving your study file will replace the original version every time an automatic save is done.
To automatically save your study file, follow these steps:
- Choose Edit Options (on Windows) or HyperRESEARCH Preferences (on Mac OS X).
- In the Options/Preferences window, click the Program tab.
- Check the box labeled “Automatically Save”.
By default, the study is saved every ten minutes (if anything in it has changed). Use the arrow buttons to specify how often you want to automatically save your study.
NOTE: If you create a new study and it has not yet been saved when the time arrives, HyperRESEARCH will ask you to specify a name and location for the study before automatically saving it.
Exercise 7: Experiment with creating and defining codes (see specific exercises in Chapter 7)
There are two basic approaches to coding in HyperRESEARCH. You can create a standardized list of codes that you enter in the Code Book when you first begin your study, or you can enter new codes as you’re reading through the source material. You can combine these two approaches, starting out with a basic list of codes for the concepts you want to track and adding codes during the coding process as you find new insights in your source material.
To create a starting list of codes for your study, choose Codes > New and enter your first code name. The new code appears in the Code Book window. Repeat this for each code you want to add to the list. These codes will be available when you begin coding. (See Chapter 7 Exercises for specific how-to information.)
Use the "Description" field at the bottom of the Code Book to define the currently selected code or as a memo attached to that code.
Exercise 8: Import data files into your new software project
Your sources contain the raw data that will be used for your study. Typical sources might include text files such as interview transcripts or survey results, sound recordings, video, photos, and other data.
To use a source in a HyperRESEARCH study, it must be located in a file on your computer, in one of the many formats that HyperRESEARCH can use. (For a complete list of formats HyperRESEARCH supports, see the File Types topic in the help system.) If your source is not in any of these formats, you will need to convert it before beginning to code the source.
The main text formats supported are Microsoft Word XML documents (.docx), Rich Text Format (.rtf), and Plain Text format (.txt).
Transcription documents created with Researchware's HyperTRANSCRIBE software (.htd) can also be opened as source files in HyperRESEARCH, with the added benefit of having the related audio or video file automatically associated with the text transcription.
Organizing your source files on your hard drive
Naming and placing sources
Your source files can have any name and be placed in any convenient location on your disk. (The only exception to this is that you cannot have two sources with the same name, even if they are in different folders. If you use two sources with the same name, HyperRESEARCH will not be able to tell which code references should be assigned to which file.)
It’s often more convenient to keep all source files for your study in the same folder. This will make it easier for HyperRESEARCH to locate the files if you move them to another computer or to another location on your computer.
Working with large sources
HyperRESEARCH does not impose any limit on the size of your sources. Sources may be of any size.
However, if text sources are very large, certain functions – in particular, viewing a source with Codes in Context – may become slow as coding progresses, particularly if you have more than a thousand code references in a single source file. To avoid this, if any of your text sources are very large (several hundred K or more), consider splitting them into multiple files before you begin coding. Since you can use as many sources as needed for each case, doing so generally will not change your study schema, and it may prevent an annoying slowdown.
Altering sources
Avoid changing your source files after you begin coding. HyperRESEARCH maintains its code references by counting the number of characters from the start of a text source to the beginning of the quoted portion. Because of this, if you change the source file (and therefore change the count of characters), HyperRESEARCH will no longer be able to locate the referenced segments of text in that source file.
If you need to add anything to a source file after coding it – for example, to add attribution data to the file – it’s best to add the data at the end of the file. Any code references that come after the change will need to be re-coded, so adding information at the end of the file avoids the need to re-code.
Adding source files to your study
There are two ways to add sources to your study. If you open a source using the Sources menu and code a selection of material in it, HyperRESEARCH automatically stores the file’s name and location in your study file. You can also add sources to your study without coding them, which may be convenient as you are preparing for coding.
Important! HyperRESEARCH does not copy or incorporate source files into your study file. Instead, it stores the name and location of each source file you use, and opens the source in HyperRESEARCH for coding. This is why it’s important to keep the source files intact once you begin coding. If you alter, move, or remove a coded source file, HyperRESEARCH will no longer be able to display the file’s coded material until you restore the source file.
Adding a single source to your study
To add a source, choose Sources > Sources List to open the Sources List window. Then choose Add New Source File from the Sources popup menu at the top left corner of the window.

Locate the source you want to add and click Select. The source is now recorded in your study file. To open it, first select it in the list of source files in the Sources List window, then click Open Source File.
Adding a batch of source files
To add all the source files in a folder, choose Add New Sources from Folder from the Sources popup menu. HyperRESEARCH adds all the plain text files from the folder you specify to the source list. (To open any of these files, first select it in the list of source files in the Sources List window, then click Open Source File.)
NOTE: HyperRESEARCH does not look in subfolders of the folder you select, so to add your source files, they all should be on the top level of the folder.
For more information about using the Sources List window, see the Sources List topic in the help system.
The Source Window
The Source window displays the source material for your study. In a source window for a movie or audio file, you can play the file and select a portion to apply a code to.
To open a movie or audio source, choose Sources ![]() Open Movie or Audio File, then select the file you want to use. The file is displayed in the Source window. You can use any audio or video format supported by the version of QuickTime you have installed. Supported video formats include MPEG, AVI, and QuickTime. Supported audio formats include AIFF, MP3, WAV, and AU. (For more information about the kinds of files you can open, see File Types.)
Open Movie or Audio File, then select the file you want to use. The file is displayed in the Source window. You can use any audio or video format supported by the version of QuickTime you have installed. Supported video formats include MPEG, AVI, and QuickTime. Supported audio formats include AIFF, MP3, WAV, and AU. (For more information about the kinds of files you can open, see File Types.)
The Source window displays your file in a window with a standard playback controller, containing icons to play, pause, go forward and back. If the file is a movie file, the movie appears above the controller. For audio files, only the controller appears.
 .
.
: If the movie appears too small, resize the window to make it larger. The movie is enlarged or reduced to fit in the source window.
To select a portion of the file for coding, do one of the following:
- Click at the starting point and choose Sources Media Playback
 Set Selection Start. Then click at the ending point and choose Sources
  Media Playback Set Selection End.
 - Click at the starting point, then shift-click at the ending point.
- Play the file. When you see or hear the start of the segment you want to code, choose Sources > Media Playback > Set Selection Start. When you see or hear the end of the segment, choose Sources > Media Playback > Set Selection End. (It will be more convenient to use the keyboard shortcuts for these menu items.)
The current time, and the start and end times of the selected portion, appear at the top of the source window. When you code the portion you’ve selected, the start and end times of the selected portion are stored in your study file.
HyperTRANSCRIBE source files
HyperRESEARCH can open transcription files you create in HyperTRANSCRIBE. Instead of exporting your transcriptions as text files, you can directly open them as source files.
To work with a HyperTRANSCRIBE file, choose Sources > Open Text File and choose “HyperTRANSCRIBE Files” from the Files of Type (Windows) or Enable (Mac) popup menu.


HyperRESEARCH displays the media file associated with the transcript in the Related Media section of the window, above the text. Time codes are also supported, so you can click a time code in the transcript to go to that point in the audio or video.
Related Media in text source window
The Related Media section allows you to have quick access to audio or video files that are related to a text source you’re coding. This feature is particularly useful when coding transcripts of audio or video. If you are coding a HyperTRANSCRIBE file, the Related Media section automatically displays the media file.
You can also manually display a related file, if you are coding a source file that isn’t a HyperTRANSCRIBE file.
To display a media file in the Related Media section, first open your text source file, then click the arrow labeled Related Media at the top of the source window to show the media section. Click the Media File button and select an audio or video file. You can use the controls to play portions of the file while coding the text.
TIP: To make a video larger, drag the horizontal bar that separates the Related Media section from the text. The video resizes to fit.
See also Tutorial 5: Graphic, Video and Audio Sources in the Tutorials folder within the Documentation folder installed with HyperRESEARCH.