Using Software in Qualitative Research
A Step-by-Step Guide
Chapter 7 - Coding (NVIVO)
Chapter 7 discusses coding, coding schemes and coded retrieval as key tools of qualitative analysis. We discuss the terminology and philosophies which underpin coding processes. Specific methodologies use particular routines when coding. More general thematic analyses or less code-based methods may use coding devices in ways which include data reduction strategies, indexing and marking data. The structures of coding schemes, alternate groupings and basic retrieval mechanisms are key to moving forward with analysis. See all coloured illustrations (from the book) of software tasks and functions, numbered in chapter order
Sections included in the chapters:
Inductive, deductive and abductive approaches
Theoretical coding
Grounded Theory
Visual data, coding directly or via a transcript
Retrieval
Filtering devices
Horizontal or Vertical cuts
Moving on
Quantitative overviews
Hierarchical and non-hierarchical coding schemes
How to escape the structures of your coding schemes
Nodes can be containers (like codes) which when they are applied to data enable retrieval or further organisation; they can also be empty – for example they can act like hierarchical top-level codes with nodes underneath them which do contain or have been applied to, data. The step by step sections here are mainly about the application of thematic or reflective nodes.
7.1.1. NODES – FOR REFLECTIVE PURPOSES
Nodes (in the former case above) are containers for or links to data exemplars based on, conceptual ideas, themes, codes or more structurally (see below) for people, contexts, places etc. In this handout, the terms nodes, codes, keywords, and themes are used similarly. Node is a term which refers to a point in the NVivo database but a code label may be the name you give the node. Codes or nodes can be your ideas about the data – they can be generated inductively or deductively, and may be refined, changed, grouped or deleted at any time. Applying nodes etc., to passages of source data at a minimum, provides the basic code and retrieve actions needed to accumulate together, all the bits of data linked by common threads and themes. The term ‘references’ in this context to be data sitting at or referenced by
Each Node of any sort can be linked directly to one memo – so that relevant analytic notes are easily accessible from the node itself
7.1.2 NODES - FOR ORGANISATIONAL PURPOSES
These nodes (applied in the same ways as thematic nodes) facilitate interrogation across individual cases or categories of respondent. You may additionally need to apply e.g socio-demographic information to whole data files - or to e.g. a speaker within a focus group. In either case in NVivo each of those catchments of data need to be at their own node. Then to be efficient those nodes should be linked to a Node Classification (which in turn enables socio-demographic information to be applied). We describe this process in greater detail in Chapter 12 Exercises but see the Node folders below in Figure 7.1 which contain the structural nodes representing cases or respondents’ nodes for Case Study A, Young Peoples project – (these nodes are linked to a Node Classification –not illustrated which allows attributes to be assigned, based on their age, gender, nationality etc. The relevant node Classification for Case Study A is illustrated in Figure XXX in Chapter 12 exercises.
Do you have too much information i.e. complex facts, features and information to keep in your head when it will come to interrogating and comparing across and within different files and cases? If so, see Chapter 12 in the book and the Chapter 12 exercise on, Organizing data
7.1.3 HIERARCHICAL STRUCTURES
TIP: When starting out it is easy to confuse folder hieracrhy with node hierarchy. Hierarchy folders are useful, but be sure you are creating nodes or sub nodes when you mean to be, not folders and sub folders!
A STRUCTURAL FRAMEWORK FOR NODES
It is useful to begin to think of using Nodes Folders to separate different types of Nodes. We already created folders for data in the Sources function to contribute to a useful structural framework.
HIERARCHIES OF NODES AND SUB CODES WILL APPEAR IN THE LIST PANE AND ARE A WAY OF ORGANISING CODES.
NODE FOLDERS ARE UNDER THE MAIN Nodes FOLDER IN THE NAVIGATION PANE AND ARE ALSO WAYS TO ORGANSE CODES – BUT ARE BETTER CONCEIVED AS WAYS TO SEPARATE DIFFERENT NODES WHICH HAVE DIFFERENT PURPOSES OR ORIGINS e.g. CASE Nodes, THEMATIC nodes, AUTO codes. You can also use the top “Nodes” level as a separate location and we sometimes use that area for thematic nodes – only using sub folders for the clearly different nodes.
FOLDERS: for beginners we advise not to create more than 1 level of sub folders (this is where it is useful to be sure you are clear that you are not confusing the need for sub folders with the need for sub-nodes)
NODE HIERARCHIES: if you need a bit more complexity in your node structure this is fine– a few more levels in the hierarchical structures of Nodes themselves, say in the thematic node/code areas would be appropriate, but we would suggest that more than 4 levels within the hierarchy of Nodes themselves is over complexifying the management of ideas. In TEAM projects, there might be a decision to restrict to two levels of hierarchy for reasons of simplicity when sharing data later.

Figure 7.1
7.3.1 CUSTOMIZE THE VIEW WHILE CODING
Although the default arrangement for the interface is shown above, you can customize what appears and where (to some extent) it is on your screen according to your needs and preferences. Experiment with the options on the View menu to find what works best for you. The following customizations (not all from the View menu) in particular you may find useful:
- Rearrange the List and Detail panes such that the Detail pane
- appears on the right and the List pane on the left
- In View tab>Detail View>choose the right option. This can be especially convenient when you are doing a lot of coding
- Resize panes Remember that all columns in the list can be resized so that the space allotted to the List pane versus the Detail pane can be adjusted by grabbing the splitter bar line in between the areas you wish to resize and dragging it of the View Ribbon tab options
- Code stripe views There are several choices to be made about how you view codes in the margin area.– note that when using NVivo 10 SP3 or later the code stripes display opens automatically ). Sometimes pro-actively varying the codes on display in the margin (against a specific selection of data) will remind you of the presence or absence of particular concepts or topics you are currently focused upon
TIP: Always use the Recently Used Nodes view, when in coding mode.

Just as there are many ways to create and code to new nodes, there are multiple ways to code data at nodes you have already created. You can also using some of these methods to select more than one code to apply to the selected passage of data. We show 3 techniques – there are more!
TIP : ALWAYS use the View /Code Stripes> Recently Used Nodes view, when in coding mode
7.4.1. Technique 1 – Drag and drop
- A favourite for many researchers, drag and drop coding allows you to drag a highlighted selection of data onto any code showing in the List pane. This, of course, necessitates the list pane be showing Nodes (as opposed to Sources or anything else from the Navigation pane)
- Simply hold down left click of mouse and and drag it onto the desired node
- IMPORTANT: One way to speed up drag and drop coding and see the most nodes possible on the screen at one time is to rearrange the windows so that the List containing the nodes is on the left side, and the Detail pane of the source is on the right side (as above)
- Do this by going to View Ribbon tab /Detail View /Right
- Then arrange vertical splitter bars to accommodate as much text on the right as possible while seeing enough of the code labels on the left
7.4.2 Technique 2 – Right click over selected data
- Select text – Right click over text > Code at Existing Nodes/ navigate around Nodes /codes system hierarchies to find the codes that are relevant and check the relevant boxes alongside -/click OK
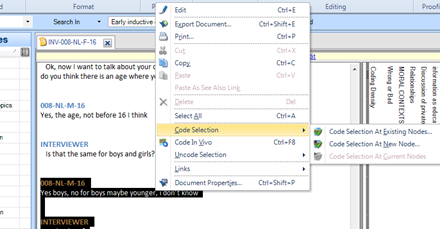
Figure 7.3
7.4.3 Technique 3 - Using Quick Coding bar at the base

Figure 7.4
- Select the data you wish to code first.
- along the Quick coding bar at the base of the detail pane Click on the Select Location icon ... on the first (three dots) icon on the middle left of the bar at base of detail pane
- The new node will go into the Nodes folder by default if you do not change the selection at the first … icon
- Select the second … icon – opens the Select Project Items pane
- Single click the folder in which the nodes you’re interested reside
- Then, ‘tick’ or ‘check’ the node(s) you wish to use for the data you have highlighted
- Once you have checked the relevant nodes (navigate around the hierarchies by clicking on plus + signs) Click OK
- VERY IMPORTANT: Lastly, on the Coding bar, be sure to hit the green checkmark towards the righthand edge of the quick coding bar to confirm the action. The previous steps might not accomplish anything without this!
These are nodes which are created and attached to selected data in one operation
- Using the same Quick Coding Bar above in Figure 7.4. – allows you to create a new (inductive? grounded? ) code by overtyping or filling in the Code At bar towards the right hand side of the bottom ‘quick coding’ bar. Be sure to hit the green checkmark to confirm the action.
OR
- See above in Figure 7.3– after selecting text you have the option to right click > Code Selection at New node – here again you will find it by default will put the new node straight under the Nodes folder unless you hit the Select button to choose EITHER another folder OR a node to hand your new node from

Figure 7.5
There are more ways to code – for instance there is a recently used list of codes available and selectable from the bottom Code-at (Quick Coding) bar. Experiment to come up with a way that best supports your preferred way to work.
There are also Uncoding actions which are possible (see Red Cross icon) and next exercises.
Remember – any coding initiated in the Quick Coding bar – needs to be confirmed by hitting the green check (tick) icon along towards the bottom right of the bar.
This section is necessarily brief but provides basic familiarisation with some useful data handling, annotation and coding devices for multi-media (note that for sound only the devices are similar to those illustrating video). Mostly, other sample data is used in the illustrations.
7.7.1 GRAPHICS/PICTURES - MAKING LINKED NOTES AND CODING

Figure 7.6
- With the picture on view, click to edit.
Either
- Make a selection within the graphic/right click/ Insert a row – and write notes.
or
- Make a selection/right click /Code selection.
or
- Code the notes instead
7.7.2. CODING AUDIO/VIDEO DATA
Coding multimedia data is very similar to coding textual data. For either audio or video sources, you can select transcript text and code per usual, or you can select a segment on the progress bar and code that directly as if you’d highlighted text.
See also basic transcription multimedia pages Section 5.5.2. (synchronised transcription, notes etc) The difference is not in how the coding works, but how passages are selected and how coding stripes are displayed.
- To select a passage – (see Exercise4, F7 to start play, F7 to pause, F8 to stop – or see Play Back area in Media Ribbon tab). Once play has started hit F11 function key to start the selection, Hit F12 to finish the selection
- To code the passage – right click over the blue rectangle now showing along the Progress bar. Code as you would text (see coding exercises 7.D. and 7.E.)
- You can also code the transcript, as you would text
- If synchronous transcripts or notes (i.e. the text were coded), coding stripes appear solidly alongside the transcript, and “shadow coding”, analogous to the solid coding stripe, will appear alongside the video progress bar. (Or vice versa if coding has been done on the play bar) Shadow coding looks like coding stripes with hatch marks which give it a slightly lighter colored look. Any annotations and links (more on these later) will appear above the progress bar as light blue (annotations) or reddish (links) coding stripes

Figure 7.7
You have been coding in order to make collections of segments of data along particular topic and concept based lines of discovery and enquiry. See next the exercises about retrieval of those topic based collections in the section related to Chapter 8.
Ann Lewins, Christina Silver and Jen Patashnick. 2014