Using Software in Qualitative Research
A Step-by-Step Guide
Chapter 12 – Organizing Data for Interrogation (HyperResearch)
Download the pdf for this chapter guide here.
Chapter 12 discusses the variety of ways organisation of data can happen and the importance of particular organizing tools to enable different levels and complexity of interrogation. Chapter 6 discussed basic structures like folders which enable simple tidying up and filtering. This chapter takes the subject further and focuses on the need to assign multiple variables or attributes to each respondent or case, so that comparing within or across cases can happen via combinations of data and subset characteristics if required. See all coloured illustrations (from the book) of software tasks and functions, numbered in chapter order.
Sections included in the chapter:
Illustrating the potential for interrogation
Timing, when to put organisational structures in place
Organising whole documents
Organising parts of documents
Auto coding structures in documents
Chapter 12 Exercises: Organising data to known characteristics
HyperRESEARCH's case-based structure makes it easy to organize your data in any way you wish.
What's a case?
A case is the atomic unit of your study, the basic unit of analysis you are studying. How you define what a “case” is will depend on the nature of your study.
During the coding process, you will be selecting source material and applying codes (and possibly annotations or memos) to that source material. Those codes are stored in the case shown in the Study Window at the time of coding, linked to the original source material and to the annotation.
The Study Window up close

(For more about the study window, see the Study Window topic in the Help system.)
For a detailed look at the survey results by respondent, you can use the Mixed Methods Importer (a HyperRESEARCH plug-in tool available from Researchware). The Mixed Methods Importer can create a study with the survey data mapped to cases and codes.
Here's what the Mixed Methods Importer will do:
- Automatically build a study from your survey data
- Create a case for each respondent (or whatever field in the survey data you choose to be used as "Casename")
- Create a text source file for each case, with the survey labels and responses for that case in the text file
- Add Code Groups to your code book (one Code Group for each survey data field you flag to be treated as a "Filter") (e.g. "EMP STAT")
- Add Codes containing the variable responses to your "Filter" data fields to your code book (e.g. "EMP STAT - EMPLYD") and to the relevant code group
- Apply codes linking to the relevant portion of the text sources
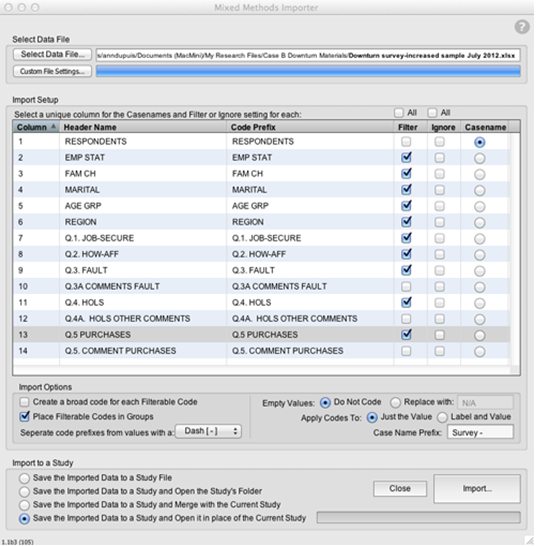
You can choose to use the study created from the spreadsheet/survey data as a separate study focusing on the survey results, or combine it with the focus group and/or media releases material provided with Case B.
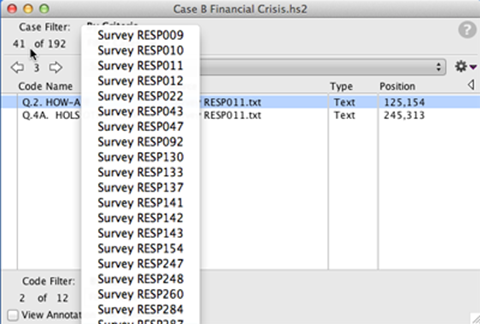
Case filters let you choose to work with only a subset of your cases, hiding the others temporarily. In this way, you can analyze subgroups and compare them. Use them with variable codes to select cases based on demographics or other coded attributes or characteristics.
With case and code filters in place, you can browse your study and run reports (including code frequencies) containing only the subset of data you have filtered for.
To filter cases, choose an option from the Cases Filter Cases submenu. You can filter cases by simply choosing their names, or by creating criteria based on your codes (so you can look at only cases that include a certain combination of codes). There is no typing or syntax involved; you simply choose your codes from a list and then the appropriate Boolean operator (and, or, not) to build as complex an expression as necessary to filter a set of cases.
Examples of filtering criteria you can set up:
Case-study A – Young People’s Perceptions


Case-study B – The Financial Crisis

Filtering Codes
You can also filter codes. You can choose to work with only certain codes you select, or which match criteria you devise. Combine case and code filters to look at specific subsets of your cases and codes.
With case and code filters in place, you can build reports focusing on the specific data you are interested in. You can also browse the cases in the study window, examining only those cases and codes that pertain to your current focus within the data.
When creating a study where individual data files will each map to their own case (e.g. Case-study A - Young People’s Perceptions), follow these steps:
1. Begin a new HyperRESEARCH study.
a. Launch HyperRESEARCH
b. Choose "Create New HyperRESEARCH Study" from the Welcome screen
c. Choose "Save As" from the File menu. Give the study file a meaningful name, (e.g. "Case-study A" or "Young People's Perceptions") and save it in a location you can find again easily)
2. Create cases
a. With the Untitled case showing in the Study Window, choose Cases --> Rename Case and change the name to the first respondent's name or identification code (e.g. " 001-ENG-M-16")
b. Choose Cases --> New... and enter the name or id of the next respondent
c. Create additional cases as necessary:
001-ENG-M-16
002-ENG-F-15
003-ENG-M-16
004-ENG-F-15
005-NL-F-15
006-NL-M-16
007-NL-M-15
008-NL-M-16
3. Create variable / demographic codes
a. Click on the Code Book to make it the active window.
b. Choose "New Code" from the drop-down menu at the top left of the code book
c. Enter a variable code's name (e.g. "Gender - Male")
d. Repeat until the variable / demographic codes you need are in your code book:

4. Add source files to Sources List
- Choose Sources List from the Sources menu
- Use "Add New Source File...." to add the a source file, or "Add New Sources From Folder" if all of the relevant source files are in the same folder on your hard drive
5. Open a source file (double-click on the file name in the Sources List)
6. Navigate to relevant case (choose from the drop-down list of case at the top of the Study Window, or choose "Go to Case...." from the Cases menu)

7. With the correct source file open and the matching case showing in the Study Window, apply variable codes to source file as a whole
a. Click in the Source Window to make it the active window
b. Select the entire file: Edit --> Select All (keyboard shortcut: cmd-a for Mac, ctrl-a for Windows)
c. With the contents of the source file highlighted, select the relevant variable / demographic codes from the code book and click Apply Code (e.g. "Age - 16," "Gender - Male," "Siblings - No" for respondent 001-ENG-M-16)

HyperRESEARCH will apply the selected codes to the selected source material (e.g. the entire document). The codes will appear on the active case (e.g. 001-ENG-M-16) in the Study Window:
d.
Add annotations (memos) to the applied variable codes if you wish to record analytical insights related to the characteristics they represent.
Note: you don't necessarily need to do these steps in the order in which they're given. For example, you can create one case at a time, open its corresponding source file, and apply the appropriate variable codes (demographics, etc.) to the source file before moving on to repeat the process with the next case.
And of course you can begin coding the source files at any time with other codes (not just variable codes indicating demographics, etc.).
You can also use variable codes to differentiate source material within the same file by speaker or other characteristics. Select the passage corresponding to the speaker, and apply a code identifying the speaker. These identification codes will be especially useful when filtering codes based on code proximity functions (see "Code Relationship Functions" in the Analysis topic in the Help system). They will allow you to look at the intersection of the speaker id code and one other code (e.g. "Speaker: R-RP382" and "Security").
Use the Autocode feature to quickly apply identification codes to the passages of each speaker.
- Choose "Autocode..." from the Codes menu.
- Specify which source files will be coded to which cases.
a. Make sure all of the cases you wish to autocode are listed in the Sources tab of the Autocode window. (Use "Add Case" and "Remove Case" as needed to specify the cases you wish to include in the autocoding.)
b. Click on a case to select it, then use "Add Source...." to add a source file to that case." (If you have already coded some source files to your cases, those source files may already be assigned to the appropriate cases.) Continue adding source files to each case's Sources settings until you have assigned all the relevant source files for this autocoding session. (if you accidentally assign a source file to the wrong case, click on the source name and use Remove Source to remove it.)

3. Click on the "Phrases" tab to set up the Phrase you will be searching for (the exact phrase that identifies each speaker in the text). The first participant listed in the "GP1 FGD-RETIRED PROFESSIONALS.docx" file is identified as "R-RP382" in the text, so that is the phrase we will have Autocode search for.

Since most of the responses from speakers in the focus groups are i the form of a single paragraph, set the "When phrase is found, select an additional:" option to one paragraph before and one paragraph after. This tells HyperRESEARCH to select the entire paragraph the searched-for phrase is found in.
Note: A few of the participant responses appear in the text files as more than one paragraph. There are two ways to handle this situation:
a. Before beginning to code your source files, review and edit them to make sure that a respondent ID is associated with every paragraph;
or
b. After Autocoding, review the results and manually add the appropriate ID code to any paragraphs that were missed due to the lack of the searched-for phrase present in that paragraph.
4. Click on the "Codes" tab to specify the code(s) to apply to the case. It's a good idea to prefix your ID codes with useful information (e.g. "Speaker: " or "Focus Group 1: ") followed by the actual identifying information (e.g. " R-RP382").
c. Use "Add Codes...." to call up the Code Selection dialog to select the code or codes you wish applied to the selected source material around every instance of the specified phrase. (Note: you can add additional variable codes such as "Gender: Male" in the same autocoding pass.)
If you haven't already created the appropriate ID codes in your code book, you can create the using the "New Code..." button in the Add Code dialog box.

5. Once you have assigned the sources to your cases in the Sources tab, specified the phrase to search on, and added one or more codes to the Codes tab, click Autocode.
HyperRESEARCH will tell you how many codes have been automatically added to your study:

You can view the new references in the Study window:
