Using Software in Qualitative Research
A Step-by-Step Guide
Chapter 7 – Coding (TRANSANA)
Download the pdf file for this chapter guide here.
Chapter 7 discusses coding, coded retrieval and coding schemes as key tools of qualitative analysis. We discuss the terminology and philosophies which underpin coding processes. Specific methodologies use particular routines when coding. More general thematic analyses or less code-based methods may use coding devices in ways which include data reduction strategies, indexing and marking data. See all coloured illustrations (from the book) of software tasks and functions, numbered in chapter order.
Sections included in the chapters:
Inductive, deductive and abductive approaches
Theoretical coding
Grounded Theory
Visual data, coding directly or via a transcript
Two sections:
7A Coding using quick clips
7B Coding using standard clips
Coding Media Files inTransana I – Quick Clips by David K. Woods, Ph.D., Transana's Lead Developer
7A.1 Clips – Transana’s basic unit of analysis
In Transana, the analytic model involves bringing in whole media files, creating transcripts which make these media files more accessible and manageable, and then identifying smaller analytic clips. Clips in Transana are those small portions of your larger raw media files that you identify as analytically meaningful for some reason. Clips are your basic unit of analysis within Transana. All coding of media files in Transana occurs through the creation of Clips.
In order to meet the needs of a variety of research styles and qualitative methodologies, Transana offers several different methods for creating Clips. This chapter will discuss Transana's "Quick Clips," which are designed to allow fast coding of media data. 7A.Section 7B below will discuss Transana's "Standard Clips," which are designed to embody analytic meaning in a slightly different way.
The differences between Standard Clips and Quick Clips can be somewhat subtle at first. In essence, a Quick Clip is a way of applying coding to a portion of your media file quickly and without worrying about what it means at the moment. Tasks like naming the clip and deciding where it belongs in your analytic framework are deferred or skipped altogether. A Standard Clip, on the other hand, requires a name and needs to be placed in a Collection which often implies something about how that Clip fits into your larger analytic scheme.
However, it is important to realize that these distinctions really only apply to how the Clip is created. Once created, Quick Clips and Standard Clips are functionally identical and can be used interchangeably in your analysis.
7A.2 An Analysis of the Structure of an Ad
When we first looked at the "1960s Coca Cola Commercial" ad, we noted the quick inter-cutting of sports activities with product shots of Coca-Cola. We wondered about subliminal advertising and the overall importance of the structure of that ad.
As our next analytic step in looking at this media file, let's explore these issues a bit. We have already created a transcript that breaks the ad up into its components by marking each transition from one shot to another with a time code. Our next step is to code each of the shots in the ad, each segment of the ad that these time codes delineate.
At this stage, we just want to apply coding to different segments of our media file. We are early in the exploration of the data set, and don’t yet have any established ideas (whether from literature review or from previous analysis of data on this project) about what the data might mean. We just want to code some information about the structure of the ad to see if we can discover something meaningful through this approach. Transana’s Quick Clips are ideal for this initial approach to the data.
7A.3 Creating a Coding Scheme
A quick look at the video suggests that as good a place to start as any is to code the video file for its outward content. We can code each segment for what is being shown. To do this, we should set up an initial coding scheme.
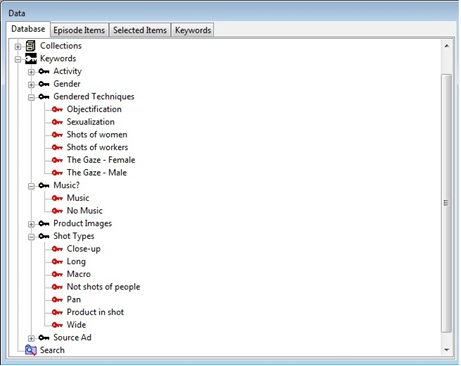
In Transana, a coding scheme is operationalized by creating a set of Keywords. Keywords are gathered into Keyword Groups for convenience. Keyword Groups are stored in the Keywords Node of the Database Tree. To prepare for the coding process, let's first create a set of keywords we can use to capture the visual contents of each scene in this ad.
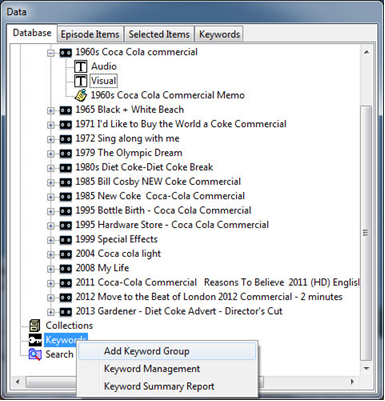
To start building a coding scheme, right-click the Keywords node in the Database Tree. Select the "Add Keyword Group" option from the popup menu.
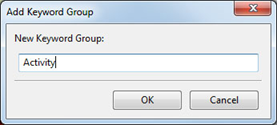
You will see the Add Keyword Group dialog box. Enter the Keyword Group name "Activity" and press OK.
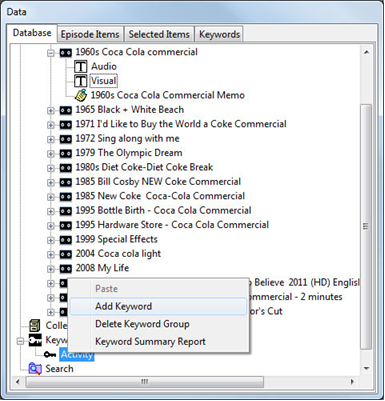
Now right-click the “Activity” Keyword Group to start adding keywords. Choose “Add Keyword” from the popup menu.
This takes you to the Add Keyword form. Keyword Group and Keyword are the only two required elements on this form, but it is a good practice to provide a full definition of each keyword as you create it. If the meaning of a code changes over time as your analysis proceeds, it is a good practice to document that change in the Keyword Definition as well. You can also define a default color for the keyword (used in Transana’s Maps and Graphs, as well as in detail coding for Snapshots) as well as other characteristics used for detail coding of Snapshots (to be covered later.)
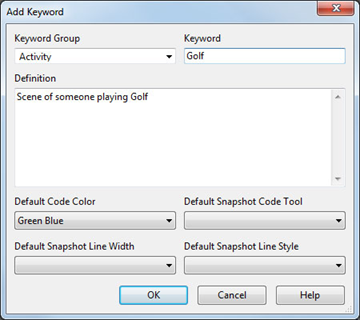
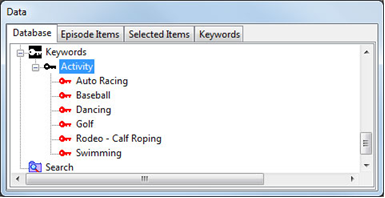
A quick scan of our Visual transcript shows that six sports activities are depicted in this commercial, Golf, Baseball, Auto Racing, Swimming, Calf-roping in the Rodeo, and Dancing. Create Keywords for each of these six activities in the “Activity” Keyword Group.
Users who are familiar with other qualitative analysis software may note that Transana does not make a distinction between different types of codes, sometimes labeled with names like codes, attributes, variables, or demographic information. In Transana, there are just Keywords, and we use Keywords for all coding, whether of demographic, practical, factual, or theoretical information. Users who find such distinctions useful can implement them easily enough by using different Keyword Group names.
7A.4 In-Vivo Codes
It is a common practice in qualitative analysis to derive codes from the content of the data being analyzed. You may, for example, want to take a phrase you see in one of your transcripts and make it into a Keyword in Transana. This is very simple.
Just highlight the word or phrase in your transcript that you want to turn into a code and drag that highlighted text onto a Keyword Group in the Data Window. Transana will create a Keyword in that Keyword Group using the selected text and will open the Keyword Definition window for you to add an appropriate Keyword Definition.
7A.5 Default Codes for a Media File
We may be interested at a later point in our analysis in making comparisons between ads. Although the Episode name will be contained in the Clip information, let's create a Keyword Group called “Source Ad” and create a Keyword for this ad. Having such a keyword makes this information available to Transana’s Search Engine, which may prove useful later in our analysis.
We want to make sure that every Clip created from each of our Episodes gets the keyword that identifies the Episode or media file the Clip is from. In Transana, adding a Keyword to an Episode makes that Keyword a default Keyword for all Clips created from that Episode. That's a good idea, so let's assign the Keyword "Source Ad : 1960s Coca Cola Commercial" to the "1960s Coca Cola Commercial" Episode.
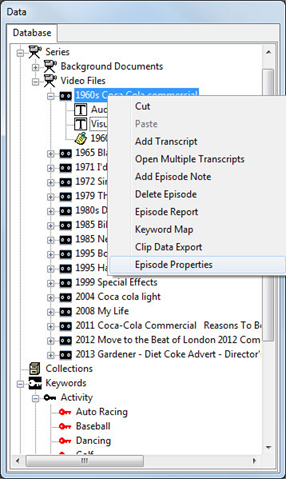
To do that, right-click the Episode and choose Episode Properties.
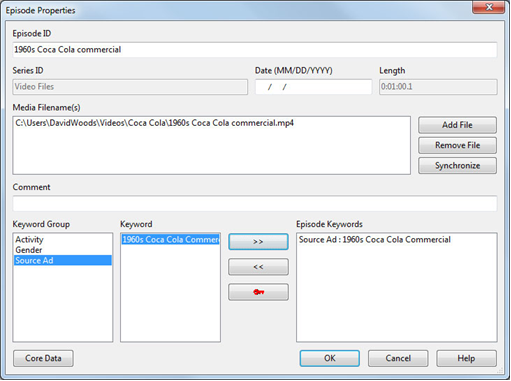
You will see the Episode Properties for the 1960s Coca Cola Commercial. Under "Keyword Group", click on "Source Ad" and the Keywords for the group will be displayed. Double-click the appropriate Keyword "1960s Coca Cola Commercial", or click it once and press the " >> " button so that the Keyword shows up in the "Episode Keywords" list. Press OK to save the changes to the Episode.
An alternate method of assigning a Keyword is to click on the Keyword in the Database Tree and either use Drag-and-Drop to drop it on the desired Episode or Clip or to use Copy-and-Paste to copy it and paste it on the desired Episode or Clip.
NOTE: If you have already created Clips from an Episode when you assign an Episode Keyword, Transana will give you the opportunity to assign the Keyword to all of the existing Clips. Therefore, if you don’t anticipate all of the Keywords you want to use as Default Keywords, you can always add them later.
7.6 Creating Quick Clips
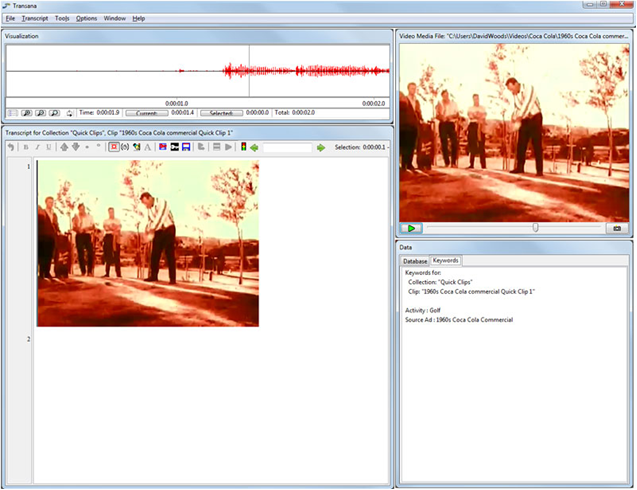
Now load the Visual Transcript for the 1960s Coca Cola Commercial Episode in the Video Files Series. Click on the first image in the Transcript, the first image of the golfer. Right-click in the transcript and you'll see the first golf scene in the ad play in Transana’s main interface. (You might also the first frame of the second scene at the very end, but that's okay.) You don’t have to play the media file each time you create a Clip, but right-clicking in the Transcript is a nice way to check the scope of the media file that will be used in the Clip you are about to create.
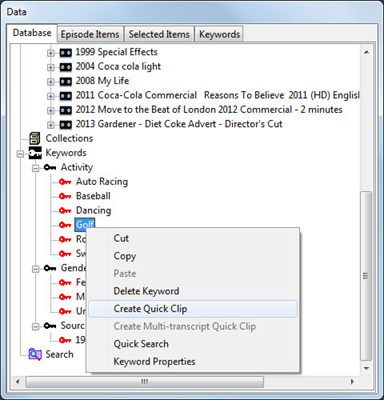
Now scroll down in the Data Window to show the Keywords in the “Activity” Keyword Group. Right-click the "Golf" keyword and choose "Create Quick Clip" from the popup menu. That’s it. You’ve created your first Clip, associating the Keyword “Activity : Golf” with the golf scene in the media file that played when you right-clicked the Transcript.
So what does it mean to have created a Quick Clip?
The first thing you may notice is that the Collections node in the Data Window is no longer empty. If you expand that node, you will see a Collection called “Quick Clips” and if you expand that node, you will see that the Quick Clips Collection contains a Clip called "1960s Coca Cola commercial Quick Clip 1".
A Collection is like a container. In Transana, researchers generally create such containers where they store analytic objects such as Clips. Collections can be named, either functionally (as in "Clips to follow up on" or "1960s Coca Cola commercial Clips") or theoretically (as in "Subliminal advertising"). Quick Clips are put in a special Collection called "Quick Clips". You'll learn more about Collections in the Section 7B below about Standard Clips.
A Clip is a portion of a larger media file that has been selected as an analytically meaningful unit. Double-click the "1960s Coca Cola commercial Quick Clip 1" Clip entry in the Quick Clips Collection. Click "Play" in the Video Window, right-click the Transcript, or right-click the Visualization window. Any one of these actions will play the Clip video for you. You'll see a segment of the ad, about 2 seconds long, of the first golf scene. If you go to the Keyword tab in the Data Window, you see that the Clip has been coded with the Keyword "Activity : Golf" (which it got because this was the keyword used to trigger Quick Clip creation) and with "Source Ad : 1960s Coca Cola Commercial" (which it got because this keyword is assigned to the Episode from which this Clip was created.)
In Transana, you can always easily get back to a Clip's context, the place in the original Episode where the Clip was created. Go back to the Database tab in the Data Window and right-click on the "1960s Coca Cola Commercial Quick Clip 1" clip. Choose the "Locate Clip in Episode" option from the popup menu. This takes you back to the Episode and Transcript that was the source of this Clip and takes you to the place in that Episode and Transcript where the Clip was take from.
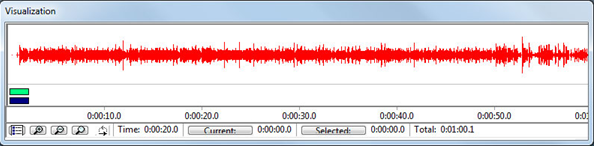
Now go to the Options menu, choose the Visualization Style item, and from the sub-menu, select Hybrid. You will now see both the waveform diagram and a visual representation of the currently-loaded Episode's coding in the Visualization Window. It is often helpful to see the coding being applied when creating Quick Clips. We can see that two codes have been applied at the beginning of the media file. Holding the mouse cursor over the bars in the Keyword Visualization reveals the names of the keywords involved. (If you are using OS X, you may need to click on the Visualization Window's header to activate the window before the mouse-over information is displayed.)
At this point, it's important to note the role of the Transcript's Time Codes in the process of Clip creation. When creating Clips in Transana, you start by making a selection in a Transcript. In the case of "1960s Coca Cola Commercial Quick Clip 1", you selected the first image in the Visual Transcript. When creating the Clip, Transana looks for the Time Code immediately preceding the current Transcript’s current position or selection and uses that as the Clip's starting position. Transana looks for the Time Code immediately following the Transcript's current position or selection and uses that as the Clip's ending position. That is, the Time Codes immediately surrounding the cursor position or selection in the Transcript are used as the Clip's boundaries. This is why we took the time to place our time codes so precisely during the creation of that Transcript. If our Time Codes are frame-accurate, then our clips will also be accurate to the 30th of a second when we create Clips. (NOTE: The true accuracy of Time Codes depends on the format of the media file. Some media formats allow more precise media positioning than others.)
Let's create some more Quick Clips. Click on the first baseball player image in the Visual transcript. Now double-click the "Activity : Baseball" keyword in the Data Window's Database Tree. Double-clicking a Keyword is an alternate method of triggering the creation of a Quick Clip that many find easier than right-clicking and selecting the “Create Quick Clip” menu item. Notice the addition of the clip to the Quick Clips Collection, and also note that the Visualization Window has been updated to reflect the additional coding done to the current Episode during the creation of this new Quick Clip.
Now continue on in the Visual Transcript as long as you see images of sports, selecting each image and using the appropriate “Activity” Keyword to create more Quick Clips. Stop when you get to the first image that shows a bottle of Coke. Be sure to note how the Visualization Window changes as you add each Quick Clip.
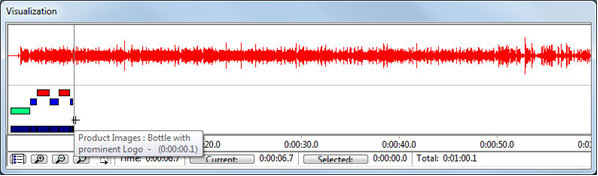
The first image of the product being advertised appears at about 6.5 seconds into the commercial. At this point, we don't have an appropriate Keyword to trigger the creation of the Quick Clip. We have to interrupt our coding long enough to create an appropriate Keyword. Let's create a Keyword Group called "Product Images" and a Keyword called "Bottle with prominent Logo". Once we have this keyword, we can click on the image in the transcript and then double-click the "Product Images : Bottle with prominent Logo" keyword to create the appropriate Quick Clip.
7A.7 Taking Notes during Clip Creation
Perhaps at this moment, we glance at the Visualization Window. We notice that the new bar created in the Visualization is very short indeed. We hover our mouse over the bar (if on OS X, click on the Visualization Window's header to activate the window first) so that its Keyword name is displayed to confirm that this is indeed our keyword from the Product Images group. That's interesting.
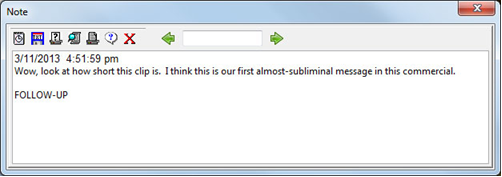
We don't really want to interrupt what we are doing right now, creating Quick Clips for all of the scenes in this ad, but we also don't want to lose this observation. Perhaps a quick Analytic Memo is in order. Right-click the newest Quick Clip ("1960s Coca Cola Commercial Quick Clip 7) and choose "Add Clip Note" from the popup menu. Type "Subliminal Message 1" into the Note ID and put your name in as the Note Taker. Press OK to be taken to the Note Editor.
In the Note Editor, press Ctrl-T to add a time stamp (which is different from a Time Code in a Transcript!) Then jot down a quick note about your observation. (I will often include a key phrase such as "FOLLOW-UP" in such a note. I can search for this phrase later when I want to see what notes I've left for myself that require further attention.)
Now close the Note Editor. Your note will be saved automatically.
7A.8 Creating more Quick Clips
Go back to creating Quick Clips of the activities in this ad. You will need to create a number of additional Product Images keywords to describe the images of Coke that you see in the ad.
It is important to recognize that creating Quick Clips when there are images in the transcript can take a few seconds. Please wait for each Quick Clip to show up in the Quick Clips Collection or to have its coding show up in the Visualization before moving on to creating your next Quick Clip.
Remember, if you're ever unsure of an image in the transcript or of how to code a portion of the video file, just click in the segment of interest in the Transcript Window, then right-click in the Transcript Window. The segment of interest will be played within Transana’s main interface so you can figure out what of interest, if anything, is going on in the selected part of the media file. When the Episode is loaded, you can click on the Data Window’s Selected Items tab to see what clips have been created that include the currently selected portion of the Episode and you can see what coding has been applied. The Keyword Visualization, if shown, also provides information about the coding of a particular location in an Episode.
Continue creating Quick Clips as described. (If you are using the Demonstration Version of Transana, you will only be allowed to create a limited number of Clips. If you're using the full version, you can create as many Clips as you wish.) When you get to about 39 seconds, you'll see a series of scenes of people from the earlier clips drinking Coke.
When I came to the first of these clips, I created a code for "Product Images : Person drinking from a bottle" and created a Quick Clip with that new Keyword. I recognized the person drinking the Coke as the swimmer from the swimming scenes, and wanted to reflect that in my coding as well. So without moving my cursor, I double-clicked a second Keyword, "Activity : Swimming". Transana displayed the following warning message:
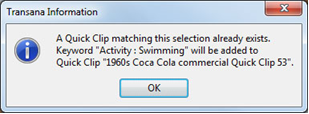
This indicates that Transana has added the additional Keyword to the existing Quick Clip created by the first Keyword rather than creating two Quick Clips with the same start and end points. Since we will be creating additional Quick Clips with multiple Keywords, we can turn this warning off by removing the check from the “Options > Show Quick Clips Warning” item in Transana's menus.
7A.9 Using Snapshots to Emphasize a Visual Point
At 46.3 seconds into the commercial, we see something unique. In this scene, one cowboy is handing a bottle of Coke to another cowboy. What I noticed is that this is the only instance where TWO bottles of coke are shown at the same time. (Play along with me here. Let's pretend that this is analytically significant for some reason.) There are several ways we could represent this observation.
One choice we have is to create a keyword for "Product Images : Two Cokes on screen" and we could add that keyword to the Quick Clip. (If we pause the video during this scene and look at the Selected Items tab in the Database Window, we can see that in my analysis, this is "1960s Coca Cola commercial Quick Clip 64". Your Clip number may differ slightly.)
But this single instance of this keyword could get lost in the larger analysis. Instead, let's capture an image of this and turn it into a Snapshot in Transana to emphasize this very significant analytic point.
The first thing we want to do is to pause the video and select a video frame that best illustrates the point we want to make with our Snapshot. As described previously (in section 3.7), we can use the cursor keys within the Visualization Window to select exactly the video frame we want.
If we want to create our Snapshot at the same time as we're creating our Quick Clips, we can simply right-click the Quick Clips Collection and choose "Add Snapshot" from the popup menu. This will cause the new Snapshot to be placed at the bottom of the list of items currently in the Collection.
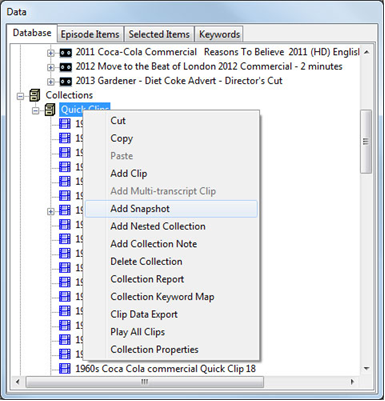
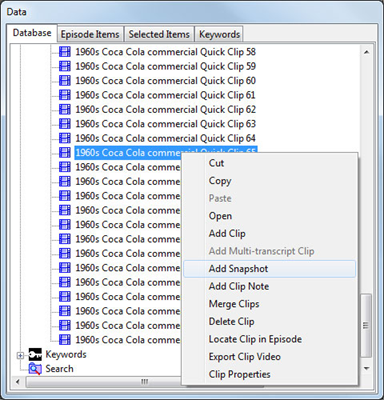
But in my case, I didn't notice this until I was looking though the clips later. It's a bit difficult to see. I want the Snapshot to be placed next to the Clip that contains that scene, Quick Clip 64, so I expanded the Quick Clips Collection and right-clicked Quick Clip 65, the clip following where I want to place the Snapshot, and selected “Add Snapshot”. Adding a Clip or Snapshot by right-clicking a Collection will add the new Clip or Snapshot at the bottom of the Collection List. Adding a Clip or Snapshot by right-clicking an existing Clip or Snapshot will cause the new Clip or Snapshot to be inserted just above the selected item in the list.
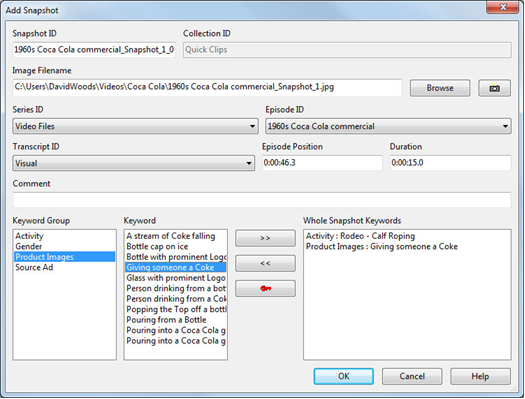
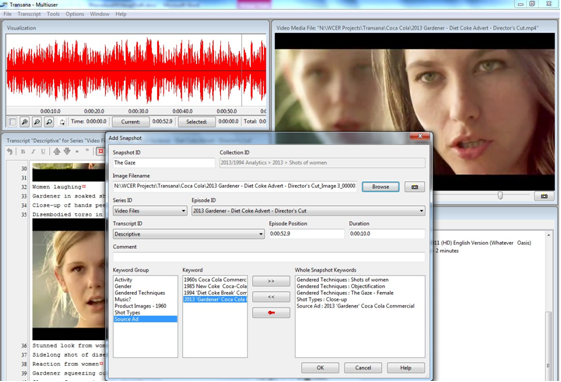
Transana now displays the Add Snapshot dialog box.
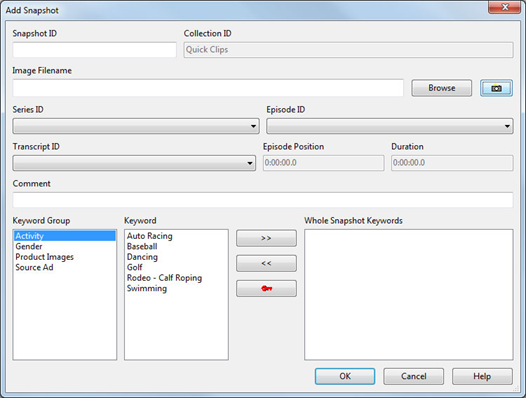
This dialog allows us to select an image file from the hard drive by pressing the Browse button to the right of the Image Filename field, or it allows us to capture an image from our current video by pressing the "Capture Snapshot for Coding" button ![]() to the right of the Browse button. I pressed the latter button. This causes Transana to call up the Media Conversion Tool, which is used to capture still images from video files. (We saw this before in creating our image-based Transcript.)
to the right of the Browse button. I pressed the latter button. This causes Transana to call up the Media Conversion Tool, which is used to capture still images from video files. (We saw this before in creating our image-based Transcript.)
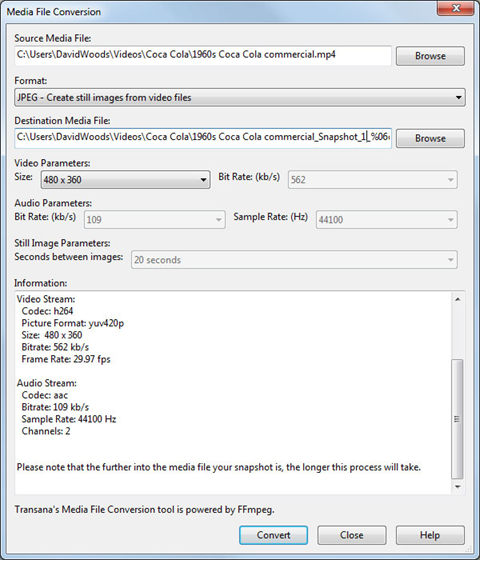
There’s an important subtlety here. When capturing a screen shot image to go into a Transcript, we can ignore the Destination Media File name. An image captured in a Transcript is written to the hard drive only transitionally, and once the image is imported into the Transcript, the image data is stored in the Transcript in Transana’s Database. However, when an image is captured to create a Snapshot, the image file is created and is linked from Transana’s Snapshot object by name. If that image on the hard drive gets over-written (by a later screen capture, for example), the Snapshot will display the incorrect image. In order to avoid that, you should alter the Destination Media File name when creating Snapshots. The default file name is fine for capturing images to Transcripts, but custom file names should be used for Snapshots.
In Transana, you can code a snapshot at the whole snapshot level or at the detail level. I coded the entire snapshot with "Activity : Rodeo - Calf Roping" and "Product Images : Giving someone a Coke" to reflect the coding embedded in the entire image. Notice that the Snapshot, because it was created through a video screen capture, is associated with the current position in the media file it was taken from. By default, the Episode Position is the time position of the screen capture and the duration is 15 seconds. In our case, however, more appropriate values would be a start position of 46.0 and a duration of 1.0 seconds. Be sure to change these values on the Add Snapshot screen before pressing OK.
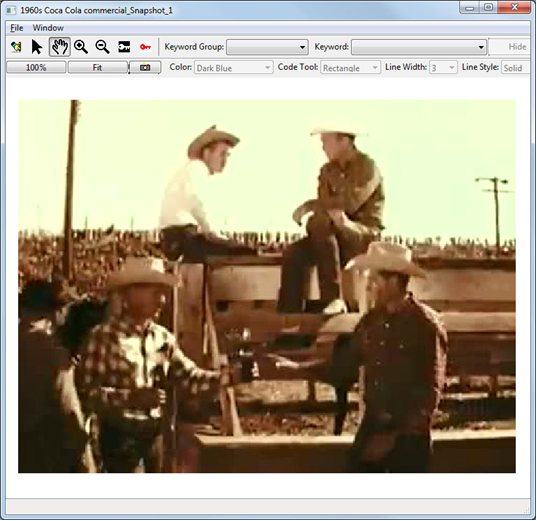
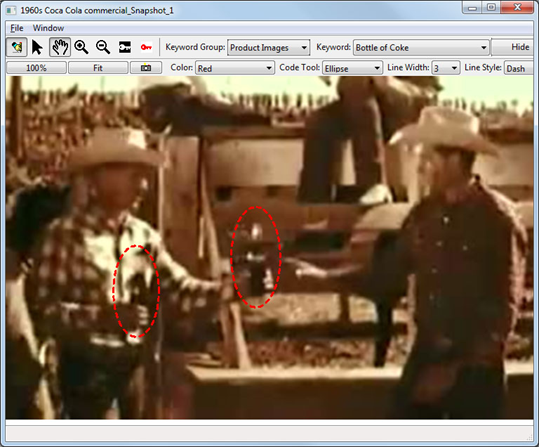
I then pressed OK on the Add Snapshot Dialog Box. Transana now displays the Snapshot in the Snapshot Coding Window
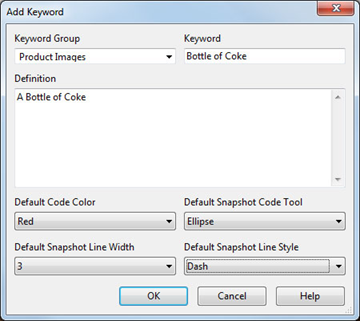
I would like to emphasize the bottles of Coke in this picture, so I created a keyword for "Product Images : Bottle of Coke". For this keyword, I took the extra time to define the Snapshot Coding properties I want to use as the default coding style for this keyword.
Now select this new Keyword in the Snapshot Coding Window by selecting the appropriate Keyword Group and Keyword in the Coding Window’s toolbar. Put the Snapshot Coding Window into Edit Mode by pressing the Snapshot toolbar’s Edit Button ![]() . Select the Coding Tool
. Select the Coding Tool ![]() in the Snapshot Coding Window's toolbar, and draw coding shapes around the two Coke bottles in the Snapshot. Finally, zoom
in the Snapshot Coding Window's toolbar, and draw coding shapes around the two Coke bottles in the Snapshot. Finally, zoom ![]() and position
and position ![]() the window to crop the Snapshot the way you want the image to appear. When you take the Snapshot Coding Window out of Edit Mode, Transana will save the detail coding (the two red dashed ovals drawn around the Coke bottles), as well as the size, zoom, and position of the image in the Snapshot Coding Window. While you can freely manipulate and explore the image when it is not in Edit Mode, those changes will not be preserved, and the next time the Snapshot is needed for screen display or one of Transana's reports, it will return to its last-saved state.
the window to crop the Snapshot the way you want the image to appear. When you take the Snapshot Coding Window out of Edit Mode, Transana will save the detail coding (the two red dashed ovals drawn around the Coke bottles), as well as the size, zoom, and position of the image in the Snapshot Coding Window. While you can freely manipulate and explore the image when it is not in Edit Mode, those changes will not be preserved, and the next time the Snapshot is needed for screen display or one of Transana's reports, it will return to its last-saved state.
If you really want to get fancy, you can replace the uncoded image in the Visual Transcript with the coded Snapshot image by putting the Transcript in Edit mode, deleting the old image, leaving the cursor in place, and pressing the Snapshot Coding Window's "Insert Coded Image into Transcript" button ![]() in the toolbar. An analytic memo attached to the Snapshot would probably also be appropriate, indicating the particular significance of this image in our analysis.
in the toolbar. An analytic memo attached to the Snapshot would probably also be appropriate, indicating the particular significance of this image in our analysis.
7A.10 Looking at Coding Across the Whole Episode
When you have completed coding the file, your Visualization Window should look something like this:
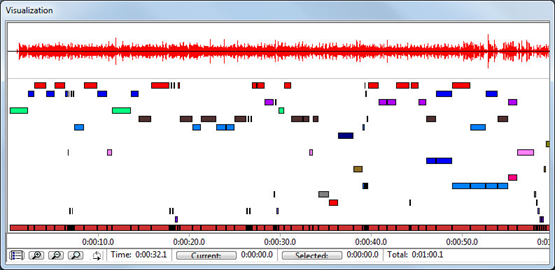
As we move our mouse over the Visualization, we can see what keywords are represented by each of the rows of colored bars. We see that the first six lines are our sporting activities, and the following lines (except for the last one) are our Product Images. We can see at a glance that sports are most common early in the commercial, while product shots become more common and last much longer in the second half of the commercial. We see that sports shots are by and large longer than product shots in the ad, and that the longest product shots are those that combine the product with the athlete, those shots of the athletes drinking Coke and those shots of people handing Cokes to the athletes.
We will probably want to record some of these insights in an Analytic Memo. Since these insights were gained by looking at a set of Clips, it may make sense to attach the Note for this Analytic Memo to the Collection containing all of these Clips, or it might make sense to simply edit the Analytic Memo already attached to the Episode these Clips are from, since they're all from the same Episode. Think about which approach would work better for you; Transana doesn’t care.
Now, we have a full set of Quick Clips that cover the coding we've done for this Episode. The Clips in this set are all related. Let's rename our Quick Clips Collection to reflect the contents. Right-click the Quick Clips Collection, choose “Collection Properties” and change the Collection ID to "1960s Coca Cola Commercial Quick Clips". That title identifies what this group of Clips has in common. Next time we create a Quick Clip, Transana will create a new Quick Clips Collection for the new Quick Clip.
7A.11 Updating Analytic Memos
When we were done creating Quick Clips, we played the video file one more time, looking at coded segments, watching the Visualization cursor move across the Keyword Visualization. At this point, I noticed the relationship between the images and the music. I guess I’d been so focused on the sports images, I had not even noticed that the image changes seem to be synchronized with the music of the ad. I had missed that observation until this latest review of the coding across the larger file.
To record this insight, I opened the Episode Note for this ad, scrolled to the bottom, added a date / time stamp, and added the new insight to my note. It’s important to note that this new idea directly contradicted something I’d written in this note earlier. I did not remove the older, obsolete thoughts, but instead described my new insight and what led to that insight.
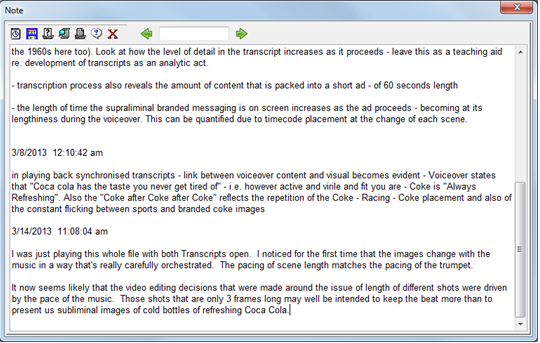
Because of the time stamps in the analytic memo, it’s easy to trace the progression of my understanding of this data, to see how my thinking changed and what analytic processes led to those changes. This trail of breadcrumbs will be crucial when I am writing up the results of my analysis.
Coding Media Files in Transana II – Standard Clips by Joseph H. Woods, Intern and David K. Woods, Ph.D., Transana’s Lead Developer
7B.1 Standard Clips
The previous Section 7A covered Quick Clips; this one will focus on Standard Clips. The differences between Standard Clips and Quick Clips can be somewhat subtle at first. In essence, as you have seen, a Quick Clip is a way of applying coding to a portion of your media file quickly and without worrying about how it relates to the rest of your data at the moment. Tasks like naming the clip and deciding where it goes are deferred or skipped altogether. A Standard Clip, on the other hand, requires a name and needs to be placed in a Collection that usually implies something about how that Clip fits into your larger analytic scheme. Often, a little more analytic thinking is required for the creation of a Standard Clip than a Quick Clip.
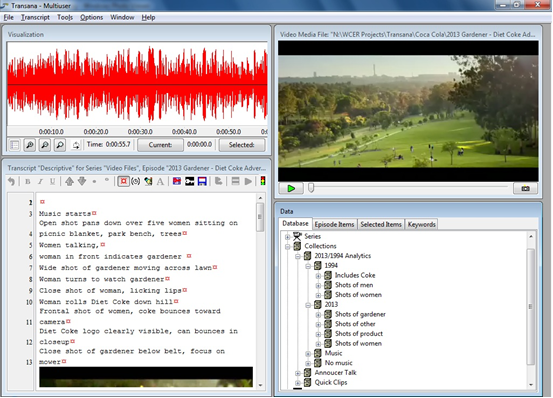
Let’s begin with a new video, specifically the 2013 advertisement in our database, labeled the ‘Gardener’ ad. We have included a transcript, with included time codes and images, in .xml format within your data set. Because the commercial involves no spoken dialogue, we created a descriptive transcript of the advertisement, taking a shot-by-shot approach, time-coded based on the change between shots instead of between speakers or sentences. Let’s use Standard Clips to analyze this file.
7B.2 Collections
Collections are containers created in the process of analysis that help to describe and organize Clips. There are many benefits to making a custom Collection structure over the generated Quick Clips Collection. First, when creating Collections, the flexibility of a naming structure allows you to create theoretical categories into which Clips can be placed as you create Clips from your media files to analyze your data. Add to this the fact that Collections are editable, moveable, and nestable and your clips can be sorted in easy-to-locate, easy-to-analyze ways.
For this video file, we have drawn up Collections as follows:
When we first began coding, we considered whether or not a difference in the camera techniques used in each shot could be relevant to our analysis. In the first analytic pass, we coded this commercial by the types of camera shots used in each Clip, and categorized each Clip into the corresponding Collection. When most of the ad turned out to be wide-angle shots (as you can still see from the Keyword distribution, below,) we shifted to an examination of the contents of each shot; we observed that the composition probably was not correlated strongly enough with the gendered messages of the advertisement’s overall presentation. With further examination and coding, we discovered that the proportion of shots containing, for example, women versus men was a much more fruitful analytical model than simply examining the camerawork. We reorganized the Clips into these new Collections, and soon refined this even further into shots where people were featured, where the product being advertised was featured, and where neither was even on screen.
Moving and reorganizing Collections is easy. To rename a Collection, or set a default Keyword Group to be accessible when creating Clips in that Collection, right-click the Collection and click Collection Properties. To move or copy a Collection, either to nest inside another or put into the root Collections node, simply move it like any other item in the Database window using drag-and-drop or cut/copy and paste. For more information about manipulating Clips within Collections, please see the Transana Screencast, Manipulating Clips in Collections.
7B.3 Keywords
For the purposes of this demonstration we will use the following Keyword Groups and Keywords in our coding of the Gardener video. We will focus on gender issues (in Gendered Techniques), types of camera shots used (in Shot Types), and the use of music in the commercial (in Music?). The process of creating these Keywords is described in sections 7A.3 and 7A.4 of the previous Section 7A.
We can view a list of all of our Keywords and their definitions using the Keyword Summary Report. This report can be accessed by right-clicking either the Keyword root node (for a report containing all keywords in all keyword groups) or a Keyword Group (for a more focused report) in the Database tree and clicking “Keyword Summary Report.”
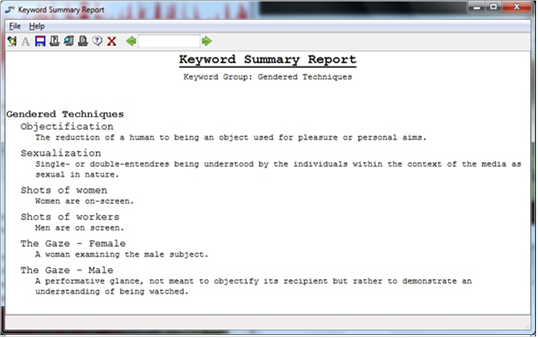
This report is an excellent way to share your coding dictionary with colleagues.
7B.4 The Relationship Between Collections and Keywords
Collections and Keywords serve similar functions in Transana. They both indicate something about how a particular analytic unit (a Clip or a Snapshot) fits into the analytic schema being developed by the researcher. But they do so in slightly different ways.
Collections tend to signify a single dominant analytic thread. Placing an analytic unit in a Collection is saying that the single most important thing about that analytic object is that it belongs in a particular category. Keywords imply category membership as well, but an analytic object can have many keywords, describing it on many dimensions, while it can only belong to one Collection. In a sense, the Collection is like a super-keyword, because it usually describes the characteristic that is most important thing about that analytic object.
The advantage of using Collections is that Collection membership is always obvious. You look in the Collections tab, and you see how your analytic units are divided up between the Collections in your analytic system. That information is placed in the forefront, and is always prominently available.
Keyword membership, on the other hand, is something you have to look for. You have to perform a search to see what analytic objects belong or do not belong. (And even in Search Results, Collection membership is prominent.) But the advantage of using Keywords is that they are more flexible. You can apply multiple keywords to an analytic object, and you can develop complex search queries to sort out data along multiple dimensions, so you can do much more complex analysis of your data.
Neither system is better; they are simply different. In fact, they can be used interchangeably. You can add a new Keyword to all analytic objects in a Collection so that Collection membership is also represented by a Keyword. You can also save the results of a search as a new Collection so that Keyword presence is also represented by a Collection. Which system you should use depends on your personal preferences as a researcher and on the complexity of your data and analytic framework.
As you will note below, we used Collections for detailing the gendered breakdown of the advertisement, and Keywords for the shot types used and the presence of Coca-Cola in a given shot.
7B.5 Clip Creation
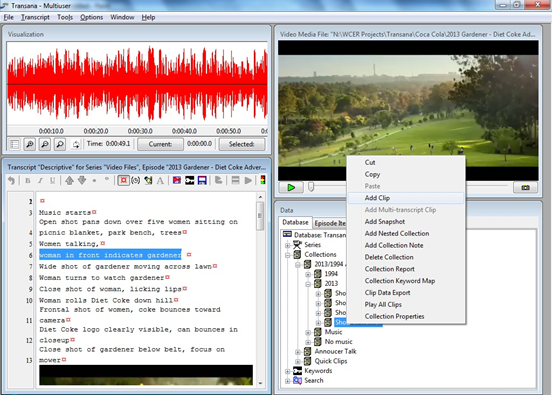
Standard Clip creation is simple. Select a portion of the transcript (which can include portions larger than just between two timecodes) and drag it to the Collection you would like to include it in, or right-click the Collection and click ‘Add Clip’, or simply double-click the Collection that should contain the new Clip. This will create a Clip, bounded by the nearest two time codes outside of the selection, and containing the transcript text selected.
All three of these methods bring up the Clip Creation Screen.

Here you can input a Clip ID, an optional comment, change the Transcript should any edits be necessary, and assign Keywords to your Clip. A descriptive title for your Clip is one of the most deceptively important aspects of Clip creation, as it allows instant recognition of the clip during later analysis. This title will sometimes be referenced independent from other related materials in Reports and Collections. For example, when coding through the ‘Gardener’ commercial, we tried to describe as plainly as possible the events happening in the video itself. As this is a nonverbal commercial, it was fairly straightforward to name Clips by their contents, but in the case of media with dialogue, phrases from that dialogue could be used to describe these segments. Much of this depends on A) what transcript the Clips is being derived from and B) what your vector of analysis is.
It is very rare that you would need to edit the Transcript of a Clip while creating it. It can be useful, however, when clarifying speakers or omitting an interjection present in the larger Transcript that either does not make sense without context or is irrelevant.
Assigning Keywords is another important aspect of the Clip Creation Screen. Keywords—Transana’s term for codes—are extraordinarily useful for organization, categorization, recall, and analysis of video files at every level. We will talk more about those in a later section of this section. Should you need more in-depth information about Clip creation, please see the Transana Screencast about Creating Standard Clips.
7B.6 Snapshots
The use of still images can be very powerful in qualitative analysis. On the one hand, still images can capture information that is extremely difficult to put into words. On the other hand, you can sometimes capture and exemplify something important from a video file in a single still image, making it possible to make a point in an article or book where sharing a video clip is not an option. In both cases, a still image can sometimes facilitate the communication of a complex idea in a way that is simple, manageable, and helpful.
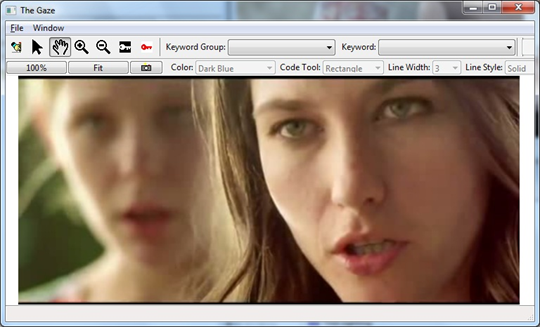
Consider, for example, how we could exemplify the concept of the female gaze used within the ‘Gardener’ advertisement. Is a simple code, with a text descriptor, enough? Or is there a more striking way to show the meaning of this concept and how it is used within the ad?
In Transana, a Snapshot is a standalone codable image placed in a Collection. To create a Snapshot, right-click a Collection and press the ‘Add Snapshot’ menu item. If you have a still image on your hard drive, browse to it and include it as your Image Filename. If you want to capture a frame from a video to use as a Snapshot, you can use the ‘Capture Snapshot for Coding’ button to take a screenshot of the current video file. You have the option of associating your Snapshot with a specific position in a media file; this can be useful to situate an image in the larger context of a related Episode, accessible using the ‘Load Snapshot Context’ feature, found by right-clicking the Snapshot in the Database window.
Snapshots can be coded to indicate specific features or analytic points. Keywords can be applied to the whole Snapshot through the Add Snapshot screen, similar to how Keywords are applied when creating a Clip. Press OK to advance from the Add Snapshot window to where the Snapshot is displayed.
In addition to whole Snapshot coding, Detail Snapshot is also possible by drawing coding shapes on an image. First, select a Keyword you would like to apply to the image itself. Then, using the Edit button and the Coding Tool, delineate the outline or shape of the Code you would like to include. This can be changed with the ‘Code Tool’ and ‘Color’ options, as well as given a thickness and line style to differentiate it from other codes.
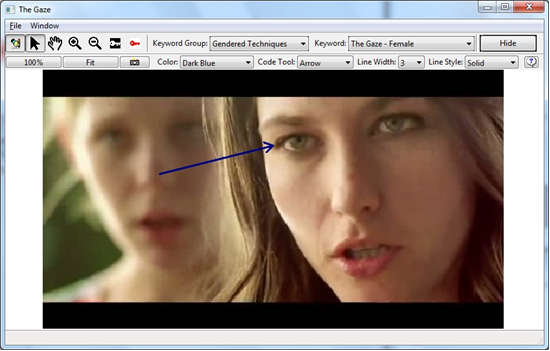
The arrow is now a code for ‘The Gaze – Female’ on the photo itself, and can be found in Reports. In this example, the arrow draws the reader’s attention to the eyes, as a direct, unblinking stare underlines the use of the Female Gaze in the Gardener ad.
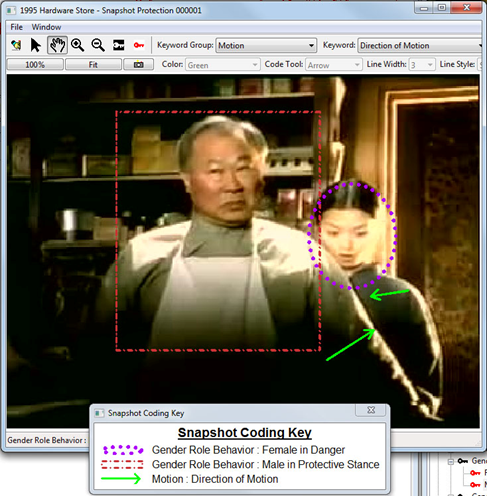
The Arrow is not the only form of annotation that can be applied to Snapshots, as this more complex example from a different Coca Cola commercial demonstrates. The image tells a story. The coding drawn on the image highlights the analytic points the researcher wishes to emphasize.
7B.7 Editing Existing Data and Refining Coding
One way to alter much of the information about an existing data object is to alter that object’s Properties. Right-click a Clip and choose “Clip Properties” from the menu, or right-click a Snapshot and choose “Snapshot Properties.” From these screens, you can alter the information about the object, including adding and removing Keywords to change the coding applied to the object. You can also rename a Keyword or move it from one Keyword Group to another, and Transana will automatically handle the task of making sure the code is renamed wherever it is used in the analysis.
In addition, a lot of changes can be made through the Database Tree in the Data Window. You can add coding to individual Clips and Snapshots by dragging a Keyword onto the desired Clip or Snapshot. You can add a code to all objects in a Collection by dragging a Keyword to the Collection. You can code all objects linked to a particular Episode by dropping a Keyword onto an Episode. You can copy and move Clips and Snapshots between Collections using Cut or Copy and Paste. The options in this window are too numerous to list.
We should note that once you have created a Clip, there is no way to edit the starting and stopping point of that clip. The subtle interaction between Clips, Episodes, Transcripts, and Time Codes make this impractical. Instead, you can right-click the Clip and choose “Locate Clip in Episode” to be taken back to the place in the proper Episode where the Clip was originally created. After noting the Clip’s coding, you can delete the Clip and create a new Clip that represents what you want, perhaps adding time codes to the Episode’s Transcript if necessary.
However, if you have two Clips that are created from adjacent positions in a media file, it is possible to merge those clips, along with their coding. Right-click one of the Clips you want to merge and select the “Merge Clips” option from the popup menu. You will be given an opportunity to select other Clips that are adjacent to the selected Clip. Transana will combine Clip Transcripts and coding, giving you the opportunity to edit the combined Clip’s properties before completing the merge action. Once merged, Clips cannot be separated again.
You may find that you have two different codes that you figure out mean essentially the same thing as you proceed with your analysis. In this case, you will want to merge the two codes. To do this in Transana, simply rename one Keyword so that it matches the other one. Transana will handle all the details of handling the merging of these two codes automatically.
7B.8 Viewing Coding
As described in section 7A.6 of the previous section, you can easily view the coding for an Episode you are working on by using the Keyword Visualization. Transana uses Keyword Visualization to give a representation of Keyword presence over time. By presenting Clips over the timeline of the video and graphically displaying those codes associated with each Clip, the Keyword Visualization can show when and how frequently each Keyword comes up, as well as allowing you to explore the relationship between codes in your analysis.
Display the Keyword Visualization by going to the Options menu, selecting Visualization Style, and selecting either Keyword or Hybrid.
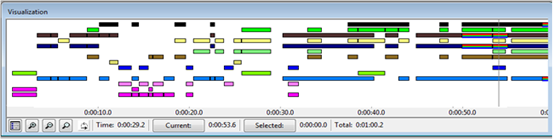
This display shows the coding applied to the Gardener ad over the ad’s 60 second time line. Floating your mouse cursor over the different bars (first selecting the Visualization Window if you are on OS X) causes a popup display indicating what keyword each bar represents.
Pressing the Filter Dialog button in the lower left hand corner of the Visualization Window allows you to alter the default specifications of the visualization, selecting which Clips, Snapshots, and Keywords are displayed, altering the color and order the different Keywords are displayed in, and setting other options.
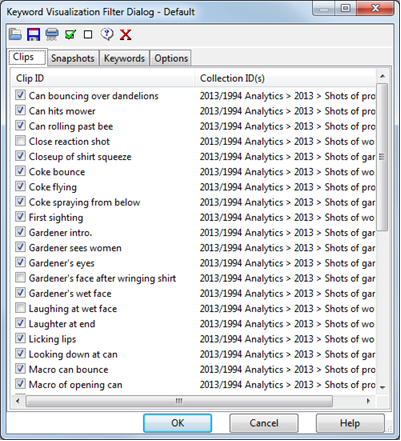
This way, you can customize the display to meet your analytic needs.
7B.9 Summary
Transana provides two slightly different mechanisms for creating Clips, as seen in the last section and this one, and for assigning meaning to Clips. Quick Clips are coding oriented, and are designed to allow for quick coding of transcribed media files. Standard Clips are collection oriented and are designed for situating portions of transcribed media files in a developing analytic structure described, at least in part, by a structure of Collections. As noted, however, this overstates the differences, as Quick Clips can be named and moved to Collections and Standard Clips can be coded, making them virtually indistinguishable from each other.
The analytic task of making further sense of coded clips in Transana has been hinted at in this discussion. It’s impossible (and not desirable) to talk about creating Clips and coding data without talking about this subject at least some. However, there is a lot more to said about this topic, and it is the subject of our remaining chapters.
See the next chapter’s exercises on retrieval
David K. Woods 2014