Using Software in Qualitative Research
A Step-by-Step Guide
Student Resources
Chapter 7 – Coding (MAXQDA)
Download the pdf for this chapter guide here.
Chapter 7 discuss coding, coded retrieval and coding schemes as key tools of qualitative analysis. We discuss the terminology and philosophies which underpin coding processes. Specific methodologies use particular routines when coding. More general thematic analyses or less code-based methods may use coding devices in ways which include data reduction strategies, indexing and marking data. See all coloured illustrations (from the book) of software tasks and functions, numbered in chapter order.
Sections included in the chapters:
Inductive, deductive and abductive approaches
Theoretical coding
Grounded Theory
Visual data, coding directly or via a transcript
MAXQDA11 and Case Study B – Creating a priori codes
Codes can be created or added at any time in MAXQDA11 with simple intuitive procedures. Where you have some ideas for codes that you expect to be useful in a project, you can create these at an early stage and then start to apply them to the data. This work is mainly carried out in the Code System window, usually located in the bottom left corner of the MAXQDA11 screen.
Creating codes and groups of codes
The same routine is used to create a single thematic code as is used to create the header of a group of codes. The program will make an assumption over which is being created depending on the location of the cursor when the routine is started. But nothing is permanently fixed, both headers and codes can be moved around the Code System as may be required at any stage.
To create a new code, click on the highest level code in the Code System window (the code called “Code System”) as shown highlighted in Figure 7.1.1, below. Then you have at least 4 equivalent ways of opening the “New code” dialog:
- Click on the “New code” icon in the Code System toolbar (2nd icon in Figure 7.1.1)
- Right-click on the highlighted code and select “New code” from the context menu
- Use the menu option “Codes > New code”
- Use the short-cut key stroke Alt + N
All of these have the same effect, and open the “New code” dialog as shown in Figure 7.1.1.
The “New code” dialog has 3 elements, a field for the code name, an option to select a colour for this code, and a field to store a memo for the code. All of these elements can be edited and changed at any stage so there is a lot of flexibility and no decision that you take closes-off later options.
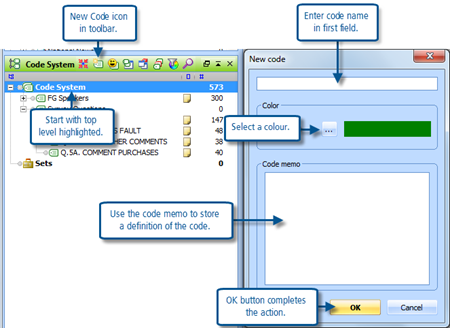
Figure 7.1.1 – Adding a new code to the Code System
To make this a thematic code, simply type the code name that you want to use (say “Angry”) into the first field, accept the suggested colour for now, and type the beginnings of a code definition into the Code memo field (say “Expressed anger. Used words like cross, furious, angry”), and finish by clicking on the “OK” button. See the new code appear and be highlighted in the Code System window just beneath the code that was highlighted when you started the routine (the “Code System” header if you followed the instructions above correctly).
If you leave the code you have just created highlighted in the Code System window and create another thematic code, say “Fear”, it will appear as a sub-code of the first code (“Angry”). This may not be the effect that you want, but it demonstrates how a new code will always be made a sub-code of something. If you want to create a list of thematic codes without any hierarchy you must always click on the Code System header code at the top of the list before opening the New code dialog and then your list will appear as equals at the highest level of the code system. It may be simpler in the long run to create a group header specifically to hold all of the non-hierarchical codes so, for the moment you should suspend judgement on this and be prepared to experiment.
The next step is to create the header for a group of codes for, say, “Sensitizing concepts”. Once again start by highlighting the “Code System” heading, open the New code dialog as before and simply type the group header label into the name field at the top of the dialog. If you want all of the codes in this group to use the same colour, possibly to distinguish these from the more grounded codes to be created later, click on the button with 3 dots to the left of the example colour bar, select “New colour” from the next dialog and then select a colour from the range of choices offered (see below for more detail about colour options). If you want to store a definition for this group, type that into the code memo field. Then press “OK” to complete the routine and see the new group appear as a highlighted code at the top of the list.
To populate this group is very straightforward as the highlighting bar will not move unless you choose to move it. Simply use the Alt+N keystroke or the New code button in the Code System toolbar to get the dialog for creating each new member of the group. If you use the “Inherit” check box for the colour, all of the codes so created will have the same colour. Each new code will be added at the top of the list within the group. In this way a series of a priori codes can be created very quickly and easily.
Figure 7.1.2 shows a code system after two groups of a priori codes have been created in addition to the two trial codes as discussed above. Your list may look different.
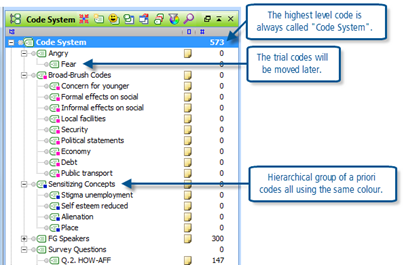
Figure 7.1.2 – A trial coding system
Note the code memo symbols beside each code, these only appear beside a code when you have entered something in the code memo field for that code (“Fear” has no such entry above). To read the code memo, simply hold the cursor over the memo icon and it will be displayed in a temporary window (this is very helpful during coding work later).
Moving codes within the Code System
The trial codes “Angry” and “Fear” may now be used to experiment with moving codes around the Code System. Drag and drop is the basic method to use. Click on a code, say “Fear” and, holding the mouse’s left button pressed down, move the cursor until it is in the place where you want that code to be shown, then release the button to drop it there.
There are two different effects that appear as the cursor approaches a new location to drop a code. If the code at the destination is highlighted with a blue background as you release the button then the code that you dragged will be dropped as a sub-code of the highlighted one. If a thin black line appears to underline the destination code as you release the button then the code will be dropped just beneath the destination code with both codes at the same level. The best way to learn this is to try it several times. Use the two codes first created in this exercise for practice and make them appear in any order at the same level and then alternately each as a sub-code of the other. You may also move them in and out of the other groups.
You can also drag a whole group and drop it in a different place by dragging the group header. The same effects work for the group. So, if you drag the “Sensitizing Concepts” header over the “Broad-Brush Codes” and drop it when the latter is highlighted with a blue bar then you will find that the first group has become a sub-group of the second. If this was a mistake it can be corrected by dragging the sub-group to another place in the code system and dropping it beneath an equivalent level group while the black line is showing beneath its name.
TIP: It is possible to sort all the codes into alphabetical order but this is difficult to undo if you do not like the resulting effect. As you work with a coding system you become familiar with the location of the codes in the list and generally the manual adjustments using drag and drop are quite sufficient to keep the list in a user-friendly sequence.
MAXQDA11 can work with up to 10 different levels in the Code System hierarchy. However, it is best to keep to 3 or 4 levels at the most until you are familiar with all of the effects and uses of the multiple levels.
Editing code parameters
All of the details that were entered in the New code dialog can be altered at any time should the need arise. Simply select the code to be edited in the Code System window with a right-click and select one of 3 relevant options from the context menu:
- Color
- Code memo
- Rename the code (F2)
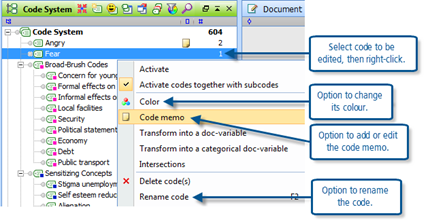
Figure 7.1.3 – Context menu on a code name in the Code System
The renaming of a code takes place on the code label where it appears in the Code System window. This uses techniques just like renaming a file in the MS Windows operating system. When a code has been renamed the new name will appear wherever the old name might have been seen, the only things that will not be altered are previously printed or stored reports.
Selecting the “Color” option from the code context menu allows you to select any colour for that code (see below for more discussions about the use of colour). If you select this option for a group header you will see an additional dialog at the end of the process asking if you want to apply the new colour to the whole group, so it is possible to change an entire group’s colour in a single operation.
Selecting the “Code memo” option from the code context menu opens up a standard memo dialog. This has a different appearance from the “New code” dialog in which you may have started the code definition, but it is the same dialog as you use for other memos in the project. Any existing text in the code memo will be present in the editing field of the memo dialog, where it can be edited, deleted or added to in the usual ways. All edits and changes are saved when you close the memo dialog.
More on colours in the Code System
There is an important difference between the use of colour in the five fixed-colour highlight coding tools (see Chapter 6) and the use of colour with a thematic code. The fixed-colour highlighters are applied to the actual text in the Document Browser and once they have been applied those colours will always shade the text in a very eye-catching way whenever the document is opened. In contrast to this, the thematic codes are more subtly displayed with brackets in the code margin beside the text to which they have been applied, and for these it is the colour of the bracket that can be altered.
It is expected that multiple thematic codes will be applied to overlapping segments of text during the analysis stage of the project and the different coloured brackets should help to distinguish those codes in the Document Browser window. It is not expected that multiple fixed-colour highlights will be used on any single segment of text in the same way, because the blending of the colours in the overlaps may become confusing, although that can be done if you want.
In keeping with the more subtle use of colours for the thematic codes, the program offers you an almost unlimited range of colours to choose from. There are 3 levels of dialog available in the selection of colour to apply to a selected code or group of codes. The first 2 of these are illustrated in Figure 7.1.4 below:
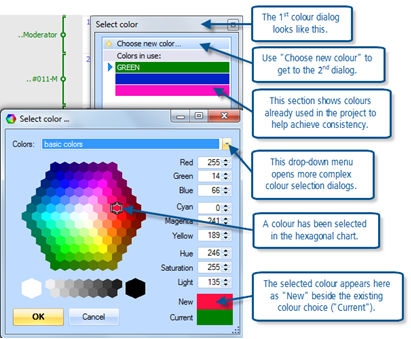
Figure 7.1.4 – Selecting colours for codes
The range of available colours is not restricted to those immediately visible in the hexagonal chart. By using the drop-down menu just above the hexagonal chart it is possible to select colours in a wide variety of different ways. Also, the hue, saturation, and light effects can be manually adjusted to fine-tune a colour choice in the main dialog.
In the first colour dialog you are offered all of the colours that are currently in use in your project. This makes it easy to select the same colour as has been used already if that is what you want to do. It is only necessary to use the “Choose new color” option if you want to specify a different colour for the application you are working on. When any of the fixed-colour highlighting tools have been used they will appear in the first colour dialog with their colour names as an additional label in the coloured bar (see “GREEN” in Figure 7.1.3).
TIP: Think about the use of colour in the Code System. The code brackets will appear in their respective colours in the code margin beside the segments of data to which the codes have been applied, and some of the visualisation functions in the Visual tools menu will also use these colours. If you try to use a different colour for every single code you will soon find it difficult to distinguish some similar tones. But using a common colour can be a useful way of visually grouping codes.
There are more options over how the colours can be displayed which can be found in the context menu following a right-click in the code margin of the Document Browser window. These can be explored later, after some coding work has been done.
More on code names and hierarchies of codes
When you begin to apply your thematic codes to segments of text in the Document Browser you will see them represented by brackets and labels in the code margin. As your analysis becomes more sophisticated the number of codes and hence brackets will increase and it may become more difficult to read all of the code labels in the normal display when several have been used on overlapping segments. There are several things you can do in this situation to help, but careful choice of code names at the outset can be very important.
TIP: Code names will be partly displayed in the code margin where codes have been applied to the data. However, to prevent excessive clutter in the margin, only the first few characters of the code name may be displayed when lots of codes have been used. So try to use code names where the first few letters help to distinguish the particular code being used. Two codes called “Effects on social – formal” and “Effects on social – informal” will mostly appear to be identical, so it would be better to call them “Formal effects on social” and “Informal effects on social” respectively. In general the shorter the name the more effective it will be in practice.
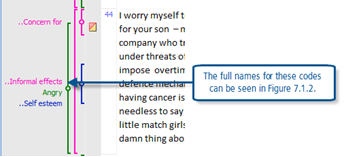
Figure 7.1.5 – Code names may be abbreviated in the margin
Many qualitative researchers are worried about using hierarchies or groups in a coding system, possibly fearing that in time these will become associated with meanings that might distort the grounding of the analysis. However, because of the way codes may be used in MAXQDA11 to identify the contributions of different speakers in a focus group or responses to different questions in a survey (both illustrated in these materials), you will find it helpful to have at least one group containing your thematic codes. This is because of the way “activation” is used in this program to select which codes are to be used in filtering and sorting the data in many of the routines, and also because it makes it easy to change the list of codes that are visible in the Coding System window by maximising and minimising the various different groups.
MAXQDA11 and Case Study B – Creating codes grounded in the data
The previous exercise detailed the ways that codes can be created or added at any time in MAXQDA11 with simple intuitive procedures, and showed how to create lists of a priori codes in preparation for applying them to relevant segments of data. This exercise moves on to show how you can create a code that is directly prompted by the data, with a minimum of fuss.
Creating new codes from within the data
In an earlier exercise you may have practised using the fixed-colour highlight tools and Emoticodes to mark passages of text that seemed interesting or significant in some way but without attaching any specific meaning to them. As your understanding of the data deepens you will want to mark segments of data and attach meanings that indicate in what way those segments may be important.
- Highlight the segment of text in the Document Browser window with the mouse
- Right-click to open the context menu, and select “Code with a new code” from the options available
- The standard New code dialog opens so that you can type in a code name, select a colour if you want to, and enter an explanation or definition in the code memo
- Click on the “OK” button to finish
- The program will do two things – it will add that new code at the top of the Code System and it will apply that code to the text that you have already highlighted
This procedure is as quick and simple as possible so that the flow of your thinking is not interrupted any more than necessary. You do not have to select a colour or enter a definition at this stage if you don’t want to, as those matters can be edited later. The important thing is to capture the fleeting inspiration without subjecting it to judgement or criticism which can so easily stifle it. You will even be able to rename the code later if your first idea proves unsatisfactory, and you can move the new code to another location within your code system at a later stage as well.

Figure 7.2.1 – Using the context menu to create and apply a new code
Figure 7.2.1, above, illustrates these simple steps. The New code dialog is illustrated in Exercise 1 of this chapter. Note that there is a short-cut keystroke for this routine, Ctrl+W, if you prefer to work in that way.
TIP: A later exercise will look at different ways of selecting text to be included in a code application. For the moment it is probably adequate to use the three clicks of the left mouse button which highlights the whole paragraph as an initial simple way of selecting the text to be coded. The 3 clicks do not have to be especially fast but they should be roughly evenly spaced to achieve the right effect. An alternative method is to click once on the paragraph number to select the whole paragraph.
It is likely that you have decided to create a new code out of what you are reading or seeing in the data because you know that you have read or seen similar ideas in other documents. So it may be quite reasonable to use the lexical search tool to look for the key words that express those ideas, and apply the new code to all of the paragraphs containing them in the documents you have already read and those that you have not yet read – this will give you immediate feed-back over whether this new idea is widespread in your data or not, and save you having to reconsider it afresh with each document separately. Remember that you can easily uncode any segments where checking shows that the key words have been used with a different meaning.
MAXQDA11 and Case Study B – Creating “in vivo” codes
The previous exercise detailed the ways that codes grounded in the data can be created or added at any time in MAXQDA11 with simple intuitive procedures.
Creating “in vivo” codes
The practice of creating new codes which use the actual text in the document as the code name may be seen as an extreme version of the previous procedure, as it removes the step of typing in the code name. In MAXQDA11 it has a separate option in the context menu, and an alternative icon on the coding toolbar.
When using in vivo coding it is probably not useful to select a whole paragraph of text as the first step, since this will result in a very long code name. For this function it may be better to use the two click method of selecting a single word, or else the method of clicking and dragging to highlight a short phrase, that will become the code name. When the desired word or phrase is correctly highlighted, click the right mouse button to open the same context menu as appeared above and select “Code in-vivo” from that menu (shown in Figure 7.3.1 below). The program immediately creates the new code with the word or phrase as its name and applies it to the highlighted word or phrase. There is no intermediate step with a dialog to complete.
In view of the direct nature of this function the alternative icon or keyboard shortcut may be even more useful. In Figure 7.3.1 you can see how both of these are illustrated in the context menu on the “Code in-vivo” line. The same icon can be found on the coding toolbar (between the green code icon and the blue undo code icon), so a single click on that button on the toolbar will create a new code and apply it to any highlighted text. And the keystroke Ctrl+I will have the same effect.
As before, it will be possible to edit the new in vivo code at a later stage, to change its colour and/or add a code memo. If need be the size of the text segment to which the new code has been applied may be altered afterwards (the ways of doing this will be described in a later exercise).
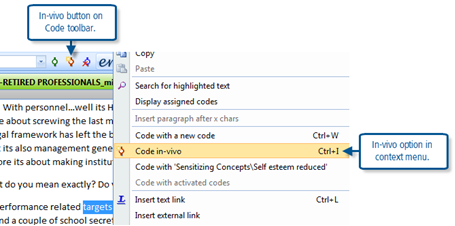
Figure 7.3.1 – In vivo code option in context menu
MAXQDA11 and Case Study B – Defining the text to be coded
A key aspect of applying codes to data is the process of defining the precise data to be coded. The ways of doing this for text are different to the ways of doing this for images. As the case study used to illustrate these materials consists of textual items only, this exercise concentrates on the methods for defining text segments.
There are five ways to select a segment of text prior to applying a code to it:
- Multiple mouse clicks.
- Clicking on the paragraph number
- Clicking on an existing code bracket
- Dragging the cursor with the mouse – ‘painting’.
- Using the keyboard – Shift + direction keys.
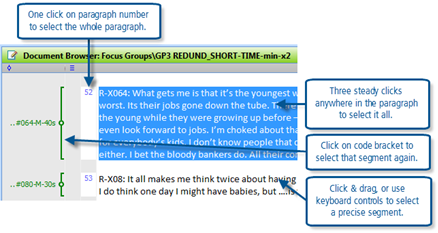
Figure 7.4.1 – Selecting text segments for coding
These will be considered in detail below.
Multiple mouse clicks
- A single click on the left mouse button positions the cursor at the precise location of the mouse pointer
- A double-click selects the word at the pointer’s location
- A triple-click selects the paragraph at the pointer’s location
A little practice may be helpful for getting the correct rhythm with which to apply the multiple clicks, particularly the triple-click to select a whole paragraph. A slight pause between the 2nd and 3rd clicks may cause the program to highlight the word and then clear the highlight, thus applying a double-click followed by a single click. Practise selecting whole paragraphs with three steady clicks, they do not have to be machine-gun quick but if they are too slow nothing will appear to happen either.
Click on the paragraph number
A single click with the left mouse button whilst the pointer is over a paragraph number is a simple way to select the whole paragraph. You do not have to be pointing exactly on the number, anywhere in the white space below the paragraph number but within the paragraph number column will have the required effect. A little practice will soon show you how this works.
Clicking on an existing code bracket
Sometimes you may want to add a second code to the same text segment as an existing code. In this situation it is simplest to click on the existing code bracket as this will ensure that the two codes are applied to precisely the same segment. As you click on a code bracket that whole segment is highlighted.
This is useful with the example data here because most paragraphs have already been coded with a speaker identifier code, so these provide another quick way to select a single paragraph.
Painting with the cursor
This technique is probably the most commonly used method of defining the boundaries of text to be coded when more precision than whole paragraphs is required. MAXQDA11 will allow you to work forwards or backward through the text, so you can start at either end of the desired segment, but many people find it easier to get the correct segment selected by dragging back from the end to the beginning.
Position the cursor at one end of the segment, press the left mouse button and hold it down as you drag the cursor to the other end of the segment. As the cursor moves, the text beneath it will be highlighted with a bright blue background, thus showing the precise text that is being selected. Release the left button at the point when the segment is correctly selected. Moving the cursor up or down during the selection process speeds up the highlighting of multiple rows in the data.
If you are working with images, this is the only way of marking a data segment. On an image you have to click and drag the pointer between the top-left and bottom-right corners of a rectangle to define a region of the image ready for applying a code to it.
Using keyboard controls
In some circumstances the most accurate way of fixing the precise boundaries of a text segment may be to use the keyboard. All of the standard MS Windows controls are valid in the MAXQDA11 Document Browser window (whether in Edit or Coding mode) but they are described below for those readers who are not familiar with all of them.
To move the cursor, which should appear as a slowly flashing vertical bar symbol, your keyboard has 4 directional arrow keys (left, right, up & down) and 4 movement keys (home, end, page up & page down). When a document is opened in the Document Browser for the first time the cursor will be located at the very beginning, in the top left corner just to the left of the first character, thereafter whenever that document is re-opened the cursor will be located at the position it was in when that document was last closed (and the document will be displayed as it appeared when last closed, which may be at the very end if you moved on after reading to the end).
To move the cursor around in an open document you can use the following controls:
- Left and right direction arrows move the cursor one character at a time each time they are tapped, or move it rapidly if they are held pressed down
- Up and down direction arrows move the cursor to the row above or below each time they are tapped, or move it more rapidly if they are held pressed down
- Home and End keys move the cursor to the beginning or end of the row it is in
- Page Up and Page Down keys keep the cursor in approximately the same place on the screen but scroll the text behind it up or down by the amount of space visible on your screen. (The distance moved has nothing to do with the page settings when the text was originally typed, it is solely governed by the size of the screen in which you are working. If you make the Document Browser window larger by dragging its bottom bar down the screen, then the page down key will scroll the text further with the apparent effect of moving the cursor further through the text.)
- Ctrl + left and Ctrl + right arrow keys moves the cursor one whole word at a time to the left or right
- Ctrl + up and Ctrl + down arrow keys moves the cursor up or down by a whole paragraph each time
- Ctrl + Home jumps the cursor to the very top of the document, Ctrl + End jumps it to the very bottom of the document
- Ctrl + Page Up jumps the cursor to the top of the current screen without scrolling the display, Ctrl + Page Down jumps it to the bottom of the current screen
With a little practice you should be able to use combinations of these techniques to move around text documents very quickly, probably quicker than may be achieved with the mouse alone in large documents (especially the Ctrl+Home and Ctrl+End commands). However these commands are less intuitive than the mouse and so require more learning or thinking.
TIP: When you open a document you will not be able to see the cursor flashing until you make the Document Browser the active window; opening a document by clicking on it in the Document System makes the Document System the active window (this is apparent because the background of its label and toolbar shows up in a bright green colour). You will tend to make the Document Browser active by clicking somewhere in its window and this, of course, places the cursor at the point where you clicked.
To highlight text with keyboard commands (in order to select it for coding) you need to hold a shift-key pressed while you use the other keys to move the cursor. For this technique it is probably easiest to work forwards through the text segment. So move the cursor to the start of the segment, then press the left hand shift-key and hold it down while using the direction keys with your right hand to move the cursor to the right and down (generally) until the whole segment is highlighted, at which point you can lift both hands off the keyboard and the segment remains highlighted.
TIP: It may seem cumbersome to use these keyboard controls but ultimately this is the most accurate way of fixing precise boundaries to a text segment, because the mouse pointer sometimes moves slightly as you release its button. You can combine two methods in a single segment. Start by double-clicking on the first word of a sentence, then use Shift+Ctrl+right arrow to extend the highlighting in whole word steps, then finish off with Shift+right arrow to get to the precise character where the coded segment will end. The mouse gets you quickly to the start point and the keyboard completes the segment with careful accuracy.
If you want to select an entire document for any reason there is a keyboard command for this, Ctrl+A .
MAXQDA11 and Case Study B – Applying codes to text segments
There are many ways of applying codes to text segments in MAXQDA11, you do not need to learn all of them, or even most of them, but it is worth exploring several in order to identify the technique that works best for you. You need to be able to apply codes accurately with the minimum amount of mental effort so that you can concentrate your energy on identifying the themes and ideas in your data.
Preparing for coding work
You need two of the main MAXQDA11 windows for most coding work, the Code System and the Document Browser, so make sure that they are both open and enlarged to take up most of the screen space. Have a look at the Windows > Screen Layout Manager and explore the four standard layouts to see which you like best. In these examples we will use the previous MAXQDA10 default with the Code System in the lower left corner and the Document Browser above the Retrieved Segments to the right. But you should squeeze the Document System window down to a small height in order to give more space to the Code System so that you can see more codes without needing to scroll that list, and you should squeeze the Retrieved Segments window down to a small height (or even close it altogether – but make sure you know how to reopen it from the Windows menu) in order to see more of the document being coded.
Now open the first focus group transcript in the Document Browser. If you have completed Exercise 1 of this chapter you should have several a priori codes already set-up in the Code System ready to use, so if you do not have these showing you should create them now in order to use them in this exercise.
Summary of the main techniques for applying existing thematic codes to text data
Briefly, the main techniques of coding text data are as follows:
- Select the text segment and then drag it onto the code label in the Code System
- Select the text segment and then drag a code from the Code System onto it
- Select the text segment and then click on the code button in the code toolbar
- Select the text segment and then use the keyboard shortcut Ctrl+Q
- Select the text segment and then right-click on the code label in the Code System and select “Code” from that context menu
- Activate one or more codes in the code system, then select the text segment and use the option “Code with all activated codes” from the context menu in the Document Browser window to apply all of the activated codes at once
- Add frequently used codes to the “Code Favourites” and apply them from there
Set out below are some more details about each of these techniques and then there is a brief discussion of the circumstances in which some of them may be preferred.
Select the text segment and then drag it onto the code label in the Code System
Using the techniques described in the previous exercise, select a passage of text to be coded so that it is highlighted in a white font with a bright blue background. Then, with the mouse pointer somewhere on the selected text, press the left mouse button down and hold it pressed down as you move the pointer across the screen to the Code System window. Keep the left button pressed until the pointer is on top of the required code, which will become highlighted when the pointer is over it, and then release the button. The action of releasing the button causes the code that is highlighted in the Code System to be applied to the text that is highlighted in the Document Browser.

Figure 7.5.1 – Dragging the text segment to the code label
Select the text segment and then drag a code from the Code System onto it
Using the techniques described in the previous exercise, select a passage of text to be coded so that it is highlighted in a white font with a bright blue background. Then select the required code in the Code System with a left-click so that it too is highlighted. Now, with the pointer on the highlighted code label, press the left mouse button down and holding it pressed move the pointer over to the Document Browser and then release the button. The action of releasing the button causes the code that is highlighted in the Code System to be applied to the text that is highlighted in the Document Browser. Note that the pointer can be anywhere in the Document Browser window when it is released, it does not have to be dragged onto the selected segment itself.
Select the text segment and then click on the code button in the Code toolbar
Using the techniques described in the previous exercise, select a passage of text to be coded so that it is highlighted in a white font with a bright blue background. Then check the code name that is showing in the Code toolbar at the top of the screen. The last used code will always be visible here (it is empty each time you open the program but as soon as you use a code in any way it will be added to the “Quick list” here). If the required code is showing, simply click once on the green code icon just to the right. The action of clicking on the code icon causes the code displayed in the toolbar panel to be applied to the text that is highlighted in the Document Browser.

Figure 7.5.2 – Using the Code toolbar
If the required code is not showing in the Code toolbar try clicking on the drop down menu arrow at the right-hand end of that field to display the current “Quick list” where you may be able to select it and then apply it with the code button.
TIP: The “Quick List” shows the 20 recently used codes, with the most recently used one at the top. Just clicking on a code in the Code System window counts as a “use” in this context so you can easily add codes to this list in that way. The number of codes in the Quick List can be adjusted with the Project > Options menu but the default of 20 is generally enough.
Select the text segment and then use the keyboard shortcut Ctrl+Q
This technique is similar to the previous one but uses a keyboard shortcut in place of the code icon. Once again select the text to be coded, check that the required code is showing in the Code toolbar, and use the shortcut Ctrl+Q. The action of hitting Ctrl+Q at any time causes the code that is displayed in the Code toolbar to be applied to the text that is highlighted in the Document Browser.
TIP: This technique may be useful if you are using the keyboard to achieve accurate and precise code boundaries and don’t want to keep switching between the keyboard and the mouse.
Select the text segment and then right-click on the code label in the Code System and select “Code” from that context menu
This technique is similar to number 2 in the list above, but uses a context menu in place of the dragging process. Once again select the text to be coded, then select the required code in the Code System window but this time use a right-click to select it and also to open the context menu. The option “Code” is the 3rd from the top, just beneath the activation options. The action of clicking on the “Code” option in the context menu causes the code that is highlighted in the Code System to be applied to the text that is highlighted in the Document Browser.
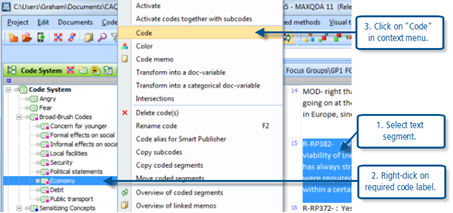
Figure 7.5.3
Activate one or more codes in the code system, then select the text segment and use the option “Code with all activated codes” from the context menu in the Document Browser window to apply all of the activated codes at once
This technique is useful if you want to apply two or more codes to the same segment of text, and especially if you may want to repeat this action on several separate segments. (The concept of “activation” in MAXQDA11 should have been encountered several times already in these materials but a lengthy explanation of it may be found in the exercise on text searches in Chapter 6.)
Once again start by selecting the text to be coded. Then activate each of the codes that you want to apply to that segment of text by using Ctrl+left-click on the code labels in the Coding System. Now move the mouse pointer back to the Document Browser window and then use a right-click to open the context menu from which you can select the option “Code with selection”. The action of clicking on this option will cause all of the activated codes to be applied to the text that is highlighted in the Document Browser.
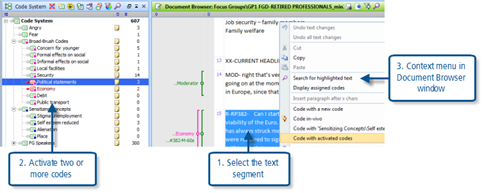
Figure 7.5.4 – Coding with several activated codes
TIP: If you cannot see the option “Code with selection” in the context menu it is probably because you have done the right-click in the Code System window, so hit the “Esc” key to close that context menu without using any of its options and try again with the mouse pointer somewhere in the Document Browser window.
Now you can maybe move on through the transcript in the Document Browser and find another passage to which the same selection of codes should be applied. This time all that you need to do is to highlight this segment, then right-click in the same part of the screen and use the “Code with all activated codes” option to swiftly apply those codes to this passage as well.
TIP: If you want to apply two codes to the same segment of text as a one-off (ie you don’t expect to repeat this double-coding on another segment soon afterwards) it is quite easy to use any of the preceding methods more than once without needing to reselect the text segment. You should notice that the text highlighting remains in place after a code has been applied and so you can use a second drag and drop operation, for example, to apply another code to the same segment.
Add frequently used codes to the “Code Favourites” and apply them from there
An alternative to the Quick List that appears in the Code toolbar is a separate list of “Code Favourites”. This is useful if you have an extensive code schema with the most frequently applied codes spread around within it, so that it becomes a tedious job frequently scrolling the list in the Code System window to find the required code. Codes can be added to the favourites list by right-clicking on their labels in the Code System window and selecting the “Add code to code favourites” option from the very bottom of the context menu. This action opens the favourites window which will remain open until you close it with a positive click on the MS Windows “X” button in its top right corner. The Code Favourites window can also be opened with the menu option “Codes > Code favourites”.
The “Code Favourites” window can be moved around to any convenient location on screen close to where you are working in the Document Browser window applying codes. To apply a code that is in the favourites list simply select the text to be coded in the Document Browser window and then click on the required code label in the Code Favourites window.
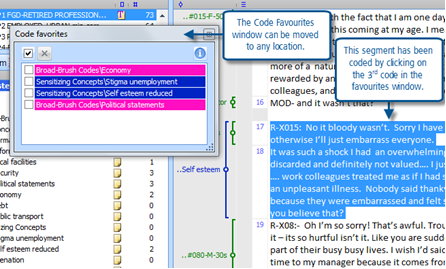
Figure 7.5.5 – Using the Code Favourites
To remove a code from the favourites list, click on its check box in the favourites window and then click on the “X” box at the top of the list. To clear the whole list and start a new favourites list, click on the ticked box at the top of the list (which selects all the check boxes) and then click on the “X” box beside it.
TIP: The check boxes in the Code Favourites window are only used for selecting the codes to be removed from that list, they play no part in the process of applying a favourite code to a text segment. These codes are applied by clicking on any part of their row except the check box.
Note that the Code Favourites list is quite different from the “Quick List” of codes. The user has complete control over the favourites list as codes can be added or removed at any time. The Quick List, which appears in the Code Toolbar, always shows the most recently used codes. You can only remove a code from the Quick List by using other codes and pushing it down the list until it drops off the bottom.
Discussion of the advantages of these techniques
The methods that you should use are those that you find easiest. If you have to think about how to apply a code then you will have less mental capacity available to think about which codes to apply to which precise segments of data and your analysis will be weaker than it might otherwise be. Some general comments may be helpful here.
Some people find the mouse easier to use than the keyboard, so if you are like this then the drag and drop routines should prove useful to you. If your code schema is small enough to show all the codes on screen at once without the need to scroll in the Code System window, then dragging from the text to the code should work well (method 1 above). But if you need to scroll the Code System to find the required code then it will be smoother to keep the mouse in that window after scrolling and drag the code into the Document Browser (method 2 above). If you want to work through your data concentrating on a single theme and coding all the segments that seem to be related to it, so that you will keep on applying the same code, then the code button in the Code toolbar (method 3) will prove particularly useful – and note that you can drag the Code toolbar itself to any location on the screen (by clicking at its extreme left-hand end) in order to place it even closer to where you are working.
However, if you want to work with a lot of care and accuracy over the precise boundaries of the codes then you may prefer to use the keyboard controls (described in the previous exercise) and so the keyboard shortcut may be helpful as it keeps your hands working in the same place.
If you find it difficult to hold the mouse steady as you click, so that you keep applying the wrong code because the pointer jumped at the last moment, then you may find method 5 helpful as you can check that the correct code will be used before actually applying it in a reliable way. This method is slower than some of the others, but correcting mistakenly applied codes is even slower.
It is quite easy to apply a second code to an already coded segment by simply using one of the basic methods before the text highlighting has been altered. However, if you anticipate using a combination of multiple codes quite frequently then the code activation technique of method 6 could be very useful.
The Code Favourites window may be very useful if you want to work through your texts looking to apply a limited number of particular codes, say in a concentrated effort to follow up certain newly-identified themes. Load those codes into the Favourites list and then apply them as required with a single click each time.
TIP: Overall, a bit of practice before you launch into coding your main data will help you to keep your focus on the analysis when the coding technique becomes instinctive.
MAXQDA11 and Case Study B – View codes appearing in the margin
It is quite likely that you have already observed the main way in which codes are represented in the margin in MAXQDA11, however there are more subtleties in this aspect of the program than you might expect. This exercise will demonstrate at least some of these.
In the help manual for MAXQDA11 the part of the Document Browser window where coding stripes are displayed is called the “Coding stripe column” however this exercise will continue to use the label “margin” for the sake of brevity and consistency with the terminology of the book with which these materials are associated.
In general, whenever a code has been applied to a segment of text then a coloured bar, or “bracket”, will be displayed beside that text (to the left of it) as an indication of the existence of the code. As the text is scrolled through the Document Browser these code brackets scroll with it, appearing and disappearing as the coded text appears and disappears. By default, the code label, or its first few characters, appears close to the middle of the bracket and in the same colour as the bracket. When several codes have been applied in a passage of text, with various overlaps between them, some care may be needed to achieve an accurate interpretation of the display. Figure 7.6.1 illustrates this situation.

Figure 7.6.1 – Code brackets for overlapping codes
In Figure 7.6.1 four codes have been applied to a single paragraph. The green bracket encloses the whole paragraph and identifies the speaker; note the position of its label (“#027-F-60s”) which is separated from the bracket by the other overlapping brackets, but the label can be identified correctly because it is the same colour as the bracket and it is level with the circle in the middle of the green bracket. Only the blue “...Self esteem” label is not on the same level as the circle in its bracket, because the “.. Security” code label is already on that line.
In this illustration we can see that the security and self esteem codes appear to apply to the same or very similar segments in the paragraph, while the concern for younger code overlaps with the later part of those segments and extends into some subsequent text. And all of these three thematic codes are enclosed by the speaker identifying code.
To see in more detail just where a coded segment begins and ends all that you have to do is to left-click on a code label or its bracket, and then the exact segment will be highlighted in the same way as it was when it was originally coded, the code label will change to a black colour and will be underlined, and a temporary information box opens giving full details of the code including the date it was applied and the person who applied it. This is illustrated in Figure 7.6.2 below.

Figure 7.6.2 – Examining a coded segment
With a little practice you will observe that the information box (called the “Tooltip”) and the underlining of the relevant code label appear whenever the cursor touches any part of the bracket or code label, and disappears when the cursor is moved away. The highlighting of the exact coded segment only appears when the left-button is clicked while the cursor is touching any part of the bracket or code label, and disappears when the cursor is clicked into another part of the Document Browser window.
If you experiment with changing the width of the Document Browser window you should be able to see how the text re-wraps within the window so that nothing is hidden as the window is made narrower. At the same time as this is happening, the code brackets adjust to reflect any movements in the anchor points at each end of the segment to which they are attached, and so the appearance of overlaps may change. It is possible that, where one coded segment closely follows another, its bracket may sometimes appear to overlap the other and sometimes not, depending on where the line wraps as the width of the window is changed. This is merely a limitation of a dynamic display being used for a visual interpretation, the program always knows whether the codes overlap and subsequent analysis with the code query function will yield correct results, but you should be aware of the possibility before relying on the visual display of the brackets to interpret patterns.
TIP: Note also that you can change the width of the margin by dragging its border in the narrow grey bar immediately beneath the header bar for the Document Browser window. However at some point there will come a trade-off between additional information in the margin and lost space in the main document part of the window. So using carefully chosen labels for your codes is a better way of maintaining clarity over which codes have been applied than greatly enlarging the width of the margin to display longer labels.
Changing the appearance of the margin
Having familiarised yourself with the basic appearance of the code brackets in the margin, or coding stripe column, it is now time to consider some adjustments which can easily be made to that display.
Make a right-click somewhere in the margin and observe a different sort of context menu that appears. This is illustrated in Figure 7.6.3 below. To describe and illustrate all of these options in detail should be unnecessary as most of them are self-explanatory, however the uses to which they might be put are much less obvious.
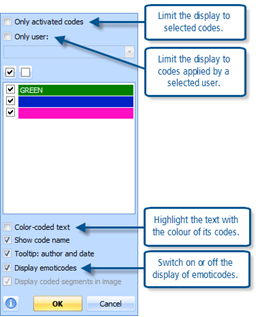
Figure 7.6.3 – Context menu in Coding stripe column (margin)
If you are beginning to see a possible pattern appearing amongst the codes that you have applied, maybe that whenever one code has been used another particular code often comes shortly afterwards, then the “Only activated codes” might be a simple way of checking this. Activate just the two codes that you suspect form this simple pattern and then click the top box in the context menu within the coding stripe column. This temporarily hides all of the non-activated code brackets leaving just the ones of current interest, making it much easier to see their pattern as you quickly scroll through a document. The display setting remains when you open different documents so you can continue looking for that pattern in several similarly coded documents. If you then activate some more codes one at a time you should be able to see their brackets re-appear in the margin, possibly extending your insight into the patterns amongst them.
TIP: Don’t forget to reset this option by removing the tick beside “Only activated codes” when you have finished in order to allow all codes to be seen again. Remember that otherwise, the next time you use the “Reset activations” button, all of your code brackets will seem to disappear – which might be alarming!
The “Only user:” check box works with a drop down menu dialog just beneath it to provide a way of seeing the coding work that has been done by one member of a team. For this to have meaning you will have to have defined separate users with their own identities in the program.
The value of the colour selection boxes will depend on the way in which you have used colour in your code definitions. In these exercises we have used pink for all of the “Broad-Brush” codes and royal blue for all of the “Sensitizing Concepts” codes. By changing the settings here we could choose to hide all of the pink code brackets for example, maybe in order to have a fresh look at the main ideas being expressed without having to destroy all of that earlier coding work by defining some new codes and using a different colour for them.
TIP: Note that you can change the colour of a single code or a whole block of sub-codes at any time by using the “Color” option from the context menu when you right-click on a code in the Code System window. So your previous decisions about colour can easily be revised.
The check box to toggle “Color-coded text” on or off makes a dramatic impact on the Document Browser window because it applies the code colours as a shading effect for the text segments that have been coded. This may not be very helpful when you have lots of detailed coding in place. However you can combine this option with the previous one and thus limit or select the codes for which you want to display the full shading effect. In these illustrations the green default colour has been used for the structural codes (such as speaker identifiers in the focus group transcripts and question identifiers in the survey responses), so by removing the tick from the green colour and then turning the color-coded text on and clicking “OK” it becomes easy to see how the thematic codes have been applied so far and thus to identify patterns or passages which have not been fully coded.
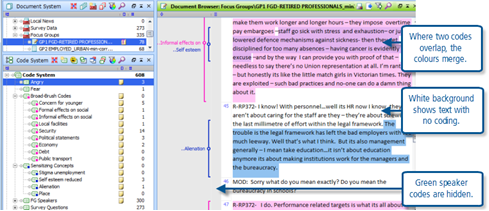
Figure 7.6.4 – Colour coded text option turned on
The switch to toggle the display of emoticodes on or off will be very useful when you have used emoticodes as an early way of familiarising yourself with the data and then want to move on with more structured themes emerging. By turning the emoticodes off you can hide them from the normal display without having to delete them or destroy that early work, to which you might want to return at a later date. Note that emoticodes will always take the default green colour for their brackets but this option means that you can use that colour for other codes and still choose to display them with or without the emoticodes.
TIP: Figure 7.6.3 shows the default settings for the Coding stripe column context menu. After you have explored these you can use this illustration to restore the settings to the most general display format where nothing is hidden from view.
MAXQDA11 and Case Study B – Define the meaning, scope and intended application of codes
The exercise at the beginning of this chapter in which a priori codes were created included some illustrations of how to include a definition at the time a code is first created. However, as the analysis proceeds it often becomes necessary to modify such definitions, maybe by adding more details, keywords or examples found in the data. It is quite straightforward to modify a code memo in MAXQDA11, the only element of difficulty being that the dialog window has a different appearance to that used in the original code definition.
Figure 7.7.1 and Figure 7.7.2 show the comparison between the code creation dialog and the dialog for editing the definition in a code memo.
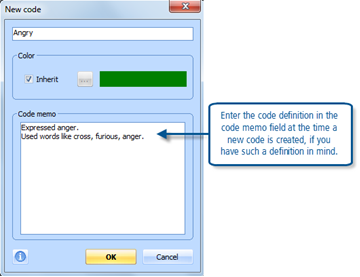
Figure 7.7.1 – Code creation dialog
To edit such a code memo at a later stage, you need to select the code in the Code System window, right-click on it to open the context menu from which you should select the option “Code memo”. This opens a normal memo dialog, showing the existing definition which can be edited like any other memo. All edits will be saved when this dialog is closed. Figure 7.7.2 uses the same code as Figure 7.7.1 when it is opened for editing in this way.
Tip: An alternative and easy way to open a code memo is to double click on the yellow memo symbol beside the code in the Code System window.
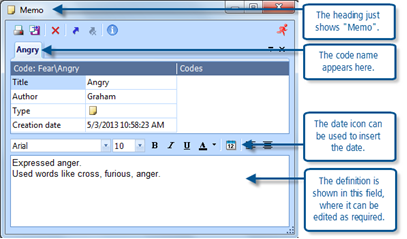
Figure 7.7.2 – Editing a code memo
In Figure 7.7.2 note how the text that was entered in the memo field during the creation of this code is shown in the lower part of the dialog. This is where that text can be edited in any of the ways that you could reasonably expect. If you want to include the date of any changes in the memo there is a button to insert the current date in the toolbar just above the text field.
The Code System window shows which codes have memos attached to them by displaying the memo symbol (a little yellow ‘post-it note’) between the code name and the number of segments to which that code has been attached.
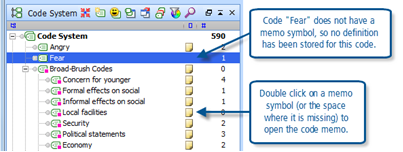
Figure 7.7.3 – Memos in the Code System
TIP: A certain amount of the memo text will be displayed in the temporary information box that appears when the cursor is held over the memo symbol beside the code name in the Code System window. But a very long description will not be shown in full. This display facility can be extremely useful during coding work to remind yourself what particular codes are to be used for just before applying them. However it is then important that you keep the important elements of the code definition at the top of the memo so that they will always be visible in such a display.
MAXQDA11 and Case Study B – Generate code reports
The coding schema can be printed out at any stage with the menu option “Codes > Print Code System”. Figure 7.8.1 illustrates the “Codes” menu from the top menu bar with this option highlighted
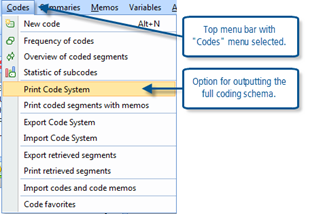
Figure 7.8.1 – Codes main menu
When you select the option to print the code system there is one supplementary dialog which asks if you want to include the code memos – it asks “Visualize code memos?” with “yes” and “no” buttons. Including the code memos may extend the length of the print-out, especially if you have stored many long definitions, but will generally be a useful part of the output.
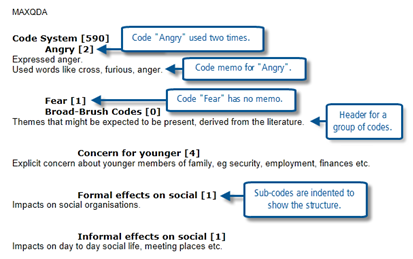
Figure 7.8.2 – Code System Print-out
Figure 7.8.2 above, shows part of such a report. Note how the code names appear in a bold font, with the number of times they have been applied in square brackets. The code memos, if you have answered “yes” to the dialog about visualizing them, are beneath the code names and in a lighter font. The names of sub-codes are indented as a way of showing the hierarchical structure.
TIP: Not shown in Figure 7.8.2 is that the report is dated automatically, in the top-right corner as part of the page header, so it should be easy to identify different versions of this report.
The Code System can also be exported in electronic formats. If you use the option “Project > Reports & Export > Code System” you can choose between an RTF document or an XLS spreadsheet. As for the printed version, you will also see a dialog asking if you want to “Visualize code memos?” which is giving you the choice whether to include these in the export or not.
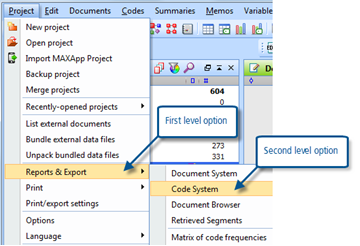
Figure 7.8.3 – Export Code System to file
This option would be useful when you want to send a snapshot of the code system by email, or create some alternative format for thinking about its structure away from MAXQDA.
There is another export option in the Codes menu, but this has a quite different function as it creates a special MAXQDA file for importing the whole code system into a different MAXQDA project. This would be useful in some team-working situations where each analyst has different documents to work on but all have the same coding schema.
MAXQDA11 and Case Study B – Change amount of text coded
In Exercise 5 of this chapter several different ways to apply an existing code to a segment of text were described. It sometimes becomes necessary at a later stage to make changes to coding that was applied earlier, either to increase the size of the segment or to decrease it. This can be achieved quite simply in MAXQDA11 with three steps.
- Click on the code bracket in the coding stripe column (or margin) to highlight the segment to be resized
- Select the revised text segment that you want to be coded
- Right click on the code bracket and choose “Recode with selection”
These steps have to be followed without doing anything else in between if you are to achieve your desired result.
Some more detailed comments on these steps follow:
Click on the code bracket in the coding stripe column (or margin) to highlight the segment to be resized
This is the simplest way to see exactly what is currently included in the coded segment before any changes are made. You can click on any part of the bracket or the code label in the margin. This step can also be thought of as telling the program that this is the segment to be altered.
Select the revised text segment that you want to be coded
Don’t worry that the moment you start to select the revised segment the highlighting of the original segment will disappear, just concentrate on getting the correct segment highlighted now. Once again you can use any of the selection methods that were described in Exercise 4 of this chapter, including combinations of mouse dragging and keyboard commands. It is important that at least some part of the revised segment overlaps with some part of the original segment, otherwise this process will merely add a new coded segment to the project without altering the existing one. However you can add or remove some text at the beginning of the segment and also at the end of the segment all in a single operation.
Right click on the code bracket and choose “Recode with selection”
You do have to tell the program that you want the same code as before to be applied to the revised segment, so you have to re-assign that code to the newly made segment. The easiest way to do this is with the context menu that opens when you right click on the bracket of the code you are modifying and select “Recode with selection” at the top.
Alternative methods also work. The same effect could be achieved by dragging that code from the Code System to the segment, or by dragging the segment onto that code in the Code System. If you want to use the code button in the code toolbar you will need to have clicked on the necessary code in the Code System before starting the whole adjustment process, because that code may not be available in the Quick List if it has not been used recently.
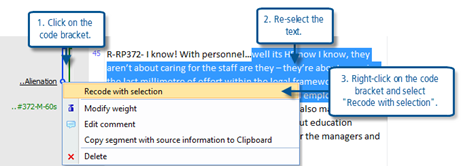
Figure 7.9.1 – Changing the size of a coded segment
MAXQDA11 and Case Study B – Unlink a code from a data segment
There are 3 main methods of unlinking a code from a data segment in MAXQDA11:
- Right-click on the relevant bracket in the margin of the Document Browser window and select “Delete” from the context menu.
- Use the Uncode icon on the Code Toolbar and select an item to undo from the list of recently applied codes.
- In the Retrieved Segments window, right-click on the information box beside the relevant segment and select “Delete” from the context menu.
These methods are now discussed in more detail below:
Right-click on the relevant bracket in the margin and select “Delete” from the context menu
This method is the most direct and intuitive and is probably the one used most often for this task. It will sometimes happen that, as you work through a document after several analysis sessions, you change your mind about a particular code application. Possibly you have refined the use of that code and an early tentative application to this segment no longer seems appropriate, or maybe you made a mistake before and didn’t realise that the wrong code had been applied.
A left-click on a coding bracket (or on the code name in the margin/coding stripe column) selects and highlights the data segment that has been coded with that code. A right-click in the same place opens a short context menu.

Figure 7.10.1 – Code bracket context menu
When you click on the “Delete” button, as highlighted in Figure 7.10.1, you will see a brief confirmation dialog that asks you to confirm that you really do want to remove this code application – it says “Delete coding?” and has 2 buttons, “Delete” and “Cancel”. This is a kind of safety function giving the opportunity to cancel if you have accidentally selected the wrong option. Clicking on the “Delete” button in this confirmation dialog causes that single application of that code to be removed.
TIP: Although the word “Delete” sounds quite drastic the operation is merely to unlink the code. The text remains unaltered in its document and the code remains listed in the Code System (although with one fewer applications than before).
If you have quite dense coding in that part of the document you may be anxious about unlinking/deleting the wrong code application. Note that as you hold the mouse pointer on a code bracket, just before clicking the right button, the code name goes into a black font with underlining and a temporary information box opens which shows the full name of the code. These visual clues should help you to perform the operation on the required code application.
Use the Uncode icon on the Code Toolbar and select an item to undo from the list of recently applied codes
MAXQDA11 maintains a short list of the most recent code applications that have been made and it is possible to use this to reverse any of those applications. The third icon from the left in the Code toolbar has the label “Undo code” and a left-click on this button opens the list of recent codings that can be undone in this way. Figure 7.10.2 shows that icon and an illustration of the list that it displays.
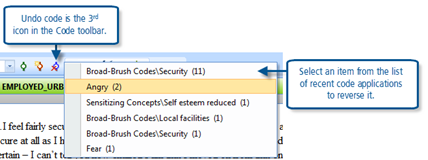
Figure 7.10.2 – Undo code icon in the Code toolbar
The numbers in brackets after each code name in this window represent the number of text segments to which that code was applied in a single operation. So, in Figure 7.10.2, the highlighted code “Angry” was applied to 2 segments in a recent operation (by using an autocode function following a text search), while the code “Security” was applied to 11 segments in a similar way, and the other recent codes were each applied by a manual method to a single segment. Any of the code applications that appear in this list may be undone or reversed without affecting the others in the list. So, to continue this illustration, if we click on the “Angry” line then those 2 code applications will be removed immediately (there is no confirmation check with this routine).
Once again, there is no change to the text in the documents and the only effect in the Code System is to reduce the number of applications beside the code that has been undone.
The list of recent code applications is stored when the program is closed and can be used to undo a code application made in a previous working session, so it is not limited to the current session only. However, if you are doing a lot of coding work then the applications will soon get pushed down the list by subsequent work and will quickly drop off the bottom of the list altogether – there will then be no way of undoing them with this routine.
If you are finding it difficult to select the desired code reliably using the mouse then this undo code function may be helpful for correcting any mistakes quickly and easily.
TIP: This routine is particularly useful for undoing an incorrect multiple segment code application such as an autocode that has gone wrong, as the alternatives would require manually unlinking each application one at a time. Knowing that this function is available should give you more confidence to try using the text search and autocode functions described in earlier exercises.
In the Retrieved Segments window, right-click on the information box beside the relevant segment and select “Delete” from the context menu
The third way to unlink a code from a segment to which it no longer applies is through the Retrieved Segments window. This would commonly be used when you are checking the consistency with which a code has been applied by retrieving all of its applications and reviewing these away from their source documents. In such circumstances it sometimes becomes clear that a few segments are not really similar in meaning to the others that share that code and so you want to unlink them.
To review all of the applications of one code you need to activate that code (and no others) and activate all of the documents to which it may have been applied. Activate the code by using Ctrl+left-click on its label in the Code System (or right-click and use the context menu). Activate a document group with Ctrl+left-click on the group header (or right-click and use the context menu) and, if two or more groups are required, repeat this on each group header in turn (or on the entire document system at once). Check the bottom bar of the screen to see that the number of retrieved segments matches the number of applications of the code in question (as shown by the 3rd field in the bottom bar and the number beside the code name in the Code System) – see Figure 7.10.3.
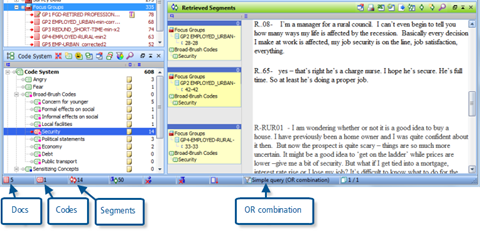
Figure 7.10.3 – Retrieving all the segments for one code
As can be seen in Figure 7.10.3, the bottom bar of the screen shows that 5 documents have been activated (the focus group transcripts), 1 code has been activated (code “Security” can be seen to have the red icon that indicates it has been activated), and 14 segments have been retrieved (and there are just 14 applications of code “Security” altogether as shown by that number on the line for that code in the Code System window). It is important that the “OR combination” is showing in the bottom bar as the retrieval function, this is the default setting but later exercises will describe how to make more complicated retrieval queries. This all confirms that the segments that can be seen in the Retrieved Segments window are all of those that code “Security” has been applied to in the data set at present.
Now turn your attention to the Retrieved Segments window itself. In Figure 7.10.3 three segments are visible and you can enlarge this window (by dragging the divider bar above it up the screen) to see more segments at the same time, or you can arrange the screen so that this window is beside the Document Browser (use the menu option “Windows > Screen Layout Manager”). In the margin area to the left of each text segment is a yellow-tinted information box which details the document source for this segment and its paragraph number within that document, as well as the code by which it has been retrieved.
If you decide that a segment should no longer be linked to the code by which it has been retrieved simply use a right-click on the yellow information box beside that segment in the Retrieved Segments window and select “Delete” from the context menu that appears. This context menu is very similar to the one at Figure 7.10.1 above but is shown here at Figure 7.10.4.

Figure 7.10.4 – Unlinking a code in the Retrieved Segments window
You would not go through this routine just to unlink a code which you could already see is incorrectly applied. But it is good practice to check code applications for consistency by retrieving all the segments which share the same code and reading them together to confirm that they all share a common theme, and sometimes as you do that you will identify segments which no longer seem sufficiently similar to the others to share the same code, and then this routine allows you to remove the code from such a segment quickly and easily.
MAXQDA11 and Case Study B – Experiment with colour coding tools
The ways to set different colours for different codes have been described already, in Exercise 1 of this chapter, as part of the process of creating a new code. This exercise is just a revision of those techniques. The uses to which colour may be put are many and varied, and personal preference will play a significant part in this aspect, so it is up to you how you exploit these facilities.
Remember that there is a difference between the use of the 5 fixed colour highlighting tools available on the “Highlight coding” toolbar and the user-created codes in the Code System. The fixed colour highlights are simply the electronic equivalent of using a highlighter pen to mark-up a printed document in order to draw attention to passages that appear to be significant on a first reading, these will not provide sufficient flexibility for full scale analysis and will generally be recoded as specific themes emerge.
Each code in the Code System (other than the Emoticodes) can be shown in the margin with its own colour, and those colours can be changed at any stage. If you have some hierarchical structures in your code schema then it is quite easy to make all of the codes in one group appear with the same colour brackets so that they can be recognised as such in the margin of the Document Browser window. Or you might use a different broad colour type for each key theme in your analysis and then use subtly different shades or intensities of that colour to distinguish the perceived importance of the various codes that contribute to the theme. The only limit is that of your own imagination.
To change the colour of a single code, use a right-click on the code label in the Code System window to open a context menu and then select “Color” in that menu. The first dialog offers you all of the colours currently in use in your project, so that you can easily re-use one of them if that is what you want to do. If you want to select a colour that is not already in use, click in the bar saying “Choose new color …” to open a new dialog box. Although there appears to be a substantial range of colours to use in the hexagonal chart, there are many more options available when you explore this dialog. When you have completed your selection, click on the “OK” button in that dialog box to make it take effect. Any changes will be effective immediately in any screens or windows where that code appears.
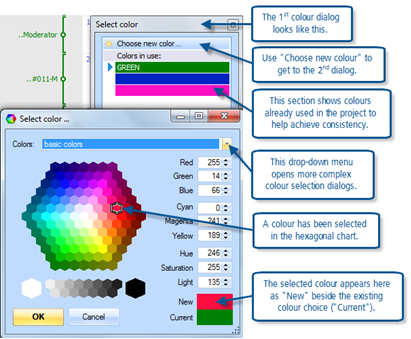
Figure 7.11.1 – Selecting colours for codes
Colour can be used to filter which code brackets are displayed in the margin, and it can also be used as a means of selecting which codes are to be activated for retrieval functions (look for the icon in the Code System toolbar labelled “Activation by color”). Several of the visual tools use the code colours in their displays, so it is worth experimenting with several different colours at least.
MAXQDA11 and Case Study B – Experiment with assigning weights to coded segments
The use of weight scores is an unusual feature of MAXQDA11. This exercise will be confined to the main techniques of setting and adjusting such weights for individual coded segments.
You can use any whole number value between 0 and 100 as the weight score for each coded segment. Later, as part of the retrieval process to look at one code in detail, you can choose to view only the segments with weights in a range that you select at the time, and thus these weights can become a means of ‘sorting the wheat from the chaff’.
MAXQDA11 uses a default weight which is applied to every data segment as it is coded, so you only need to think about the segments which are somehow different (whether weaker or stronger). You can set the default weight to any appropriate value, though this should be done at the start of the analysis as it will not retrospectively change the weight score of any segments already coded.
Setting the default weight
In the menu option “Project > Options” the setting for the default weight is in the top section “General”. The current value appears at the extreme right end of the line, and it may be changed with the up/down arrow buttons or a new value may be typed in. The current default weight is always displayed in the bottom bar of the window in the 4th field from the left (beside a blue paperweight and a green code bracket icon).

Figure 7.12.1 – Bottom bar showing default weight score of 50
Tip: Double click on the weight symbol in the bottom status bar to change the default weight.
Viewing the weight for any coded segment
The weight score for a coded segment is not visible on screen all of the time, but it can be checked by holding the cursor over any part of the code bracket or label and reading it in the temporary information box that is then displayed (see Figure 7.12.2 below).
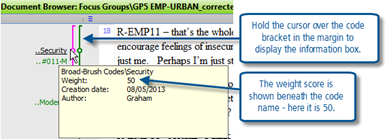
Figure 7.12.2 – Code weight in the Document Browser window
If you want to change that weight score, keep the cursor in the same place and press the right button to open the context menu. From there select the top option, “Modify weight”. This opens a very small dialog box in the same part of the screen, showing the current weight, see Figure 7.12.3.

Figure 7.12.2 – Code weight in the Document Browser window
There are no up/down arrow buttons in this dialog, you simply type in the new weight score that you want used for this coded segment. The tick and cross buttons are used to either confirm the change or cancel the change respectively.
Changing the weight in the Retrieved Segments window
The current weights are always visible for any data segments that have been retrieved and are showing in the Retrieved Segments window. They appear as a white number at the right-hand end of the blue bar that heads the information box in the margin beside each segment (see Figure 7.12.4).
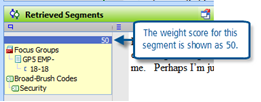
Figure 7.12.4 – Weight score in Retrieved Segments window
The weight score can be changed in the Retrieved Segments window in a way that is very similar to that used in the Document Browser (described above). Right-click on the yellow-tinted information box and select “Modify weight” from the context menu to open the small dialog where you can type a new weight score.

Figure 7.12.5 – Context menu in Retrieved Segments information box
When you click on the “Modify weight” option you will see the same dialog box as is shown in Figure 7.12.3 above. Type the new score in place of the previous one and click on the tick box to confirm the change.
Advanced technique for changing several weight scores more quickly
If you have come to this exercise a bit late and maybe have quite a lot of coded segments already in place with a default weight that is no longer suitable, you may want to find a way of changing several weight scores that will be quicker than the one-at-a-time methods described above. For this you may find the “Table view” of the Retrieved Segments window helpful.
The left-most icon in the Retrieved Segments toolbar (as shown in Figure 7.12.5 above) has the label “Table view”. A click on this makes a big difference to the appearance of the working screen by turning the whole Retrieved Segments window into a data table (see Figure 7.12.6 below).

Figure 7.12.6 – Table view of Retrieved Segments to edit weight scores
This view of the Retrieved Segments changes the visual emphasis away from the content of the segments (the transcribed speeches) onto the background data. Here each coded segment is a row in the table. The texts, which are so prominent in the normal view, are now only partly shown in the column headed “Preview” (but when you click in any cell of the table, that row is highlighted in yellow, and the full segment appears highlighted in blue in the Document Browser window).
The weight scores are displayed in one column (in Figure 7.12.6 just to the left of the preview column) and they can be edited directly in this table. Once a score has been used in the table it becomes available for re-use in the drop-down menu that appears as each cell is worked-on. This is useful because you cannot use the Enter key or the down arrow in this table, you have to click on the next cell with the mouse to fix a change in score and move to that cell to edit it. There is no need to look for a “Save” button, as usual in MAXQDA11 your changes are saved automatically as you work.
Chapter 8 in the book focuses on retrieval – a crucial aspect of qualitatively coding data. Yet there are many aspects of this which lead to other things. While looking at one batch of coded data you may want to delve deeper and recode it. There is an aspect of interrogation, using filters to examine particular catchments or subsets of data, cutting data in different ways – vertically in one document or horizontally across all. Next set of exercises!
Graham Hughes and Stefan Radiker 2014
Section title
Section content
Section title
Section content
