Using Software in Qualitative Research
A Step-by-Step Guide
Chapter 5 (QDA Miner)
In Chapter 5 to help get you started, we talk about productive things you can do in the early stages of setting up a ‘project’ in software. Experimenting with these processes where relevant in your chosen software will help to become familiar with useful entities. See all coloured illustrations (from the book) of software tasks and functions, numbered in chapter order.
Sections included in the chapter:
Creating the software project
Transparency
Getting organized
Importing data
Cross referencing
Literature management
A framework of memos
Included below are starting points to create projects (see previous introductory page to Dedoose)
- Create an empty project and later import data
- Start a project off by selecting a list of files,
- Start a project from a spreadsheet of mixed quantitative and qualitative data.
- You can create a project from and RIS file exported from a bibliographic database
For any of them you can then proceed to do various things. We include in these sections for instance a section for creating codes as a way of experimenting with your new project,
Although the easiest method to create a project is by importing documents, sometimes one may need to create an empty project where documents and image would later be stored. To create an empty project, you first need to define the initial structure of the project. This structure is defined by the list of variables that each case will contain. A variable be a document or an image to be manually coded, but can also consist of a numeric value, a date, a Boolean value (true or false), a date, a categorical variables, etc. A single project can contain up to 2035 variables per case. It is possible to create several document and image variables for each case. The ability to store many documents per case is especially useful when a specific unit of analysis (an individual, a group, or the project involves a set of several document types or in cases where individuals are being interviewed at different points in time. A document variable may also be created to store notes or comments that are specific to a case. QDA Miner can later be instructed to search and analyze specific document or image variables or in all documents.
To create a new empty project file, select the NEW command from the PROJECT menu. This command calls up a dialog box similar to the one below.
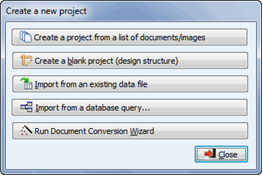
Select the Create a blank project button. The Variable Definitions dialog box will appear.

In the Variable Definitions dialog box (see above), you can define various attributes for these new variables, such as their name and whether they will contain numeric, alphanumeric values, or dates.
VARIABLE NAME – The first edit box at the top of the dialog box allows you to enter a variable name. Each variable name must be unique (within that project file). Valid variable names begin with a letter and may contain letters, numbers or underscore characters. Punctuation marks, blank spaces, accentuated and other special characters are not permitted. The maximum variable name length is ten characters.
DESCRIPTION – The Description option is used to enter a variable label that describes in more detail the content of the variable. You may leave this column blank if you wish since it is always possible to add or edit a description later using the VARIABLES | PROPERTIES command.
DATA TYPE – Each variable in the data file must have a type. QDA Miner supports the following types:
- Document – This data type is used to store documents that will be manually coded. QDA Miner stores text in this data type using Rich Text Format (RTF). This format enables the use of different fonts and styles and paragraph formatting. Graphics and tables may also be inserted in the document. Numerous file formats may be directly imported into document variables, such as plain ASCII files (*.TXT), Rich Text files (*.RTF), MS Word documents (*.DOC), Acrobat files (*.PDF), HTML (*.HTM or *.HTML) and WordPerfect documents (*.WPD)
- Image – This data type is used to store graphics that will be manually coded. Numerous file formats may be directly imported into document variables, such as Windows bitmaps (*.BMP), Windows Meta Files (*.WMF), or Enhanced Meta Files (*.EMF), Compuserve Graphic Interface (*.GIF), Portable Network Graphics (*.PNG) or JPEG files (*.JPG or *.JPEG)
- Numeric – Numeric variables can contain either integer or floating-point numbers. When you choose floating point numbers, you will be asked to specify the number of decimal places to display. Floating-point numbers are stored in the data file using double precision values (at least 15 significant digits). The option is used exclusively to control how numeric values are displayed in the Variables grid and in other locations and does not affect the internal precision of the variable
- Nominal/Ordinal – Nominal or ordinal variables are used to hold a limited number of short strings used to describe specific properties of a case. For example, you may choose to use this variable type to identify the gender of the interviewee ("male" or "female") or its group membership ("manager", "employee", "client", etc.). You may also use this data type to hold ordinal ranking ("novice", "intermediate", or "expert") or responses to close-ended questions such as Likert scale items (e.g.: from "strongly disagree" to "strongly agree"). You should use this data type instead of short strings if you plan to analyse this variable or examine the relationship between its values and any other variable or coding of documents
When a nominal/ordinal data type is selected, you will be asked to first provide a list of values that this variable can take. To enter new values, click the EDIT button. A dialog box similar to the one below will appear:.
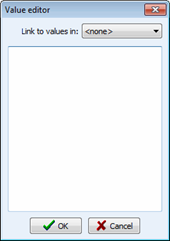
You can start typing values (one value per line) in the large edit box. If the current variable uses the same values as another existing variable, you may also establish a link to this other variable so that they will share the same list of values. Click OK to confirm the setting of these values. Note: this list may later be modified to add new values or edit existing ones.
- Date – The date type holds a year, month and day. The display and data entry format used for dates is based on the Windows date setting
- Boolean – The Boolean type stores a value that can be either true or false (or Yes or No)
- Short String – Short string variables can contain up to 254 alphanumeric characters. When creating a short string variable, you must first specify the maximum number of characters this variable with hold
To create a new variable
- Enter a unique variable name
- Enter a description (optional)
- Select the data type for this variable
- Set the option associated with the chosen data type (see above)
- click the Add button to add the defined variable to the list
To remove a variable from the list
- Select the row containing the variable you want to remove
- Click the Remove button
To change the position of a variable in the list:
- Select the row containing the variable you want to move
- Click the up or down arrows located to the right of the grid until the variable appears in the desired location
To create the data file
- When you have finished defining the structure of the new project, click the OK button
- You will be asked to specify the name of the project that you want to create. If a project with an identical name already exists, you will be asked to confirm the overwriting of the older project
Moving a project from Windows Explorer
Up to QDA Miner 4.0, a project consisted of five or six files stored in the same folder, with the same name but with a different file extensions, such as .wpj, .fpt, .sup, .dbf, .vlb, etc. To move or copy a project to a new location from Windows Explorer, one simply has to copy all files to the new location. Since version 4.1, the entire project is now stored in a single file with a .ppj file extension. Moving a project can be achieved by coping this single .ppj file to the new location.
There are several other ways in QDA Miner to move projects or subsets of it to other locations. The sections below describe different approaches.
Moving a project using the TEAMWORK | DUPLICATE command
The TEAMWORK | DUPLICATE PROJECT command from the PROJECT menu provides an easy way to store an exact copy of the existing project or a subset of it under a different project name or into a different location. To create a subject of the current project, run the FILTER command from the CASES menu and set the case-filtering conditions of the active project to display the cases that should be stored in the new data file before running the exportation command.
Moving a project by Email
The SEND BY EMAIL command provides an easy way to electronically send a project to another team member or to any other interested party. If a case filter has been applied, one can choose to send the whole project or only the currently filtered cases. The project may be renamed to prevent any confusion and outputs in the Report Manager may also be cleared. The custom project is then stored in a compressed ZIP file and sent to the user as an email attachment. When executed, your default e-mail program is called allowing you to enter recipient names, add any additional information, or select any other options.
To send the project by email:
- If needed, filter the cases to display only the data that should be sent
- Select the TEAMWORK | SEND BY EMAIL command from the PROJECT menu. A dialog box similar to the one below will appear:
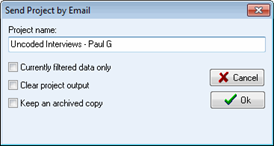
- If needed, edit the project name
- If a case filter is active, enable the Currently Filtered Data Only option if you want to send only those selected cases, or disable it to ignore the filter and to send all cases
- Set the Clear Project Output option if you want to clear the content of the Report Manager of this project
- If you want to keep a zipped copy of the project sent to the user, select the Keep Archived Copy option
- Click the OK button. If an archived copy was requested, you will be asked to provide a destination for the ZIP file. The default email application is called. Enter one or more recipient names and type any required information
The easiest method to create a new project and start doing analysis in QDA Miner is by specifying a list of existing documents or images and importing them into a new project. Using this method creates a simple project with two or three variables: A categorical variable containing the original name of the files from which the data originated, a DOCUMENT variable containing imported documents and/or an IMAGE variable containing imported graphics. All text and graphic files are stored in different cases so, if 10 files have been imported, the file will have 10 cases with two or three variables each. To split long documents into several ones or to extract numerical, categorical, or textual information from those documents and store them into additional variables, use the Document Conversion Wizard.
To create a new project using this method
- Select the NEW command from the PROJECT menu. This command calls up a dialog box similar to the one below
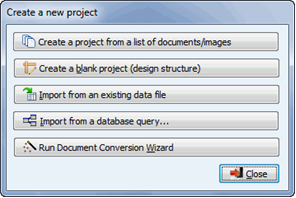
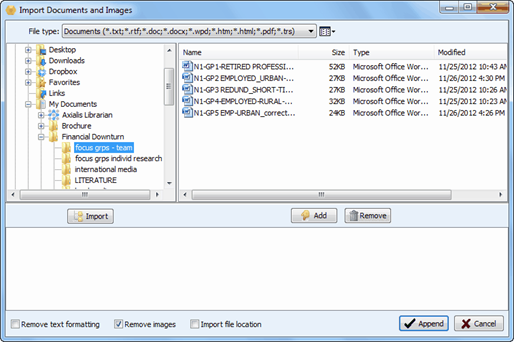
- Click the Create a project from a list of documents/Image button. A dialog box similar to the one below will appear:
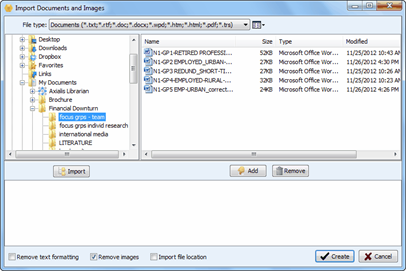
- Click on a folder in the folders list on the upper left section of the dialog box to display its contents. If you want to see contents stored in another drive, go to the folders list, click My Computer, and then double-click on a drive
- In the upper right section of the dialog box, QDA Miner displays all supported document file formats that may be imported, such as MS Word, WordPerfect, RTF, PDF documents, plain text files or HTML, as well as all graphic file format supported (BMP, JPG, GIF, PNG and WMF). To display only files of a specific type, set the File Type list box to the desired file format
- Click the file you would like to import. To select multiple files, hold down the CTRL key while clicking the other files
- Click the
 button below the file list box to add those files to the list of files to import, located at the bottom of this dialog box. You may also drag the files from the top right section to this list
 - This dialog box also offers a way to import at once all documents stored in a folder and its subfolders. To import all documents of specific type, first select the main folder containing the documents, then click the
 button below it. A dialog box will appear, allowing you to specify which file type to search for and whether to search in subfolders. Once set, click OK to proceed. In the provide example, selecting the Financial Downturn folder and then using this command will import all 80 documents stored in the Financial Downturn folder and in any of its six subfolders (the Excel spreadsheet won't be imported)
 - To remove a file from the list of files to import, select that file name and click the
 button
When importing formatted documents like Word, HTML or PDF files, images stored in the document may significantly increase the resulting document size and slow down the browsing and text-processing speed of QDA Miner and WordStat. For this reason, the Remove Images option has been set by default, resulting in smaller documents. To keep the images in the imported documents, simply disable this option.
If the text formatting of the existing documents such as the font styles and colors or the paragraph formatting are not relevant, one can further reduce the size of the imported documents by selecting the Remove Text Formatting option. Enabling this option will convert all documents into plain-text documents without any formatting or images.
- Setting the Import File Location check box may be used stored in the project, along with the document and the file name, the path under which the file can been found. This LOCATION variable may then be transformed or recoded into meaningful additional variables. This feature is especially useful when folders have been used to store separately documents of different types or belonging to different groups or individuals
- Once all files have been selected, click the CREATE button. You will be asked to specify the name of the project that you want to create. Type 'Financial Downturn'. If a project with an identical name already exists, you will be asked to confirm that you wish to overwrite the previous version of the project
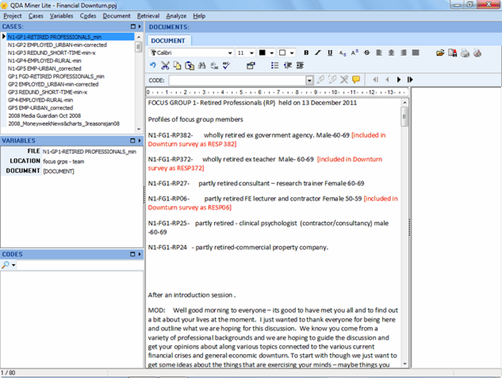
QDA Miner closes this dialog box, imports all the specified files into a new project and then brings you back to the main window. This window should look like the one below:
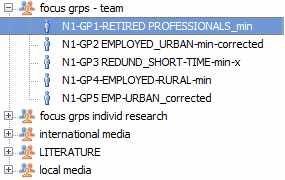
If you imported all documents from all folders as instructed above, we suggest grouping cases by the folder location. To achieve this, follow the following instructions:
- Select the GROUPING / DESCRIPTOR command from the CASES menu. A dialog similar to this one will appear:
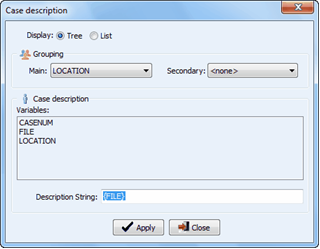
- Set the Display option to Tree, and choose as the main grouping variable LOCATION
- Click the Apply button. The content of the Cases window should now look this way, allowing you to easily browse through different sources of documents:
The Document window allows users to enter text directly in the document editor or paste text from the clipboard. It is also used to import an existing document stored on disk into the project.
To import a document into an existing case
- From the Cases window, select the case in which you would like to store the document
- If your project contains more than one document variable per case, make sure the Document window points to the proper document by selecting its tab on top of this window
- Select the DOCUMENT FILE | IMPORT command from the DOCUMENT menu or click the
 button on the document editor toolbar. An Open File dialog box will appear
 - Select the file format of the document that you want to import from the Files of Type list box located at the bottom of this dialog box
- Highlight the file name that you want to import and click OPEN
Please note that importing a document will overwrite existing text stored in the currently selected document. To append a file to an existing text, simply select this text, copy it to the clipboard, import the new document, and paste the text back in the proper location.
To import a document into a new case
- Select the ADD command from the CASES drop-down menu. A data entry dialog box will appear
- Double-click the document variable or select the document variable and press F2.to access the text editor
- Select the OPEN command from the FILE menu or click the
 button on the editor toolbar. An Open File dialog box will appear
 - Select the file format of the document that you want to import from the Files of Type list box located at the bottom of this dialog box
- Highlight the file name that you want to import and click OPEN
- Exit the editor by selecting the CLOSE command from the file window or clicking the
 button
 - After entering data for other variables, click the OK button
To import several documents into new cases
To append documents or images and store them in new cases, select the APPEND DOCUMENTS/IMAGES command from the CASES menu. A dialog box similar to the one below will appear:
- Click on a folder in the folders list on the upper left section of the dialog box to display its contents. If you want to see the contents of a drive, go to the folders list, click My Computer, and then double-click on a drive
- In the upper right section of the dialog box, QDA Miner displays all supported document or graphic file formats that may be imported. To display only documents or images of a specific type, set the File Type list box to the desired file format
- Click the file you would like to import. To select multiple files, hold down the CTRL key while clicking the other files
- Click the
 button to add those files to the list of files to import, located at the bottom of this dialog box. You may also drag the files from the top right section to this list
 - This dialog box also offers a way to import at once all documents stored in a folder and its subfolders. To import all documents of specific type, first select the main folder containing the documents, then click the
 button below it. A dialog box will appear, allowing you to specify which file type to search for and whether to search in subfolders. Once set, click OK to proceed
 - To remove a file from the list of files to import, select that file name and click the
 button
Once all files have been selected, click the Append button. If the project contains more than one categorical, document or image variable, a dialog box similar to this one will appear:
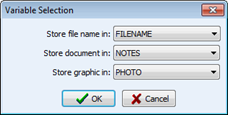
- Select the categorical variable in which the file name will be stored. Set this list box to <none> to prevent the program from storing this information in the project
- Select the document variable where the imported documents should be stored
- If the option to import the document location was checked, you will also need to specify the categorical variable where this location should be stored
- Select the image variable where the imported graphic should be stored
- Click the OK button
What might codes be used for now?
The creation of codes could be useful early on:
- to experiment with the structures in the software
- to create a very crude but useful system of marking passages of data for relevance or significance
- you might indeed have a carefully thought out coding frame you wish to build in the software
To add a new code to the existing or an empty codebook, select the ADD command from the CODES menu. The following dialog box will appear:
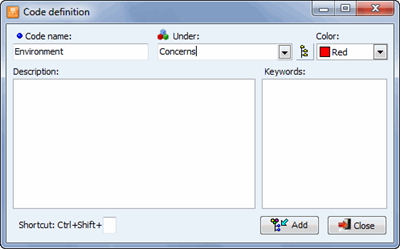
When you create a new code, you must (i) specify a unique name and (ii) select a category.
The UNDER list box allows you to select the category under which this code will be stored. This control can be used both as an edit box to create a new category and as a list box from which you can select an existing category.
If you want to add the new code to an existing category, select the category name from the list of available categories by clicking the down arrow key to the right of the list box and by selecting the category name.
To add the new code under a new category, simply enter the name of the new category. By default, the new category is listed at the top level of the codebook. To create a subcategory underneath another one, type its full path separating each level by a backslash. For example, typing Topics\Economy will create a subcategory Economy under the Topics main category. If this top-level category does not exist, the program will create both this category and its subcategory and then add the specified code into this subcategory. To store a new subcategory into an existing path, one may also type this new category name and then click the ![]() button, which will display the tree view of the codebook categories. From that, select the parent category under which this new category will be stored. Selecting any existing category from this tree view automatically inserts the full path before the new category name in the edit box.
button, which will display the tree view of the codebook categories. From that, select the parent category under which this new category will be stored. Selecting any existing category from this tree view automatically inserts the full path before the new category name in the edit box.
The maximum number of levels a codebook can contain is set to 4 by default for every new project. Since the last level can only contain codes, the actual maximum level of a subcategory is equal to this maximum minus 1. To increase or decrease the maximum number of levels allowed in a project codebook, run the PROPERTIES command from the PROJECT menu, and set the Maximum Levels in the Codebook option to a number between 2 and 9.
When a code is assigned to a text segment, a bracket appears in the MARGIN of the document to indicate the beginning and end of the code along with the code name. The COLOR option can be used to select the color of this bracket and of its associated label.
The DESCRIPTION option allows you to enter a definition or a detailed description of the code. You can use this section to specify coding instructions for the coders, along with examples or non-examples, and related codes that may be used in place of or in conjunction with this code.
See further work on Codes and coding retrieval see Chapter 7
If you want to remain at data level to explore the content go to Chapter 6 Exercises where tools like the ‘query by example’ allow very fast exploration of text with similar content (pattern matching tools). See Chapter 6 exercises
Normand Peladeau 2014